Easy dinosaur crafts for kids
Ready to take craft time millions of years back?
Dinosaurs have a way of turning ordinary craft time into a prehistoric adventure.
From fierce T. rex to gentle-looking herbivores, these fascinating creatures give kids plenty of room to imagine, create, and explore.
In this collection, we’ve brought together 25 dinosaur craft ideas for kids, with something for different ages, interests, and skill levels.
You’ll find simple paper crafts for little hands, creative painting projects, recycled-material dinosaurs, dinosaur eggs and fossils, fun masks and puppets, 3D creations, and bigger projects for kids who love a challenge.
1. Paper Plate Dinosaur
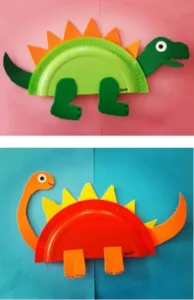
Turn an ordinary paper plate into a colorful dinosaur that kids can paint, decorate, and make their own.
It’s an easy and simple project that gives them plenty of room to get creative.
Materials Needed:
A paper plate, paint, colored paper, scissors, glue, googly eyes or a marker, and a paintbrush.
How to Make It:
1. Cut the paper plate in half and paint it in your chosen color. Allow it to dry.
2. Cut a dinosaur head, tail, legs, and spikes from colored paper.
3. Glue the pieces onto the back of the paper plate to form the dinosaur.
4. Add googly eyes or draw an eye and mouth with a marker.
5. Let the finished dinosaur dry completely before displaying it.
Fun Twist:
Let kids experiment with different colors, patterns, and dinosaur features to create their own unique prehistoric creature.
2. Dinosaur Trackway Art
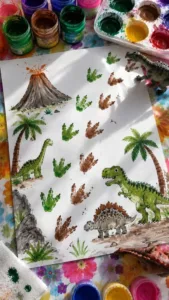
Let kids follow in the footsteps of prehistoric creatures with this simple dinosaur trackway craft.
They can stamp a trail of tracks across the page, then turn the artwork into a colorful prehistoric landscape.
Materials Needed:
Washable paint, paper or cardstock, a small dinosaur toy with textured feet, a paintbrush, a shallow plate or tray, and additional paints or markers for decorating the scene.
How to Make It:
1. Pour a small amount of washable paint onto a shallow plate or tray.
2. Lightly coat the dinosaur’s feet with paint.
3. Press the dinosaur onto the paper to create a footprint.
4. Repeat the stamping to make a trail of dinosaur tracks across the page.
5. Allow the tracks to dry.
6. Use paint or markers to add trees, leaves, grass, rocks, and other prehistoric scenery around the tracks.
7. Add drawings or paper dinosaurs to complete the scene.
Fun Twist:
Create a whole dinosaur jungle around the trackway.
Kids can paint tall trees and plants, add rocks and a volcano, then place their favorite dinosaurs around the scene to make it look like a prehistoric world.
3. Accordion Paper Triceratops
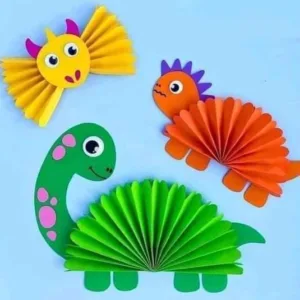
Give a simple sheet of paper a few folds, and it can become a three-dimensional Triceratops.
This fun paper craft is easy to customize and gives kids a chance to practice folding, cutting, and assembling.
Materials Needed:
Colored paper or cardstock, scissors, glue, a pencil, and a marker.
How to Make It:
1. Cut a strip of colored paper and fold it back and forth like an accordion.
2. Cut out a Triceratops head, tail, and four legs from another sheet of paper.
3. Glue the head and tail to opposite ends of the accordion body.
4. Attach the legs underneath the body.
5. Add the three horns, eyes, mouth, and any other details with paper or a marker.
6. Gently adjust the folds so the dinosaur can stand or move when played with.
Fun Twist:
Make a small herd of Triceratops using different colors and patterns, then create a paper prehistoric landscape for them to explore.
4. Dinosaur Bookmark
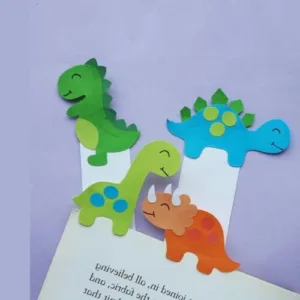
Turn reading time into a prehistoric adventure with a dinosaur bookmark.
Kids can create a colorful character to mark their place in their favorite books and personalize it with their own colors and details.
Materials Needed:
Cardstock or thick colored paper, scissors, glue, markers or crayons, and googly eyes.
How to Make It:
1. Cut a long rectangle from cardstock to create the bookmark base.
2. Cut out a small dinosaur head, tail, or other features from colored paper.
3. Glue the dinosaur pieces onto the bookmark.
4. Add eyes, scales, spots, and other details with markers or crayons.
5. Allow the glue to dry before using the bookmark.
Fun Twist:
Create a dinosaur that appears to peek over the top of the book.
You can also make different dinosaurs for different books or reading adventures.
You may also like;
Top Christmas Gift Ideas for Men, Women & Kids: Meaningful Gifts Made Easy
25 Fun & Creative Kids Activity Ideas for Home and Outdoor (No Screens Needed)
5. Torn-Paper Dinosaur Mosaic
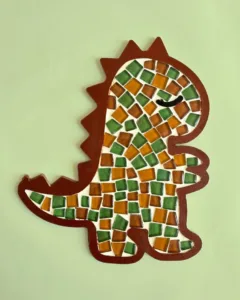
Turn scraps of colorful paper into a bright dinosaur mosaic.
Instead of cutting every piece into a perfect shape, kids can tear the paper into small pieces and arrange them to fill a dinosaur outline.
Materials Needed:
Colored paper, white cardstock or drawing paper, glue, a pencil, and markers or crayons.
How to Make It:
1. Lightly draw a simple dinosaur outline on the paper.
2. Tear colored paper into small pieces of different shapes and sizes.
3. Apply glue to a small section of the dinosaur outline.
4. Press the torn paper pieces onto the glued area, slightly overlapping them as needed.
5. Continue until the entire dinosaur is covered.
6. Add details such as eyes, claws, spots, or a background with markers or crayons.
7. Leave the artwork flat until the glue dries.
Fun Twist:
Turn the dinosaur into part of a prehistoric scene by adding trees, ferns, mountains, rocks, and other paper shapes around it.
6. Standing Cardboard Dinosaur
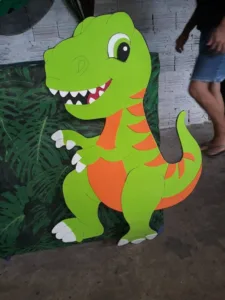
Turn a piece of cardboard into a dinosaur that can actually stand up on its own.
Kids can cut, paint, and decorate their prehistoric creation, making this a fun project for imaginative play or room decoration.
Materials Needed:
A piece of sturdy cardboard, a pencil, scissors or a craft knife for adult use, paint, a paintbrush, glue, and markers.
How to Make It:
1. Draw a simple dinosaur shape on the cardboard, including its head, body, tail, and legs.
2. Carefully cut out the dinosaur.
An adult should handle the cutting if the cardboard is thick.
3. Paint the dinosaur and let it dry completely.
4. Add eyes, scales, spots, claws, and other details with paint or markers.
5. Cut small slots or feet at the bottom so the dinosaur can stand upright.
6. Place it on a flat surface and add a few more cardboard dinosaurs to create a mini herd.
Fun Twist:
Turn the finished dinosaurs into a prehistoric play scene by adding cardboard trees, rocks, and a volcano around them.
7. Cardboard Box Dinosaur Costume
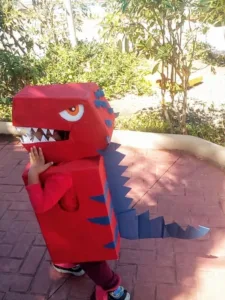
Have a little dinosaur fan turn an ordinary cardboard box into a costume they can wear for imaginative play.
With some paint and simple details, a plain box can become a fun prehistoric creature.
Materials Needed:
A large cardboard box, cardboard scraps, paint, paintbrushes, scissors or a craft knife, glue or tape, and markers.
How to Make It:
1. Choose a cardboard box that is large enough to fit comfortably around the child’s body.
2. An adult should cut openings for the head, arms, and legs as needed.
3. Paint the box in the child’s chosen dinosaur colors and allow it to dry.
4. Use cardboard scraps to create features such as spikes, scales, or a tail.
5. Attach the pieces securely with glue or tape.
6. Add eyes, patterns, and other details with paint or markers.
7. Check that all openings are comfortable and that the costume is easy to move around in before play.
Fun Twist:
Add a matching cardboard dinosaur tail or headpiece to make the costume feel like a complete prehistoric character.
8. Hatching Dinosaur Egg
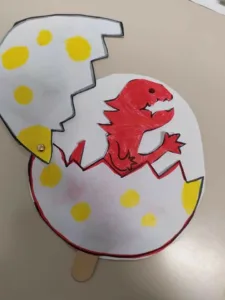
Make craft time feel like a tiny dinosaur is about to hatch!
This interactive paper craft lets kids create an egg that opens to reveal a baby dinosaur inside.
Materials Needed:
Cardstock or thick paper, colored paper, scissors, glue, crayons or markers, and a split pin/brad.
How to Make It:
1. Draw and cut out a large egg shape from cardstock.
2. Cut the egg into two pieces with a zigzag line across the middle to create a cracked opening.
3. Draw and cut out a small baby dinosaur.
4. Attach the baby dinosaur behind the lower half of the egg with glue.
5. Use a split pin/brad to connect the two egg pieces so the top can open and close.
6. Decorate the egg with patterns, cracks, and colors.
Fun Twist:
Make several eggs with different baby dinosaurs inside and let kids guess which dinosaur is about to hatch.
9. Dinosaur Surprise Egg
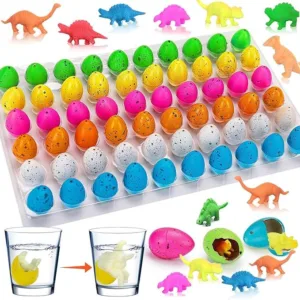
Create a colorful dinosaur egg with a hidden surprise inside.
Kids can decorate the egg and open it to discover a tiny dinosaur waiting to hatch.
Materials Needed:
A plastic or paper egg, colored paper, scissors, glue, markers or crayons, and a small paper or cardboard dinosaur.
How to Make It:
1. Decorate the outside of the egg with spots, stripes, cracks, or other dinosaur-inspired patterns.
2. Make a small dinosaur from paper or cardstock.
3. Fold or position the dinosaur so it can fit inside the egg.
4. Place the dinosaur inside and close the egg.
5. Add a few paper “egg pieces” around the dinosaur to make the surprise more fun.
6. Open the egg and let the dinosaur “hatch.”
Fun Twist:
Create several decorated eggs with different dinosaurs hidden inside.
Kids can open each one and match the dinosaur to its egg.
10. Handprint Stegosaurus
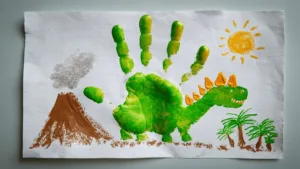
Turn a little handprint into a friendly Stegosaurus!
This keepsake-style craft is simple to make and gives kids a chance to turn their own hand shape into a prehistoric creature.
Materials Needed:
Washable paint, white or colored paper, a paintbrush, markers, and optional googly eyes.
How to Make It:
1. Paint the child’s hand with the color they want for their dinosaur.
2. Press the painted hand firmly onto the paper to make a handprint.
3. Let the print dry completely.
4. Turn the handprint into a Stegosaurus by adding a head, tail, legs, and a row of plates along its back.
5. Draw or glue on an eye and add details such as grass, rocks, or trees around the dinosaur.
Fun Twist:
Make several handprint dinosaurs in different colors and sizes, then turn them into a little prehistoric family.
Read also:
Digital Detox Easter Activity Ideas for Teens: 20 Fun Ways to Unplug and Recharge
25 Kids Locs Hairstyles for Black Mothers
11. Dinosaur Footprint Trackway
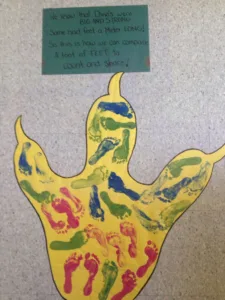
Create a prehistoric trail using your child’s footprints.
This craft turns simple footprints into a fun dinosaur scene while giving kids plenty of space to decorate the world around their tracks.
Materials Needed:
Large sheets of paper, washable paint, a paintbrush or sponge, markers or crayons, and optional colored paper and glue for decorations.
How to Make It:
1. Paint the bottom of a child’s foot with washable paint.
2. Carefully press the painted foot onto the paper to create a footprint.
3. Repeat with the other foot to form a trail across the page.
4. Once the footprints are dry, add dinosaur features around them, such as claws or toes.
5. Decorate the rest of the paper with grass, trees, rocks, ferns, or a volcano.
6. Add a paper or drawn dinosaur at the end of the trail to complete the prehistoric scene.
Fun Twist:
Create several trails using different colors and sizes of footprints, then turn the page into a busy dinosaur landscape.
12. Leaf Collage Dinosaur
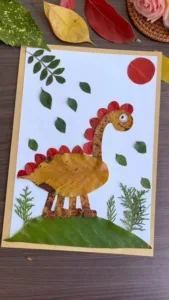
Turn colorful leaves into a one-of-a-kind dinosaur with this nature-inspired collage.
Kids can arrange leaves of different shapes and sizes to build the dinosaur’s body, then add smaller details and a simple prehistoric background.
This type of leaf dinosaur craft is also used in children’s nature-craft activities.
Materials Needed:
Clean, dry leaves in different shapes and colors, white cardstock or drawing paper, glue, scissors, a pencil, a black marker, and optional googly eyes.
How to Make It:
1. Collect a variety of clean, dry leaves in different shapes and sizes.
2. Choose a large leaf for the dinosaur’s body and arrange smaller leaves for its head, neck, tail, and legs.
3. Cut leaves into smaller pieces to create features such as spikes, scales, or facial details.
4. Once you’re happy with the arrangement, glue the leaves onto the paper.
5. Add an eye and other small details with a marker.
6. Use extra leaves, twigs, or drawn details to create grass, plants, and other parts of the prehistoric setting.
7. Leave the collage flat until the glue has completely dried.
Fun Twist:
Challenge kids to create a whole prehistoric scene around their leafy dinosaur, complete with plants, a sunny sky, rocks, and even other dinosaurs.
13. Dinosaur Suncatcher
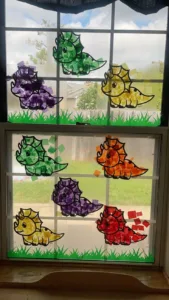
Bring a little prehistoric color to the window with a dinosaur suncatcher.
Kids can fill a dinosaur-shaped frame with colorful tissue paper, then hang their finished creation where sunlight can shine through it.
Materials Needed:
Black cardstock or construction paper, colored tissue paper, clear contact paper or another transparent adhesive sheet, scissors, glue, and a pencil or dinosaur template.
How to Make It:
1. Draw or trace a dinosaur shape onto the cardstock and carefully cut out the center to create a frame.
2. Place the dinosaur frame over a sheet of contact paper with the sticky side facing up.
3. Tear or cut the tissue paper into small pieces and arrange them inside the dinosaur frame.
4. Overlap the pieces slightly until the entire opening is covered with color.
5. Place another sheet of contact paper over the top to seal the tissue paper in place.
6. Trim around the dinosaur and hang it in a sunny window.
Fun Twist:
Use several colors of tissue paper to create a rainbow dinosaur, or make different dinosaur shapes and hang them together as a prehistoric window display.
14. Paper Plate Dinosaur Mask
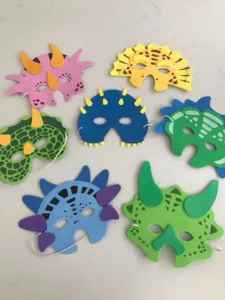
Turn a paper plate into a colorful dinosaur mask that kids can wear for pretend play.
A simple Triceratops design works especially well because its horns and frill make the finished mask instantly recognizable.
Materials Needed:
A paper plate, paint, colored cardstock or construction paper, scissors, glue, a black marker, a hole punch, and elastic or ribbon.
How to Make It:
1. Paint the paper plate and let it dry completely.
2. Cut the bottom section of the plate away and shape the edge to create the dinosaur’s frill.
3. Carefully cut out two eye holes.
4. Cut out two large horns and a smaller horn from colored paper.
5. Glue the horns and other facial features onto the plate.
6. Add the eyes, nostrils, and other details with a marker.
7. Punch a hole on each side and attach elastic or ribbon so the mask can be worn.
Fun Twist:
Try making different dinosaur masks, such as a Triceratops, T. rex, or a dinosaur with colorful spikes, and let kids choose which prehistoric character they want to become.
You may also like
20 DIY 4th of July Decorations to Turn Your Home Into a Celebration
15 Baby Shower Ideas & Decorative Tips for a Heartfelt, Creative & Stress-Free Celebration
15. Clothespin Chomping Dinosaur
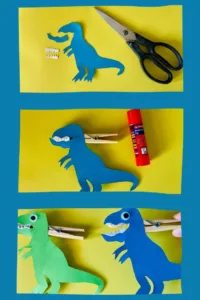
Give a simple wooden clothespin a prehistoric makeover and turn it into a dinosaur with a moving mouth.
Kids can decorate their dinosaur, add teeth and features, then use the clothespin to make it chomp and “talk.”
This craft is specifically designed around the clothespin’s opening-and-closing action.
Materials Needed:
A wooden clothespin, construction paper or cardstock, colored felt or foam, paint, glue, scissors, a black marker, and optional googly eyes.
How to Make It:
1. Paint the clothespin in a color of your choice and let it dry.
2. Cut a dinosaur head shape from felt, foam, or cardstock.
3. Cut the head in half so the upper and lower pieces can attach to the two sides of the clothespin.
4. Glue the pieces onto the clothespin, keeping the hinge clear so the mouth can open and close.
5. Add eyes, teeth, spikes, and other dinosaur details.
6. Let the glue dry completely, then squeeze the clothespin to make your dinosaur chomp.
Fun Twist:
Make several dinosaurs with different colors and features, then have them “talk” to one another or put on a mini prehistoric puppet show.
16. Paper Bag Dinosaur Puppet
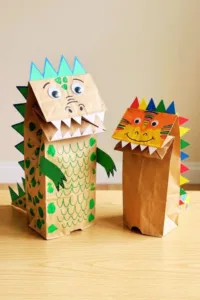
Turn a simple paper bag into a dinosaur puppet that kids can decorate and use for imaginative play.
The bag’s folded flap becomes the dinosaur’s moving mouth, making the finished craft fun to play with as well as easy to personalize.
Paper-bag dinosaur puppets are also used in classroom and children’s craft activities.
Materials Needed:
A brown paper bag, colored cardstock or construction paper, scissors, glue, markers or crayons, and optional googly eyes.
How to Make It:
1. Place the paper bag with the folded flap facing upward.
2. Cut out a dinosaur head, body, arms, legs, tail, and other features from colored paper.
3. Glue the dinosaur’s head onto the folded flap.
4. Attach the body to the front of the bag below the flap.
5. Add the arms, legs, tail, eyes, and other details.
6. Allow the glue to dry completely.
7. Put your hand inside the bag and move the flap to make the dinosaur open and close its mouth.
Fun Twist:
Create a small dinosaur puppet theater using a cardboard box, then let kids make up a prehistoric story for their puppets.
17. Dinosaur Shadow Puppet
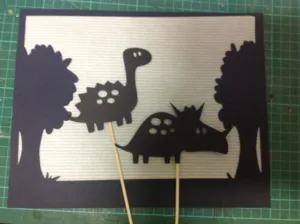
Turn cardstock dinosaurs into dramatic shadow puppets for a mini prehistoric show.
Kids can create their own dinosaur silhouettes, attach them to sticks, and use a light source to project their shapes onto a screen or wall.
The Natural History Museum has a dinosaur shadow-puppet activity that also includes movable joints and scenery.
Materials Needed:
Black cardstock or thin cardboard, a pencil or white crayon, scissors, craft sticks, tape, and a flashlight or lamp.
For a simple screen, you can also use white paper or a light-colored wall.
How to Make It:
1. Draw a dinosaur silhouette on black cardstock or trace a dinosaur template.
2. Carefully cut out the dinosaur shape.
3. Attach a craft stick to the back with tape.
4. Create a few extra shapes such as trees, rocks, or ferns for the background.
5. In a dim room, shine a light toward a wall or simple paper screen.
6. Hold the dinosaur puppet between the light and the screen to create its shadow.
7. Move the puppet around to make your dinosaur walk, run, or interact with the scenery.
Fun Twist:
Make several dinosaur characters and create a short prehistoric story.
Kids can change the scenery and experiment with how moving the puppets closer to or farther from the light changes their shadows.
18. Toilet-Roll Dinosaur
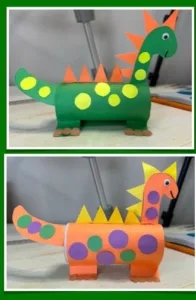
Give an empty cardboard tube a prehistoric makeover!
This simple 3D craft turns a recycled toilet roll into a dinosaur that can stand up and become part of imaginative play.
Similar versions use cardboard tubes with paper, paint, and glue to create dinosaurs such as Triceratops and Diplodocus.
Materials Needed:
An empty toilet-roll tube or cardboard tube, colored paper or cardstock, scissors, glue, paint, a paintbrush, markers, and optional googly eyes.
How to Make It:
1. Paint the cardboard tube in your chosen dinosaur color and let it dry.
2. Cut out the dinosaur’s head, tail, legs, and other features from colored paper.
3. Attach the head and tail to opposite ends of the tube.
4. Glue the legs underneath the body so the dinosaur can stand.
5. Add eyes, spots, scales, spikes, or other details with paper or markers.
6. Allow the finished dinosaur to dry completely before playing with it.
Fun Twist:
Make different dinosaurs from several cardboard tubes and create a small prehistoric herd.
19. Paper Cup Dinosaur
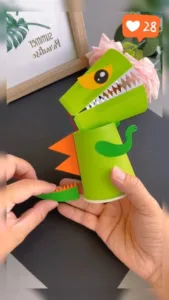
Turn a simple paper cup into a colorful 3D dinosaur that kids can decorate and use for imaginative play.
The cup forms the dinosaur’s body, while paper pieces create its head, tail, legs, and other features.
This type of craft is well established in children’s craft resources.
Materials Needed:
A paper cup, colored cardstock or construction paper, scissors, glue or double-sided tape, markers or crayons, and optional googly eyes.
How to Make It:
1. Turn the paper cup upside down to use as the dinosaur’s body.
2. Cut out a dinosaur head, tail, legs, and arms from colored paper.
3. Attach the head to the top of the cup and the tail to the back.
4. Glue the legs and arms onto the sides of the cup.
5. Add eyes, a mouth, spikes, spots, or other details.
6. Allow the dinosaur to dry completely before playing with or displaying it.
Fun Twist:
Make several paper-cup dinosaurs with different colors, patterns, and features, then create a small prehistoric scene for them.
20. Dinosaur Fossil Impressions
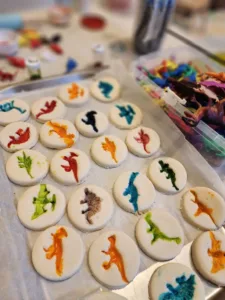
Let kids step into the role of little paleontologists by making their own dinosaur fossil impressions.
With simple salt dough and a toy dinosaur, they can create realistic-looking impressions and then turn them into colorful prehistoric keepsakes.
Materials Needed:
Flour, salt, water, small plastic dinosaur figures, a rolling pin, a baking sheet, parchment paper, food coloring, paint, and paintbrushes.
How to Make It:
1. Mix the flour, salt, and water to make a soft salt dough.
2. Add a few drops of food coloring if you want the dough itself to have a different color.
3. Divide the dough into smaller pieces and flatten each one into a thick disc.
4. Press a dinosaur figure firmly into the dough to leave an impression.
5. Carefully remove the dinosaur to reveal the fossil-like imprint.
6. Place the impressions on a parchment-lined baking sheet and allow them to dry according to your chosen salt-dough method. An adult should handle the oven if baking is needed.
7. Once completely dry and cool, use paint to highlight the dinosaur impressions.
Fun Twist:
Let kids experiment with different dough colors, then paint the finished fossils in earthy shades like brown, tan, gray, bronze, or even gold.
For an extra activity, hide the dried fossils in sand and let kids create their own mini dinosaur excavation.
Conclusion
Dinosaur crafts are a fun way to keep kids entertained while giving them plenty of opportunities to create, explore, and use their imagination.
From simple paper projects to colorful dinosaur mosaics, there’s something for every little dinosaur fan to enjoy.
So, gather a few craft supplies, pick a favorite idea, and let the creativity begin!
Don’t be afraid to add your own fun twists, colors, and decorations to make each dinosaur craft uniquely yours.