Looking for something to keep your kids busy?
Something fun, easy, and interactive?
Fish crafts are a simple and straightforward way to get kids creative while doing something they love and making colorful projects they can enjoy at home or in the classroom.
You don’t need an expensive kit, lots of supplies, or complicated instructions.
Many fish crafts can be made with everyday materials such as paper, cardboard, and other recycled items.
In this post, we’ll explore different easy fish craft ideas for kids, including simple and creative projects suitable for different ages and skill levels.
Whether you’re planning an ocean themed activity, a school project, or just looking for something fun to keep your kids busy, there’s an idea here for you to try.
15 Easy and Creative Fish Crafts kids are going to love.
1.Paper Plate Fish

If you’re looking for something easy, inexpensive, creative, and engaging for kids, a paper plate fish is a great option.
It is colorful, customizable, and has remained a popular children’s craft for years.
Materials Needed:
One plain paper plate, paint, crayons or colored markers, a paintbrush if using paint, scissors, glue or a glue stick, colored construction paper or cardstock, and googly eyes or a black marker.
Optional Materials for Decoration:
Tissue paper, stickers, yarn, sequins, glitter glue, and small pieces of colored paper.
You don’t need all the optional materials.
The idea is to let children use whatever craft materials they already have available to decorate their fish.
How to Make a Paper Plate Fish
1. Prepare the plate
If you’re using a white paper plate, let the child paint it in their desired color and allow the paint to dry before continuing.
If you’re using a colored plate, you can start decorating it right away.
2. Cut out the mouth
Cut a triangular wedge from one side of the plate to create the fish’s mouth.
Keep the piece you cut out because it will be used to make the tail later.
3. Make the tail
Take the triangular piece you kept aside and turn it around.
Glue it to the opposite side of the plate so that it forms the fish’s tail.
You can also use tape if that is easier.
4. Add the fins
Cut two or three fin shapes from construction paper or cardstock and glue them to the top, bottom, or side of the fish.
This part can be customized depending on how you want your fish to look.
5. Add the eyes and details
Stick on a googly eye or draw an eye with a black marker.
Then decorate the body however you like.
You can use beads, stripes, spots, scales, patterns, stickers, or other craft materials you have available.
Tips to Make It More Creative
Let the children use their imagination when decorating their fish.
You can make a rainbow fish by using several bright colors, add small pieces of tissue paper to create textured scales, or paint different designs such as stripes and spots.
Most importantly, let the children do as much of the work as they can.
For younger children, an adult should supervise and handle the cutting when necessary.
Older children can do more of the cutting themselves using age-appropriate, child-safe scissors.
2. Handprint Fish

Looking for something easy, inexpensive, and personal?
A handprint fish is just the right craft for you.
It gives children room to be creative while creating a simple keepsake they can look back on later.
Materials Needed:
Colored construction paper or cardstock, a pencil, scissors, glue or a glue stick, and a black marker or googly eyes.
Optional Materials for Decoration:
Blue paper, tissue paper, crayons or colored markers, small pieces of colored paper, stickers, and other craft scraps.
How to Make a Handprint Fish
1. Trace the hand
Carefully place the child’s hand on a sheet of colored construction paper and trace around it with a pencil.
The fingers will form the fish’s tail, while the palm becomes its body.
2. Cut it out
Carefully cut around the handprint.
3. Turn it into a fish
Place the handprint sideways so the fingers point backward like a tail.
Add a small paper mouth or draw one with a marker, then attach a googly eye or draw an eye.
4. Decorate the fish
Let the child take over this part. They can add scales, stripes, spots, bubbles, fins, or any other details they like.
You can also place the fish on blue paper and add tissue-paper seaweed and other underwater decorations to create a little ocean scene.
Tips to Make It More Creative
Make several handprint fish in different colors and arrange them together as a school of fish.
You can also write the child’s name and the date on the back, turning the craft into a simple keepsake that captures a little memory in time.
You may also like,
25 Fun & Creative Kids Activity Ideas for Home and Outdoor (No Screens Needed)
25 Kids Locs Hairstyles for Black Mothers
3. Simple Paper Fish

This is a very easy and straightforward craft, especially for kids who enjoy drawing and coloring.
Materials Needed:
Colored construction paper or cardstock, a pencil, scissors, glue or a glue stick, and a black marker or googly eyes.
Optional Materials for Decoration:
Crayons, colored markers, stickers, glitter glue, tissue paper, and small pieces of leftover paper.
How to Make a Simple Paper Fish
1. Draw the fish
Draw a simple fish shape on a sheet of colored paper.
Alternatively can use plain paper and let the child draw and color the fish themselves.
The body can be oval, rounded, or any shape they prefer, with space for the tail and fins.
2. Cut it out
Carefully cut around the fish shape.
3. Add the features
Add an eye, mouth, fins, and tail if they weren’t included in the original drawing.
4. Decorate it
Let the child decorate the fish with stripes, spots, scales, stickers, or any patterns they like.
Tips to Make It More Creative
Encourage the children to think beyond an ordinary fish.
They can create a rainbow fish, experiment with unusual patterns and colors, or make several different fish and arrange them together as a school of fish.
You can also place the finished fish on blue paper and add simple underwater details to create a small ocean scene.
4. Upcycled Toilet-Roll Fish

Apart from being inexpensive, this craft turns an everyday waste material into something magnificent, leaving kids with a sense of accomplishment while encouraging creativity.
It is also a great opportunity to show children how they can reuse materials instead of throwing them away.
Materials Needed:
One empty toilet-paper roll, colored paper or cardstock, scissors, glue, paint or colored markers, and a black marker or googly eyes.
Optional Materials for Decoration:
Tissue paper, stickers, yarn, glitter glue, sequins, crayons, and other leftover craft materials.
How to Make an Upcycled Fish
1. Prepare the roll
You can either leave the toilet-paper roll in its original shape or flatten it slightly, depending on the look you want.
Paint it in your desired color or cover it with colored paper, then allow it to dry if necessary.
2. Shape the fish
Shape one end of the roll to create the fish’s tail. If you have flattened the roll, you can pinch or fold the end into a pointed shape.
If you leave it round, you can cut and shape the cardboard to create the tail.
3. Add the fins
Cut small fin shapes from colored paper or cardstock and glue them to the sides or top of the fish.
4. Add the eyes and details
Attach a googly eye or draw one with a marker.
Add a mouth, scales, stripes, spots, or any other details you like.
Tips to Make It More Creative
Let the children experiment with different colors, patterns, and decorations.
They can make several fish from different recycled rolls and arrange them together to create an underwater display or a little school of fish.
5. Coffee-Filter Fish

This craft is simple, inexpensive, and gives children plenty of room to experiment with colors.
Materials Needed:
One white coffee filter, washable markers or crayons, a small amount of water, scissors, glue, colored paper or cardstock, and a black marker or googly eyes.
Optional Materials for Decoration:
Paint, glitter glue, stickers, tissue paper, and other craft scraps.
How to Make a Coffee-Filter Fish
1. Color the coffee filter
Let the child color the coffee filter with different colors.
They can use bright colors, mix shades, or create their own patterns.
2. Add a little water
Lightly dab or spray the colored filter with a small amount of water and allow it to dry.
The colors will spread and blend, creating an interesting effect.
3. Shape the fish
Once dry, fold or shape the coffee filter into a fish body.
You can cut a small section to form the mouth and use the piece as a tail, similar to the paper-plate method.
4. Add the features
Glue on an eye or draw one with a marker. Add fins, a mouth, and any other details you want.
Tips to Make It More Creative
Encourage children to experiment with different color combinations and patterns.
Make several colorful fish and arrange them together to create an underwater scene.
You may also like,
25 Eye-Catching 10th Birthday Decoration Ideas Kids Will Love
Top Christmas Gift Ideas for Men, Women & Kids: Meaningful Gifts Made Easy
6. Egg Carton Fish

This craft is creative, inexpensive, and a great way to turn an everyday egg carton into something colorful and fun.
It also gives children the chance to practice cutting, painting, and decorating.
Materials Needed:
An empty cardboard egg carton, scissors, paint or colored markers, glue, colored paper or cardstock, and a black marker or googly eyes.
Optional Materials for Decoration:
Tissue paper, stickers, yarn, glitter glue, sequins, and other leftover craft materials.
How to Make an Egg Carton Fish
1. Prepare the egg carton
Cut out one or two sections from the egg carton, depending on the size of fish you want to make. Trim any rough edges.
2. Paint the body
Let the child paint the egg-carton piece in their desired color and allow it to dry.
3. Add the tail and fins
Cut a tail and fins from colored paper or cardstock and glue them to the egg-carton body.
4. Add the eyes and details
Attach a googly eye or draw one with a marker.
Add a mouth, scales, stripes, spots, or any other decorations.
Tips to Make It More Creative
Let children experiment with different colors and patterns.
They can make several egg carton fish in different colors and turn them into a small underwater display.
7. Fish Puppet
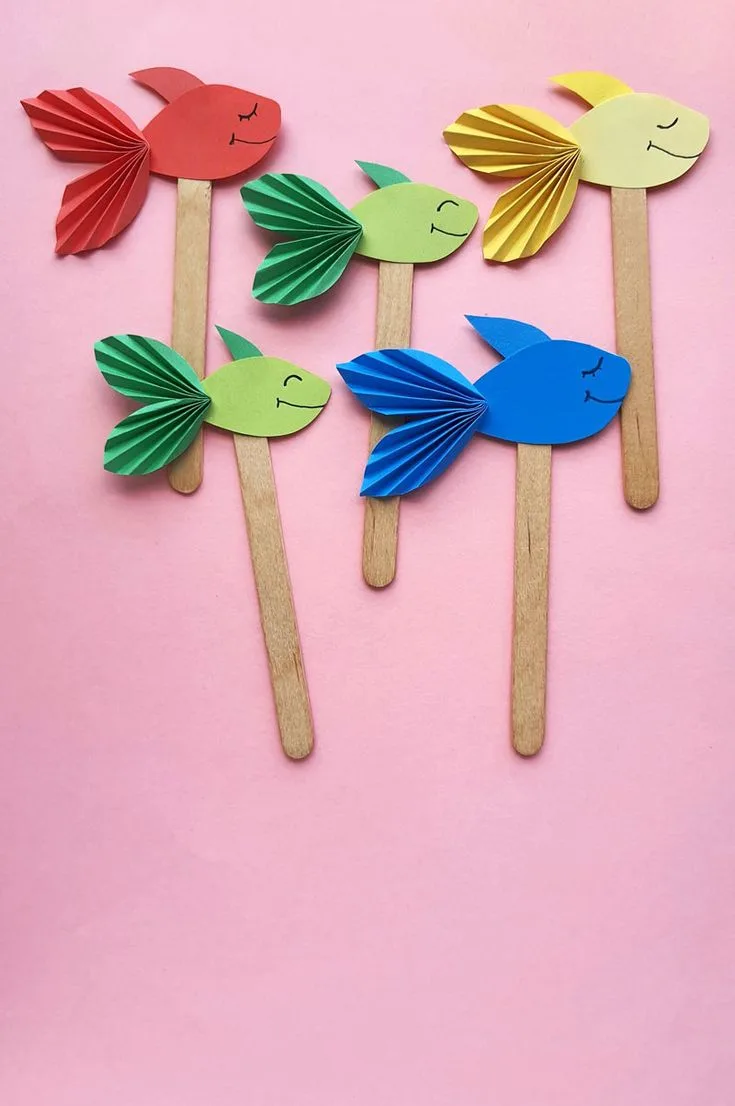
A fish puppet is a fun craft that children can make and play with afterward.
It encourages creativity while giving the finished craft a purpose beyond decoration.
Materials Needed:
Colored construction paper or cardstock, a pencil, scissors, glue or a glue stick, and a black marker or googly eyes.
Optional Materials for Decoration:
Crayons, colored markers, tissue paper, yarn, stickers, glitter glue, and other craft scraps.
How to Make a Fish Puppet
1. Create the fish shape
Draw a simple fish shape on colored construction paper or cardstock and carefully cut it out.
You can also draw the fish on plain paper and let the child color it first.
2. Add the features
Draw or attach the eyes, mouth, fins, and tail.
3. Decorate the fish
Let the child add scales, stripes, spots, or other patterns using their preferred materials.
4. Turn it into a puppet
Attach the fish to a craft stick to make a simple stick puppet.
Alternatively, make a small opening at the bottom so the child can place their hand inside and use it as a hand puppet.
Tips to Make It More Creative
Make several fish in different colors and turn them into characters for a simple underwater puppet show.
Children can create their own stories and use the puppets to act them out.
8. Aquarium Fish Craft

This goes way beyond making a single fish.
Kids get to create their own little underwater world, making it colorful, creative, and fun to display afterward.
Materials Needed:
Colored construction paper or cardstock, scissors, glue, a pencil, crayons or colored markers, and a black marker or googly eyes.
Optional Materials for Decoration:
Tissue paper, yarn, stickers, glitter glue, cotton balls, and other craft scraps.
How to Make an Aquarium Fish Craft
1. Create the fish
Draw or trace a simple fish shape on colored paper and cut it out. Let the child choose the color and design.
2. Prepare the background
Use a sheet of blue paper as the aquarium or underwater background.
3. Add underwater details
Cut or tear green paper to create seaweed. You can also add bubbles, rocks, shells, and other simple decorations.
4. Add the fish
Glue the fish onto the blue background and arrange the other decorations around it to create an underwater scene.
Tips to Make It More Creative
Make several fish in different shapes, sizes, and colors.
Children can create their own little underwater world and give each fish its own pattern or personality.
9. Leaf Fish Craft

This is a creative way to bring nature into craft time.
Kids can turn fallen leaves into colorful fish while experimenting with shapes, colors, and patterns.
Materials Needed:
Dry leaves, colored construction paper or cardstock, glue, scissors, crayons or colored markers, and a black marker or googly eyes.
Optional Materials for Decoration:
Paint, glitter glue, small pieces of colored paper, stickers, and other craft scraps.
How to Make a Leaf Fish
1. Choose a leaf
Pick a clean, dry leaf with a shape that can work as the body of a fish.
Different leaf shapes can create different-looking fish.
2. Create the fish
Place the leaf on a sheet of colored paper and add a paper tail and fins. Glue everything in place.
3. Add the eyes and details
Attach a googly eye or draw one with a marker.
Add a mouth, scales, spots, or other details to bring the fish to life.
Tips to Make It More Creative
Let children paint the leaves before using them or combine different leaves to create unusual fish.
They can also make several leaf fish and arrange them on paper to create an underwater or nature-inspired scene.
10. Fork-Print Puffer Fish
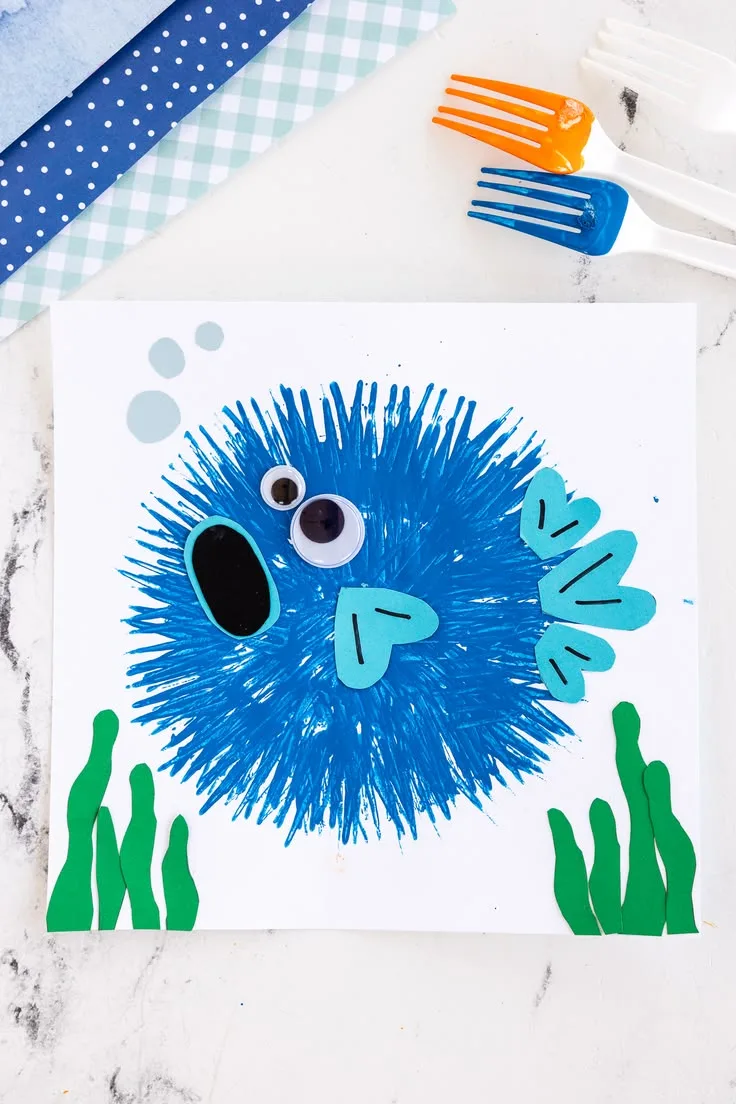
This craft is simple, creative, and a fun way to use an ordinary fork to create the texture of a puffer fish.
Kids can experiment with paint while turning a familiar household item into a craft tool.
Materials Needed:
White or colored construction paper, paint, a plastic fork, glue, scissors, and a black marker or googly eyes.
Optional Materials for Decoration:
Colored markers, crayons, tissue paper, glitter glue, and small pieces of colored paper.
How to Make a Fork-Print Puffer Fish
1. Create the fish body
Draw and cut out a simple round or oval fish body from construction paper.
2. Make the texture
Dip the back of a plastic fork lightly into paint and press it around the fish’s body to create the puffer fish’s spiky texture. Continue until the body is covered.
3. Add the features
Let the paint dry, then add the eye and mouth with a marker or googly eye.
4. Add the finishing touches
Add fins, a tail, and any other details you like.
Tips to Make It More Creative
Try different paint colors or combine two colors to create a more colorful puffer fish.
Children can also make several fish with different patterns and arrange them into an underwater scene.
Read Also,
15 Summer Nail Ideas for Busy Moms
20 Teacher’s Appreciation Board Ideas (School Decor Inspo)
11. Bubble-Wrap Fish craft
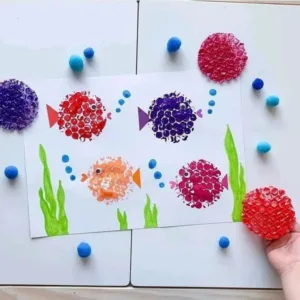
This is a fun and unusual craft that lets kids use bubble wrap to create the texture of fish scales.
It is simple to make and gives the finished fish an interesting pattern.
Materials Needed:
Bubble wrap, colored construction paper or cardstock, paint, a paintbrush, scissors, glue, and a black marker or googly eyes.
Optional Materials for Decoration:
Crayons, colored markers, tissue paper, stickers, glitter glue, and other craft scraps.
How to Make a Bubble- Wrap Fish
1. Create the fish
Draw a simple fish shape on construction paper or cardstock and cut it out.
2. Add the bubble-wrap texture
Apply a thin layer of paint to the bubble side of the bubble wrap. Carefully press it onto the fish’s body to create a pattern that looks like scales, then gently remove it and allow the paint to dry.
3. Add the features
Attach a googly eye or draw one with a marker. Add a mouth, fins, and tail.
4. Decorate the fish
Add any extra details you like, such as stripes, spots, or colorful fins.
Tips to Make It More Creative
Try different paint colors or combine colors to create different scale patterns.
Kids can also make several bubble-wrap fish in different colors and arrange them together as a colorful school of fish.
12. Foil Fish Craft
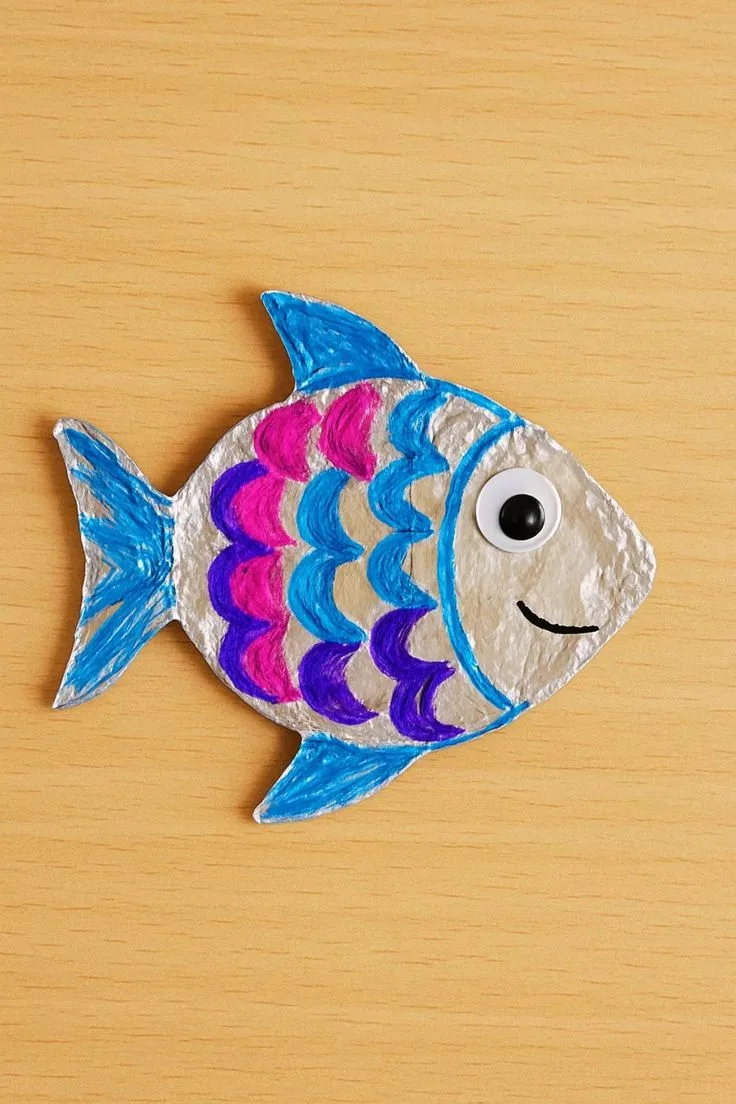
This craft is simple, inexpensive, and gives kids a chance to create a shiny, eye-catching fish using an everyday household material.
Materials Needed:
Aluminum foil, cardboard or cardstock, scissors, glue, paint or permanent markers, and a black marker or googly eyes.
Optional Materials for Decoration:
Colored paper, stickers, glitter glue, yarn, tissue paper, and other craft scraps.
How to Make a Foil Fish
1. Create the fish shape
Draw a simple fish shape on cardboard or cardstock and carefully cut it out.
2. Cover it with foil
Place a piece of aluminum foil over the fish shape and gently press it around the edges. Fold or trim the excess foil behind the fish and secure it with glue or tape.
3. Add the features
Draw or attach the eyes and add a mouth, fins, and tail.
4. Decorate the fish
Use markers or other decorations to add scales, stripes, spots, and patterns to the foil surface.
Tips to Make It More Creative
Let children experiment with different patterns and textures.
They can gently press designs into the foil before decorating it, or make several shiny fish in different shapes and colors for an eye-catching underwater display.
13. Yarn-Wrapped Fish
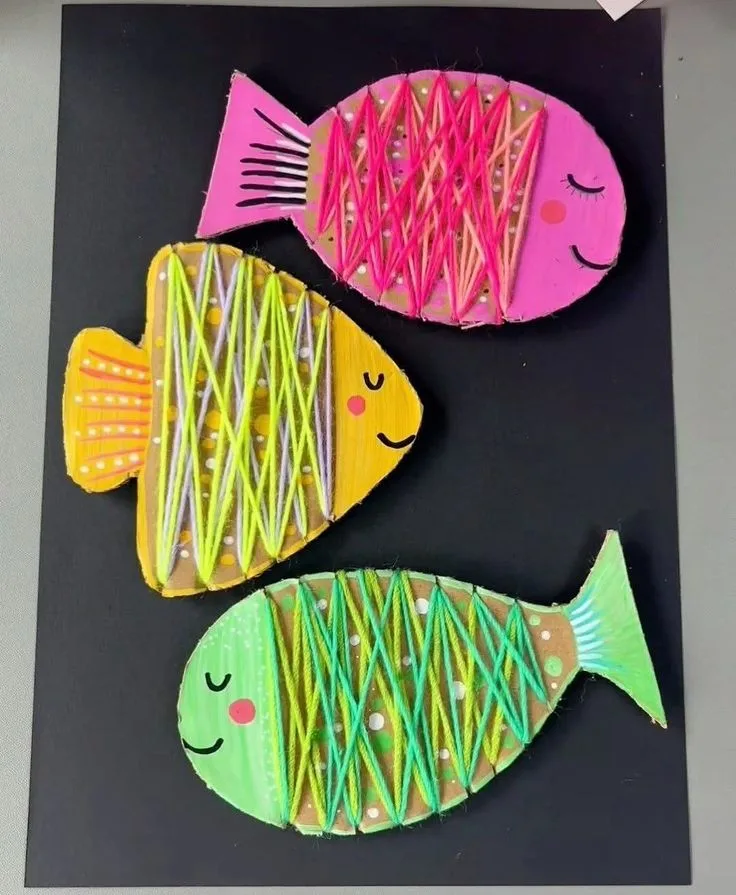
This craft is a fun way to introduce children to texture and simple weaving techniques while creating a colorful fish they can proudly display.
Materials Needed:
Cardboard or cardstock, yarn, a pencil, scissors, glue, and a black marker or googly eyes.
Optional Materials for Decoration:
Colored paper, paint, stickers, beads, glitter glue, and other craft scraps.
How to Make a Yarn-Wrapped Fish
1. Create the fish shape
Draw a simple fish shape on cardboard or cardstock and carefully cut it out.
2. Add the yarn
Apply a small amount of glue to the fish and begin wrapping yarn around the body.
Continue wrapping until the body is covered, leaving the tail and fins exposed if you want them to stand out.
3. Secure the yarn
When you’re finished wrapping, cut the yarn and secure the end with a little glue.
4. Add the features
Attach a googly eye or draw one with a marker. Add a mouth, fins, tail, or other details.
Tips to Make It More Creative
Use different yarn colors to create stripes or patterns, or combine several colors for a rainbow fish.
Children can also make several yarn-wrapped fish in different colors and sizes to create a colorful display.
14. Fish Mobile

This craft goes beyond making a fish for display.
Kids can create several colorful fish and turn them into a simple decoration for their room, classroom, or play area.
Materials Needed:
Colored construction paper or cardstock, a pencil, scissors, glue, string or yarn, a paper plate or cardboard ring, and a black marker or googly eyes.
Optional Materials for Decoration:
Crayons, colored markers, tissue paper, stickers, glitter glue, sequins, and other craft scraps.
How to Make a Fish Mobile
1. Make the fish
Draw or trace several fish shapes on colored paper and carefully cut them out.
Make them different colors and sizes if you like.
2. Decorate the fish
Add eyes, mouths, fins, scales, stripes, spots, and other patterns to each fish.
3. Prepare the mobile
Cut several pieces of string or yarn and attach one fish to the end of each piece.
4. Assemble the mobile
Tie the strings around a paper plate or cardboard ring, spacing the fish around it. Add another piece of string at the top so the mobile can be hung.
Tips to Make It More Creative
Let children give each fish its own color and design. You can also add paper seaweed, bubbles, or other ocean shapes to make the mobile look more like an underwater scene.
15. Moving Paper Fish
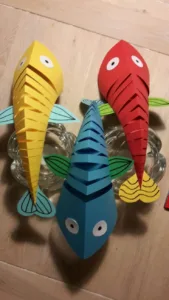
This craft is simple, creative, and fun because the finished fish can bend and wiggle like it’s swimming.
Materials Needed:
Colored construction paper, colored paper scraps, white paper, scissors, glue, a pencil, and a black marker.
Optional Materials for Decoration:
Crayons, colored markers, stickers, glitter glue, and other craft scraps.
How to Make a Moving Paper Fish
1. Prepare the paper
Start with a sheet of colored paper. Fold one corner across to the opposite edge to form a square, then trim off the excess paper.
2. Create the creases
Open the paper and fold two corners toward the center crease to form a kite shape.
Open it again, then fold the paper in half along the diagonal crease.
3. Create the moving body
Make several narrow cuts along the folded edge, leaving about an inch uncut at both ends.
Keep the cuts close together so the finished fish has a flexible, rippling body.
4. Form the fish body
Open the paper and fold it back into the kite shape.
Apply glue to one side and fold the other side over it to create the fish’s three-dimensional body.
5. Create the mouth
Cut a small curved piece from colored paper and glue it inside the front of the fish to form the mouth.
6. Add the fins and tail
Cut out the fins and tail from colored paper and glue them onto the fish.
7. Add the eyes
Cut two small circles from white paper, draw the pupils with a black marker, and glue them onto the fish.
Tips to Make It More Creative
Try different color combinations and patterns to make each fish unique.
Once finished, gently hold the fish by the head and tail and move it up and down to make the body wiggle as though it is swimming.
Tips for Making Fish Crafts with Kids
Making fish crafts with kids can be very interesting.
However, a few things should be taken into consideration. Keep the craft age-appropriate and choose materials that children can handle comfortably.
Let them make their own choices when it comes to colors, shapes, and decorations rather than trying to make every fish perfect.
By doing so, you help them develop their creativity and ability to think independently.
Use materials you already have around the house, especially leftover paper, cardboard, tissue paper, and other recyclable materials.
This keeps the activity inexpensive and also teaches children the value of reusing everyday items.
Supervise and offer assistance when necessary, but do not take over the craft.
Most importantly, let the process be fun. The goal is to encourage fun-filled creativity, not perfection.
What Materials Do You Need to Make Fish Crafts?
Most fish crafts require simple materials that you may already have around the house.
Common supplies include construction paper or cardstock, cardboard, scissors, glue, crayons, colored markers, paint, and googly eyes.
Depending on the craft, you can also use recyclable materials such as paper plates, toilet rolls, egg cartons, coffee filters, and aluminum foil.
Optional decorations like tissue paper, stickers, yarn, glitter glue, and other leftover craft materials can be used to add more color and personality to the finished fish.
Conclusion
Fish crafts are a simple and enjoyable way to keep children engaged and creative without needing expensive or complicated supplies and instructions.
Using the materials you already have at home, you can turn an ordinary afternoon into a fun craft session filled with colors, imagination, and creativity.
Ranging from simple paper fish to recycled-material crafts, there are plenty of ideas to choose from.
Let your child explore, experiment, and make each craft their own. The goal isn’t to create the perfect fish, but to enjoy the process and give their creativity room to grow.