Learn How to Start Locs on Short Hair: A Gentle Beginning to Your Natural Hair Journey.
You cut your hair.
Maybe it was a big chop, maybe you just never grew it long.
And now you’re standing in the mirror wondering whether this dream, the one with the beautiful, full, long locs, is even possible from where you’re starting.
Here is the truth nobody says loudly enough: short hair does not disqualify you from starting locs.
In fact, for many women and men with tightly coiled, type 4 natural hair, short hair creates one of the cleanest, most intentional foundations a loc journey can have.
No excess length pulling on young locs. No old damage dragging into a fresh chapter. Just your natural hair, ready to begin.
This guide walks you through everything you need to know about how to start locs on short hair, from the minimum length that works, to the best methods for your texture, to the step-by-step process of installing and maintaining your starter locs.
If you have been waiting until your hair is “long enough,” this is your sign to stop waiting.
Below you will learn How to Start Locs on Short Hair: A Gentle Beginning to Your Natural Hair Journey:
How to Start Locs on Short Hair: A Gentle Beginning to Your Natural Hair Journey
1. Can You Really Start Locs on Short Hair?
Yes, and not just technically, but well. Short hair locs beautifully, especially for people with tightly coiled natural hair textures (4a, 4b, 4c).
The coil pattern means hair grips itself quickly, forms tight knots at the root, and begins the locking process faster than looser curl patterns often do.
Many professional locticians will tell you that some of their best-formed locs were installed on hair that was only a few inches long, precisely because there was nothing complicated to manage during installation.

The one honest caveat is that very short hair, think a fresh tapered cut or hair under about 2 inches, may require a specific technique or professional help to get a clean result.
Hair that is at least 2 to 3 inches gives you the most flexibility in terms of method choice, section neatness, and how quickly those early locs hold their shape.
Below that threshold, instant locs done with a crochet tool tend to be the more reliable route.
Texture matters just as much as length.
Tightly coiled hair tends to loc faster and hold sections more firmly than wavy or loosely curled hair.
If your hair is on the looser side, you may need extra patience in the starter phase, but it is absolutely still possible.
2. Benefits of Starting Locs on Short Hair
Easier Sectioning and Control
When hair is shorter, there is less weight pulling each section out of place during installation.
Your parts stay cleaner, your sections are easier to hold, and you spend less time managing tangles or length.
For beginners installing their own locs, this makes the DIY process significantly more manageable.

A Stronger Root Foundation
Locs that are installed early, before the hair grows long and starts coiling on itself randomly, tend to develop cleaner, tighter roots.
When each loc starts from a neatly parted section close to the scalp, the roots lock more evenly and with less bulk.
This means fewer problems down the road, like locs that are too thick at the base or sections that merge unintentionally.
Less Product Buildup
Short hair uses significantly less product than longer hair.
This actually works in your favour during the starter phase because heavy creams, thick butters, and excess product are among the biggest enemies of locking progress.
Clean, product-light hair locks faster.
With short hair, you are less tempted to load your locs up, which gives the hair a much better chance of locking quickly.

A Clean Transition
If you are coming from relaxed or colour-treated hair and did a big chop, starting locs shortly after gives your hair a genuinely fresh start.
There is no line of demarcation to manage, no damaged ends to work around, just healthy new growth ready to be shaped into something intentional.
Many people find that beginning their loc journey from this point feels particularly powerful.
Here’s a complete guide on How to Start Locs Yourself at Home Without a Loctician: A Simple, Confident Beginner’s Guide
3. Things to Consider Before You Start

Locs are one of the few hairstyles that are truly long-term by nature.
While they can be combed out in the very early stages with patience and the right technique, the further along your journey goes, the harder undoing them becomes.
Before you start, ask yourself honestly whether you are ready for a style that will evolve with you, and sometimes test your patience, over the next year and beyond.
The people who thrive with locs tend to be those who go in with eyes wide open about the starter phase.
Your Hair Texture
Type 4 hair, especially 4b and 4c, generally locks the fastest because the tight coil structure creates natural friction between strands.
Type 3 hair can lock too, but it often takes longer and may require a method that creates more definition, like two-strand twists rather than comb coils.
Understanding your own texture helps you set realistic expectations about timeline and choose the right starting method.
Desired Loc Size
The size of your finished locs is determined by how you section your hair before installation.
Small, tight sections (roughly pencil-width) create thin, delicate locs. Wider sections create thicker, chunkier locs.
Medium sections, about the size of your pinky finger in diameter, are the most popular starting point and tend to create versatile locs that look full once they mature.
Decide on your size before you begin, because changing it later is not easy.

Professional vs. DIY Installation
Both routes work. DIY is completely achievable for comb coils and two-strand twists if your hair is at least 2 to 3 inches long and you have the patience for it.
Professional installation is recommended if your hair is very short (under 2 inches), if you want instant locs, or if you simply want a perfectly neat installation that you can build on confidently.
A good loctician will also advise you on the right method for your specific texture and lifestyle.
Pro Tip: Before committing to a method, research locticians in your area and look at healed results, not just fresh installs. Freshly done locs always look good. Healed locs tell the real story.
You be interested in reading 10 Dreadlock Edge Control Tips for Corporate Women: Stay Sleek Without Losing Your Style
4. Best Methods for Starting Locs on Short Hair

Comb Coils
Comb coils are one of the most popular methods for short natural hair, and for good reason.
The technique involves sectioning the hair, then using a fine-tooth comb to twist each section tightly into a small spiral coil from root to tip.
The result is a very defined, neat starter loc that sits close to the scalp and has a clean, intentional look from day one.
Comb coils work best on tightly coiled type 4 hair and are most reliable when hair is at least 2 to 3 inches long.
The main downside is that they can unravel in the early weeks, especially when exposed to water, which is why protective styling and careful wash routines matter most during this phase.
Two-Strand Twists
Two-strand twists involve dividing each section into two smaller parts and twisting them around each other from root to tip.
They sit slightly larger than comb coils and tend to be more durable in the early stages, they are less likely to unravel with water exposure and typically create a strong, even foundation for locking.
This method works well on short to medium hair and is a great choice for anyone who wants a little more volume in their starter locs or whose hair texture is on the slightly looser side of type 4.
Two-strand twists also tend to look very polished even before they lock, which can make the starter phase feel more enjoyable for people who are conscious about their appearance during the transition.
Finger Coils
Finger coils are created by applying a light hold gel or loc butter to small sections and coiling each section tightly around your finger from root to tip.
They are the best option for very short hair, often working when comb coils are difficult because the hair is too short for a comb to grip cleanly.
The texture from finger coils can be slightly less defined than comb coils, but the technique is gentle and effective for fine or very tight coil patterns.
Instant Locs (Crochet Method)
Instant locs use a small crochet needle to knot and compress the hair, creating locs that look mature immediately after installation.
This is the only method that essentially bypasses the starter phase entirely, you leave the appointment with locs that already look locked.
It is also the best option for very short hair that would otherwise struggle with coil methods.
The trade-off is that instant locs require an experienced professional to do correctly. Poor technique can cause thinning at the roots or damage the curl pattern.
When done well, however, they create beautiful, even locs with a clean mature look that can be very motivating for people who find the starter phase discouraging.
5. Step-by-Step: How to Start Locs on Short Hair
Step 1 — Wash and Clarify Your Hair
Start with a clarifying shampoo that removes product buildup, oil, and debris from the scalp and strands.
Do not use a moisturising or conditioning shampoo, the goal here is clean, product-free hair.
Locs need a clean foundation to form properly, and any residue left on the strands can slow down the locking process.
Clarify, rinse thoroughly, and allow the hair to air dry or gently pat dry before moving on. Skip the conditioner.
Step 2 — Section and Part Your Hair
Using a rat-tail comb, part your hair into clean, even sections.
The most common parting pattern is a square grid, neat rows and columns that create equal sections across the entire head.
Some people prefer a brick-lay pattern (where sections are staggered like bricks) because it creates a fuller appearance and reduces the visibility of the parts as the locs grow.
Use clips to hold completed sections out of the way as you work.
The size of your sections determines the thickness of your finished locs, so be intentional here and stay as consistent as possible from section to section.
Uneven sections create uneven locs, and this is difficult to correct later.

Step 3 — Choose and Install Your Starter Method
Based on your hair length, texture, and preference, use your chosen method, comb coils, two-strand twists, finger coils, or crochet, to install each loc.
Work from the back of your head to the front, completing each section fully before moving to the next.
Apply only a very small amount of product if needed (a light loc butter or aloe vera gel works well); less is always more at this stage.
Do not pull tightly at the roots.
Tension is one of the most common causes of thinning and traction alopecia in loc journeys, and it is entirely avoidable.
Each loc should sit snugly against the scalp without pulling at the hairline or crown.
You may be interested in reading Wedding Nails for Bride: Elegant & Timeless Designs for the Big Day
Step 4 — Allow the Locs to Set
The first two to four weeks are when your starter locs are most fragile.
Avoid excessive touching, manipulation, and over-washing during this window.
The less you disturb the locs during this period, the better the foundation they build.
Frizz at this stage is normal and expected, do not try to smooth it down with product, as this can create buildup and actually delay locking.
Wear a satin bonnet to bed every night without exception.
Friction from cotton pillowcases causes significant frizz and disrupts the locking pattern on young locs.
A satin bonnet is the single cheapest and most effective maintenance step you can take during the starter phase.
6. Maintaining Your Starter Locs on Short Hair
Washing
Wash your locs every one to three weeks depending on your scalp and lifestyle.
Use a residue-free shampoo, one specifically formulated for locs or a gentle clarifying formula.
Focus the shampoo on your scalp, massaging gently with your fingertips, and let the lather rinse through the locs without squeezing or rubbing them.
Avoid heavy creams, coconut oil, and thick product during the first few months, as these create buildup that slows locking and can cause mildew if the locs do not dry properly.
Retwisting
Retwist every four to six weeks, not more frequently.
Over-retwisting is one of the most damaging things you can do to a developing loc, because repeated tension at the same point of the root thins the hair over time.
Let your roots grow naturally between retwists, and resist the urge to neaten them too often.
When you do retwist, use a very light product and focus only on the new growth at the base.

Moisturising
Short locs do not need heavy products.
A light water-based moisturising spray used every few days, or a very small amount of a lightweight natural oil (jojoba, argan, or a dedicated loc oil) applied to the scalp, is sufficient.
The goal is a hydrated scalp and strands that are not coated in product. When in doubt, use less than you think you need.
Separating Your Locs
Once a week, check your roots for any locs that have started to merge or join at the base. Gently pull them apart with your fingers, never a comb or brush at this stage.
The longer you leave two locs connected at the root, the harder they are to separate without causing thinning or breakage.
Separation is one of the most important maintenance habits to develop early, and it takes only a few minutes once you get into the rhythm.
7. Bad Ideas When Starting Locs on Short Hair
Using heavy gels and thick butters to keep locs looking neat.
The buildup these products create is extremely difficult to remove once it is inside a loc.
It slows locking, causes flaking, and can make locs smell musty.
If your locs look frizzy, that is not a problem to fix with product, it is a normal part of the process.
Retwisting every week because you do not like how the roots look. Fresh roots are a sign of healthy new growth, not a sign that something is wrong.
Retwisting too frequently causes thinning at the hairline and crown, and the damage from repeated tension accumulates over time in ways that are hard to reverse.
Comparing your progress to people on social media. Loc timelines vary enormously depending on hair texture, method, maintenance habits, and genetics.

Someone with 4c hair who does not wash often may lock faster than someone with 4a hair who washes weekly. Your journey belongs only to you.
Neglecting your scalp while focusing only on the locs themselves.
Healthy locs grow from a healthy scalp. If your scalp is dry, flaky, or itchy, address it directly with a soothing oil or scalp spray rather than covering it with products that will build up.
Your scalp health is the foundation of everything else.
Starting locs on freshly relaxed or chemically treated hair.
Chemically processed strands are significantly weaker than natural growth, and the manipulation involved in loc installation can cause breakage at the point where the two textures meet.
If you are transitioning, give your natural growth time to come in before you begin.
You may enjoy reading How to Start Sisterlocks on Natural Hair: A Beginner’s Step-by-Step Guide
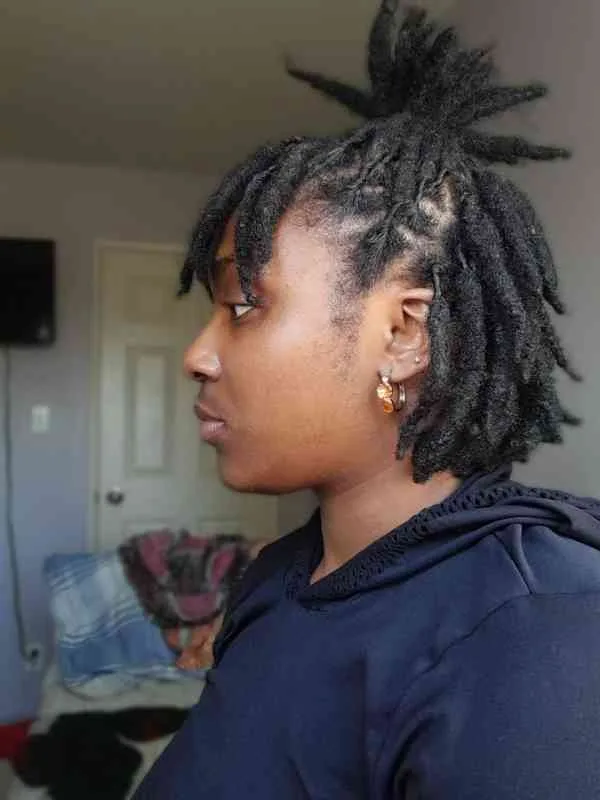
8. What to Expect in the First Few Months
The first three months of a loc journey on short hair are the most mentally challenging for most people. Your locs will frizz.
They will look uneven some days. They may unravel slightly at the ends when you wash.
This is all normal. The starter phase is not supposed to look perfectly neat, and fighting it by over-manipulating or applying too much product will only extend the awkward period rather than shorten it.
By around the three to six month mark, most people with type 4 hair will start to notice genuine locking progress, the hair begins to feel denser, the ends start to close, and the overall shape of each loc becomes more defined.
Full maturity typically takes between 12 and 24 months, depending on texture and maintenance.
For short hair, because the locs start closer to the scalp, this process can sometimes move a little faster than it does for longer starting lengths.
The most important thing you can do during this time is stay consistent with a simple routine, leave your locs alone as much as possible, and trust the process.
The people who abandon their loc journey in the first six months almost always do so because their expectations were misaligned with reality, not because there was anything wrong with their hair.
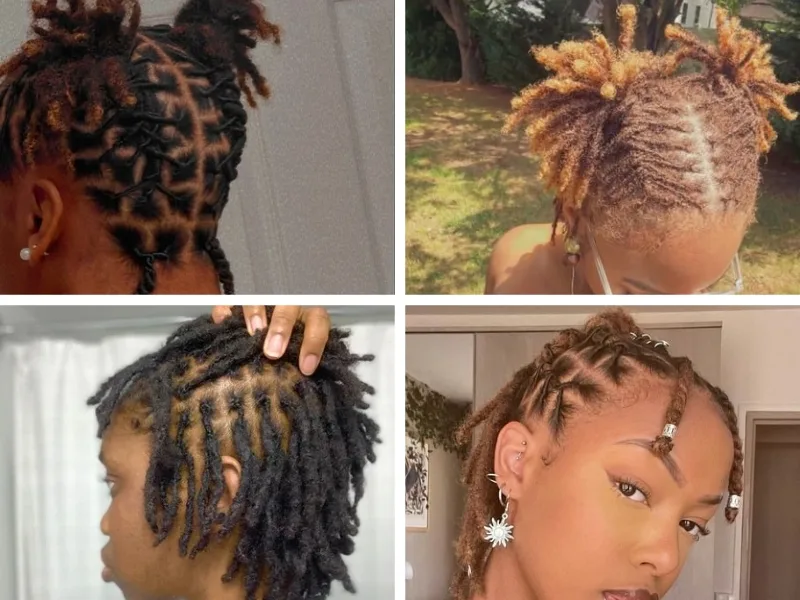
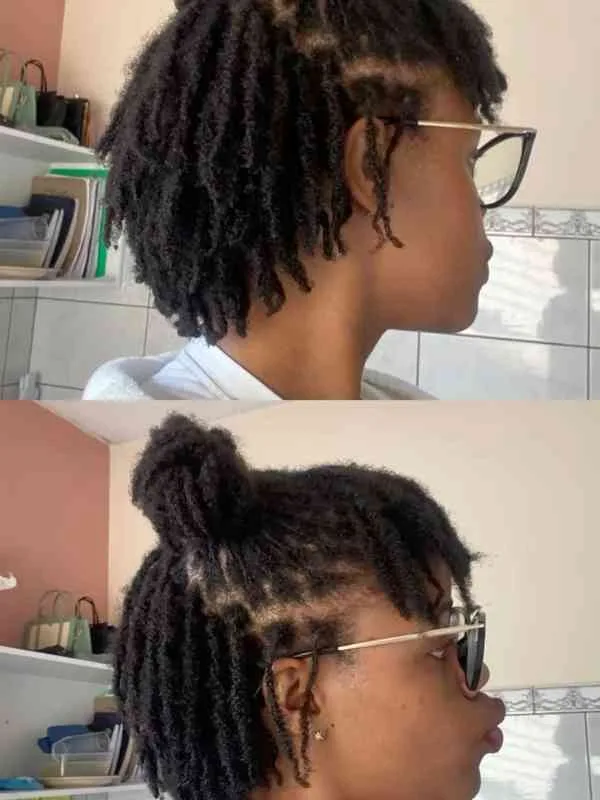
9. Simple Styles for Short Starter Locs
Short starter locs do not need to look plain while you wait for length.
Even in the first few months, there are simple ways to add personality and polish to your look without manipulating the locs enough to disturb their formation.
A simple side part with clean edges immediately elevates the overall look and draws attention to the face rather than the length of the locs.

Wrapping your locs in a headwrap or turban is both protective and stylish, it keeps the locs from environmental friction while looking intentional.
Loc cuffs and beads can be slid onto individual locs to add character, and they are completely safe to use as long as they are not pulling tightly on the root.
As your locs grow, your styling options will expand naturally.
Many people find that the phase between 4 and 8 inches is actually their favourite, enough length for simple up-dos and half-up styles, but still short enough to move freely and feel light.
Enjoy each stage rather than rushing to the next one.
Final Words
How to Start Locs on Short Hair: Starting locs on short hair is not a compromise. It is a beginning, and one of the cleanest, most intentional beginnings a loc journey can have. Short hair gives you control, definition, and a foundation that longer hair sometimes cannot offer.
The months ahead will ask for your patience and consistency, and in return they will give you something that grows with you, reflects your care, and becomes more beautiful with time.
The locs you grow from here will not just be a hairstyle.
They will be a record of every week you chose to stay consistent, every day you trusted the process, and every moment you decided that what was growing from your scalp was worth showing up for.
That is not a small thing.
Start where you are. Your hair is ready.
You Have Learnt How to Start Locs on Short Hair: A Gentle Beginning to Your Natural Hair Journey.