
You Will Learn How to Start Locs Yourself at Home Without a Loctician: A Calm, Confident DIY Journey.
You have been thinking about it for a while now.
You scroll past photos of healthy, full locs and feel that familiar pull – the one that says this is the direction your hair is meant to go.
But then you look up the price of a loctician in your area and the excitement suddenly feels expensive.
Here is something nobody says loudly enough: you do not need a loctician to start your loc journey. Locticians are skilled professionals, and their work is beautiful – but they do not perform magic that your own hands cannot.
The process of forming locs is natural.
Hair tangles, knots, and locks all on its own when it is properly sectioned and left alone.
What a professional adds is precision and speed. What you can add, on your own time and at your own pace, is intentionality.

This guide walks you through exactly How to Start Locs Yourself at Home Without a Loctician. What to know before you begin. The tools you actually need. The best methods for different hair types. A full step-by-step installation process and how to maintain your locs as they develop.
Even if you are starting fresh after a big chop or working with a few inches of natural growth, this is everything you need to begin your DIY loc journey with confidence.
Below You Will see a Step-by-Step Guide on How to Start Locs Yourself at Home Without a Loctician: A Calm, Confident DIY Journey:
How to Start Locs Yourself at Home Without a Loctician: A Calm, Confident DIY Journey
1. Can You Really Start Locs Yourself at Home?
Yes – and many people have done it well. DIY loc installation is not a shortcut or a compromise.
For most people with type 4 natural hair. Starting locs at home produces results that are just as healthy and well-formed as a professional installation, provided the process is done carefully and the maintenance routine is consistent.
The truth is that locticians are not creating locs.

They are creating the conditions for your hair to loc. They section the hair cleanly, apply a method, and give the strands a structured starting point from which the natural locking process can begin.
Every single one of those steps is learnable. What takes a loctician two hours may take you four or five the first time. But the result, given the same care, is the same.
The areas where professional help genuinely adds value are very fine parting, perfectly symmetrical sections.
If those things matter deeply to you, a one-time professional installation is worth the investment.
This article dives into How to Start Sisterlocks on Natural Hair: A Beginner’s Step-by-Step Guide
For everyone else, a patient DIY installation with the right preparation produces locs you will be proud of.
2. What to Know Before You Start
Hair Length and What It Means for Your Install
Your hair does not need to be long to start locs.
Most methods work well with hair that is at least 3 to 5 inches, and some techniques like finger coils and the sponge method work on hair as short as 2 inches.
Longer hair holds twists and coils more easily in the early weeks because the weight of the strand helps keep the shape, but short hair locks quickly. Especially if your texture is tightly coiled.
Hair that is between 4 and 6 inches tends to give you the most flexibility: long enough to hold a clean twist, short enough not to be difficult to manage solo.
If your hair is significantly longer than that, set aside a full day for the installation and work in smaller sections at a time.

How Your Hair Texture Affects the Journey
Tightly coiled hair – type 4b and 4c – locks faster than looser curl patterns because the natural kink structure creates friction and tangles between strands.
This means your starter locs will begin to knot internally and feel denser relatively quickly, often within the first two to three months.
Type 4a and type 3 hair can absolutely loc, but the timeline is longer and the early stages can feel frustrating if you are not expecting it.
Understanding your texture also helps you choose the right method. Comb coils grip best on tightly coiled hair.
Two-strand twists tend to work across a wider range of textures and hold better in the early weeks for people with slightly looser curl patterns.
Do not copy someone else’s method just because it worked for them – use your own texture as your guide.
The Stages You Will Move Through
Knowing the stages of loc development removes most of the panic that causes people to abandon their journey too early.
The starter stage is when you install your chosen method, your hair looks neat and defined immediately after. But may loosen, frizz, or partially unravel over the following weeks.
This is normal.
The budding stage follows, where small knots begin forming inside each loc and the hair starts to swell.
The teen stage is when locs become thicker and more frizzy as the internal matting continues.
Mature locs – firm, smooth, and fully compressed, typically arrive between 12 and 24 months depending on your texture and routine.
This Post explains How to Fix Thinning Locs at the Crown and Bring Your Locs Back to Life
The most important thing to hold onto during the messy middle stages is that frizz and uneven texture are signs of locking in progress. Not signs of failure.
The people who reach mature locs are almost always the ones who resisted the urge to over-manipulate during the difficult early months.
3. Tools You Need for a Home Loc Installation
One of the most encouraging things about starting locs at home is that the tool list is short and affordable. You likely already own most of what you need.
A rat-tail comb is the most essential tool, the pointed end creates clean, even parts without disturbing the surrounding hair.
A spray bottle filled with plain water keeps your hair damp and workable throughout the installation.

A good supply of hair clips holds completed sections neatly out of the way as you move across your head. Two mirrors, one fixed and one handheld – let you see the back and sides clearly while you work.
For product, keep it minimal.
A light hold gel or aloe vera gel gives each loc just enough grip to hold its shape without creating the buildup that slows locking.
A small amount of a lightweight natural oil applied sparingly to the scalp can address dryness during the process.
A satin bonnet for nighttime protection is non-negotiable from day one.
4. Choosing the Right Starter Method for Your Hair
Two-Strand Twists
Two-strand twists are the most beginner-friendly loc starter method and the most forgiving for DIY installation.
The technique involves dividing each parted section into two equal parts and twisting them around each other from root to tip.
The resulting twist sits neatly, holds well during the early weeks, and is less prone to unraveling with water exposure than comb coils.
Two-strand twists work well across most type 4 hair textures and on hair that is at least 3 to 4 inches long.
They tend to create locs that are slightly thicker and fuller-looking than comb coils. Which many people prefer aesthetically in the early stages.
For first-time DIY installs. This is the method most likely to give you a result you feel good about from the start.
You may be interested in reading 17 Sustainable Father’s Day Gift Wrapping Ideas That Are Thoughtful, Stylish & Zero-Waste
Comb Coils
Comb coils are created by applying a small amount of gel to a section of hair and using a fine-tooth comb to wind the strands into a tight spiral coil from root to tip.
The result is an extremely neat, defined starter loc with a clean appearance from day one. Comb coils work best on tightly coiled type 4c and 4b hair. The natural kink helps the coil grip and hold its shape.
The main limitation of comb coils for a home install is that they require more practice to execute evenly and are more vulnerable to unraveling when wet.
If you wash frequently in the early months. Be prepared to re-coil loose sections.
This is not a sign that the method is failing. It is a natural part of the early process with this technique.
Finger Coils
Finger coils use the same principle as comb coils but replace the comb with your fingers.
You apply a small amount of gel to a section and coil the hair tightly around your index finger from the root down.
Finger coils are the best option for very short hair where a comb cannot get enough grip. And they are gentle enough to use on fine or delicate strands.
The process is slower than comb coils but is very beginner-accessible.

Braids
Starting locs with small box braids is a less common method but a valid one, particularly for people who want a very structured foundation.
The braid gradually loosens over time as the hair begins to lock internally, and the resulting loc retains the shape of the original braid for quite a while.
This method works best for people with medium to long hair and creates locs with a flat, defined shape rather than a round coil-based texture.
Sponge Method
The loc sponge is a foam tool with small holes that coil very short natural hair into twists when rubbed across the head in a circular motion.
For more insight 35 Loc Styles for Interviews: Professional, Polished, and Powerfully You
It is specifically designed for short hair. The type of length that is difficult to work with using a comb or your fingers . And it creates small, even coils across the entire head quickly.
For hair under 2 to 3 inches, the sponge method is often the most practical DIY starting option.
5. Step-by-Step: How to Start Locs Yourself at Home Without a Loctician
Step 1 – Clarify and Wash Your Hair
Start with a clarifying shampoo that removes all product buildup, oil, and debris from the scalp and strands.
Do not use a moisturising or conditioning shampoo on installation wash day. The goal is clean, product-free hair that will grip and hold your chosen method.
Lather at the scalp, let the rinse work through the lengths, and skip the conditioner entirely.
Your hair will feel stripped and slightly rough, which is exactly what you want. Buildup-free strands lock faster and hold methods more cleanly.

Step 2 – Dry and Detangle
After washing, gently squeeze excess water from your hair with a micro-fibre towel or a soft cotton T-shirt.
Avoid rubbing. Your hair should be damp, not dripping, before you start parting.
If your hair is tangled, use a wide-tooth comb to gently work through knots while it is still wet, starting from the ends and working toward the roots.
This is the last time you will detangle – from here, the goal is for your hair to begin its natural tangling process inside the locs.
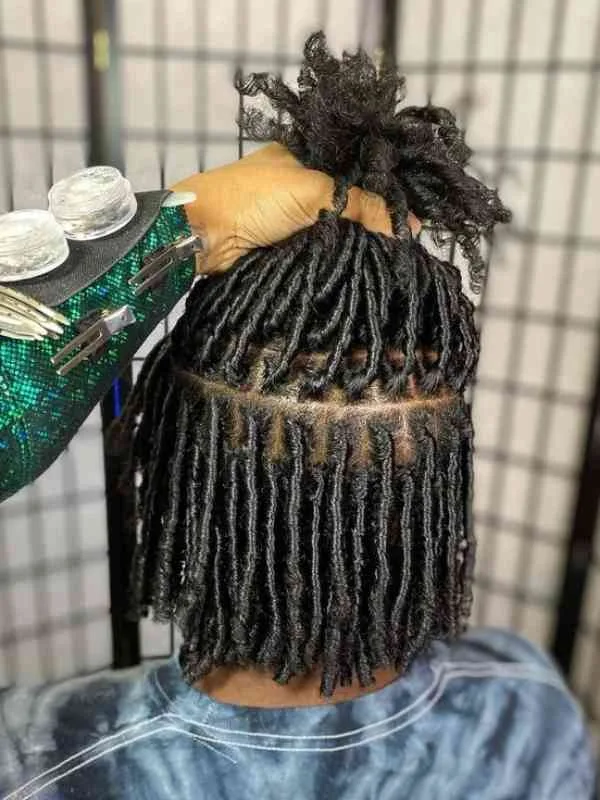
Step 3 – Part Your Hair Into Even Sections
Using your rat-tail comb, divide your entire head into clean, even sections before you begin installing.
The most common pattern is a square grid – neat horizontal rows with vertical columns creating equal squares across the scalp.
A brick-lay pattern is a popular alternative where each row is offset from the one above it like bricks in a wall.
This pattern creates a fuller appearance and hides parting lines more effectively as the locs grow.
Use hair clips to hold each section out of the way as you complete it.
The size of your sections determines the final thickness of your locs, so be consistent throughout.
A section roughly the width of your pinky finger creates a medium loc – a versatile starting point for most people.
Smaller sections produce thin, delicate locs; larger sections create thick, chunky ones. Decide your size before you start and stick to it across the entire head.
Step 4 – Install Your Chosen Method Section by Section
Work from the back of your head toward the front, completing each section fully before moving on.
Apply only a very small amount of product to each section before twisting or coiling – less than you think you need. Work from root to tip, keeping the tension firm but never tight.
The loc should sit against your scalp without pulling at the hairline.
Take your time.
A full head installation done at home can take anywhere from three to six hours depending on the density and length of your hair and the method you choose.
If you need to stop and continue the next day, secure completed sections with clips and keep unworked sections moistened with your spray bottle.
Rushing produces uneven sections and inconsistent loc sizes, both of which are difficult to correct later.
Step 5 – Secure, Set, and Leave Alone
Once all locs are installed, do a final check – look at every section to ensure no parts are joining across sections, no coils have loosened at the root, and the overall parting pattern is consistent.
Mist the entire head lightly with water and allow to air dry completely before covering or sleeping.
Covering damp locs traps moisture against the scalp and can create mildew, which is one of the most persistent problems new loc-wearers face.
Put your satin bonnet on before bed and leave the locs completely alone for at least the first two weeks.
No touching, no re-coiling, no smoothing.
The two weeks immediately following installation are when the foundation of your locs is being set, and every time you manipulate them during this window. You are interrupting that process.
6. How to Maintain Your Starter Locs at Home
Washing
Wash every one to three weeks using a residue-free shampoo. Focus the shampoo on your scalp, massaging with your fingertips in gentle circular motions.
Allow the lather to rinse down through the locs without squeezing or rubbing them together.
After rinsing, gently squeeze each loc downward to remove water and allow to air dry fully – do not cover or sleep on damp locs.
In the first few months, washing less frequently gives your locs more time to settle and reduces the risk of unraveling.
Retwisting
Retwist every four to six weeks, using a light hold product and focusing only on the new growth at the base of each loc.
Retwisting too frequently is one of the most common and damaging mistakes in the early loc journey.
Repeated tension at the same root point causes thinning over time. A problem that is slow to develop, difficult to notice until it is significant, and hard to reverse.
Let your roots grow between sessions and resist the urge to neaten them constantly.
You may enjoy reading 12 Couples Bucket List Ideas for Relationships That Go Beyond the Ordinary
Moisturising
Your locs need hydration, but they do not need heavy products. A light water-based spray applied every few days keeps strands from drying out without coating them in residue.
A small amount of lightweight oil applied to the scalp. Not the locs themselves. Addresses dryness at the root where the real moisture need lives.
Keep products minimal across the board.
The locking process benefits from clean, uncoated strands, and every product you skip is one less source of buildup.

Separating
Check your roots once a week for locs that are beginning to merge or fuse at the base. Gently pull them apart with your fingers, do not use a comb.
The longer you leave two locs joined at the root, the more they fuse, and the harder and more painful it becomes to separate them without causing thinning.
Separation takes only a few minutes and becomes completely intuitive once you build the habit into your weekly routine.
Nighttime Protection
Wear a satin or silk bonnet every single night without exception.
Cotton pillowcases absorb moisture from your locs and create friction that causes frizz, disrupts the locking pattern, and leads to breakage over time.
A satin bonnet is one of the highest-return investments you will make in your loc journey. If bonnets slip off while you sleep, a satin pillowcase is the next best option.
7. Bad Ideas When Thinking of How to Start Locs Yourself at Home Without a Loctician
Using thick gels and heavy butters to keep locs looking smooth in the early weeks.
Heavy products feel like they are helping because the locs look neater immediately after application.
What they are actually doing is coating the strands in residue that slows locking, creates buildup inside the loc that is extremely difficult to remove, and makes your locs feel heavy and waxy.
Frizz in the starter phase is not a problem. It is a signal that your hair is doing exactly what it should.
Retwisting every week because the roots look messy.
New root growth is healthy and normal. The instinct to neaten it constantly is understandable, but acting on that instinct too often causes real damage.
Repeated tension at the same point of the root thins the hair gradually, and by the time you notice it, the problem has often been building for months.
Redoing locs that have partially unraveled instead of leaving them to re-coil naturally.
In the early weeks, some locs will loosen, especially after washing. Every time you manipulate a loc, you are essentially resetting its progress.
If the loc is not fully unraveled, leave it alone. The hair will find its way back.

Starting locs on hair that has not been fully clarified. Oil, product residue, and silicone buildup all sit on the strands and prevent them from gripping and tangling properly.
A clarifying shampoo on installation day is not optional.
Skipping nighttime protection because your locs seem fine.
Short locs are actually more vulnerable to friction damage than longer ones because they sit closer to the pillowcase and move more during sleep.
If you are looking to understand 10 Dreadlock Edge Control Tips for Corporate Women: Stay Sleek Without Losing Your Style
8. What to Realistically Expect in the First Six Months
The first month after installation is usually the most psychologically difficult. Your locs will frizz.
Some will loosen at the ends. After your first wash, a few may look like they are barely holding together. This is normal. This is not failure.

This is the starter phase, and it looks this way for almost everyone regardless of whether a professional installed them or you did.
Between months two and four, most people with type 4 hair begin to see real locking progress.
The locs start to feel denser, the ends begin to close, and the overall shape becomes more defined.
By the six-month mark, the vast majority of people with tightly coiled hair have locs that are clearly maturing.
The hair is thicker inside each loc, the shape is more stable, and the frizzy look of the early starter phase has softened into something that genuinely looks intentional.
Full maturity, locs that are firm, smooth, and completely locked, typically arrives between 12 and 24 months.
9. Pros and Cons of Starting Locs Without a Loctician
Why DIY Works in Your Favour
The most obvious advantage is cost. Professional loc installation can range from a few hundred to over a thousand dollars depending on your location, hair density, and method – with ongoing maintenance appointments on top.
DIY eliminates the installation cost entirely and gives you full control over your maintenance schedule and spending.
Doing your own locs also builds a deep working knowledge of your hair.
You understand exactly how your texture responds to different products, how your roots grow and move between retwists, and what your locs need at each stage of development.
That knowledge makes you a better caretaker of your hair than any number of salon appointments can.

Where to Be Honest About the Challenges in How to Start Locs Yourself at Home Without a Loctician
The most common challenge of DIY installation is the back sections.
Parting and coiling the hair at the crown and nape without losing symmetry requires patience and two mirrors.
The first time you do it, the sections in the back will likely be slightly less even than the sections you can see directly.
This matters less than people fear, locs are forgiving, and slight unevenness in the parting becomes invisible once the hair grows.
The process also takes longer when you do it yourself, especially for the first install. Locticians work quickly because they do this every day.
You will work more slowly, and that is perfectly fine.
Set aside a full day, put on a playlist or a show you enjoy, and let the process be enjoyable rather than rushed. The finished result is the same.
Final Words
How to Start Locs Yourself at Home Without a Loctician: Starting your loc journey at home is one of the most intentional decisions you can make about your hair.
You are not just saving money – you are choosing to know your hair, to understand it, and to be the one who nurtures it from the very first twist.
That means something.
The starter phase will test your patience.
There will be weeks when your locs look messier than they did the week before, when you question whether you are doing this right, when everyone else’s mature, beautiful locs make yours feel impossibly far away. Stay with it anyway.
The locs you are growing are building their foundation in those exact weeks, even when you cannot see it.
Your hair is capable of this journey. You are capable of guiding it.
Start where you are, use what you have, and trust the process enough to let it unfold at its own pace.
The locs on the other side of this patience are worth every week you chose to keep going.
In this Post You Learnt How to Start Locs Yourself at Home Without a Loctician: