There’s a moment every fall when the last bright summer polish in your collection starts to feel wrong for the weather, too sweet for sweater layers and pumpkin-spice afternoons.
That’s usually when a classic French manicure gets a rework, the crisp white tip swapped for something warmer and moodier, closer to the color of fallen leaves than a bridal-adjacent neutral.
Burnt orange does exactly that. It keeps the French shape’s clean, structured look while pulling in enough warmth to feel seasonal without tipping into full Halloween-orange territory.
From thin, barely-there lines to bold, wide tips layered over deeper bases, there’s a version of this look for every nail length and every comfort level with color, starting with the most versatile option first.
Choosing Your Tip Width and Base Shade First
Two decisions shape almost every idea on this list: how wide the burnt orange tip is, and what color sits underneath it.
A thin tip line reads more refined and works well for anyone easing into a bolder color for the first time, while a wide tip makes more of a statement and suits nails with a bit of length to showcase the shape.
Base color changes the whole mood of the design. A milky white or sheer nude base keeps things soft and wearable for daily life, while a deeper base like chocolate brown or taupe makes the burnt orange tip feel richer and more intentional, closer to editorial than everyday.
Skin undertone matters here too. Warmer undertones can wear a more saturated, red-leaning burnt orange, while cooler undertones often look better with a version that leans slightly more toward amber or rust.
Deciding on tip width and base color before your appointment saves time in the chair and helps your nail tech understand exactly which version of this trend you’re going for.
Pin this post 30+ Burgundy September Nails for Early Fall
Burnt Orange French Tip Nails That Are Made for Fall
1. Classic Thin Burnt Orange French Tips
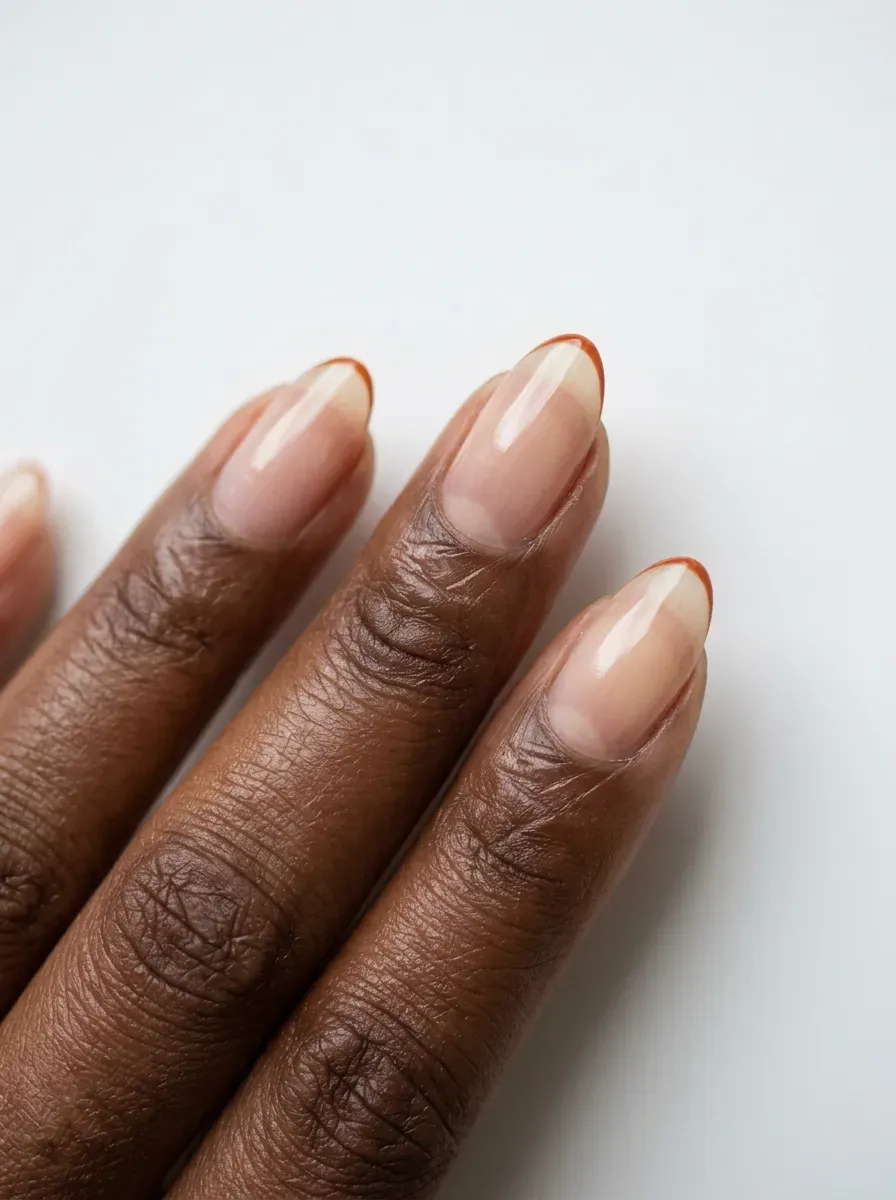
A hairline-thin burnt orange tip sits over a bare, natural nail base, keeping the classic French silhouette intact while swapping the usual white for something seasonal.
This version works especially well for anyone who wants the trend without much commitment, since the thin line reads as an accent rather than a bold statement.
Almond or squoval shapes give the thinnest tip line the cleanest edge to follow. Ask for a striping brush specifically, since a regular polish brush struggles to lay down a line this fine.
2. Almond Shape Burnt Orange French Tips
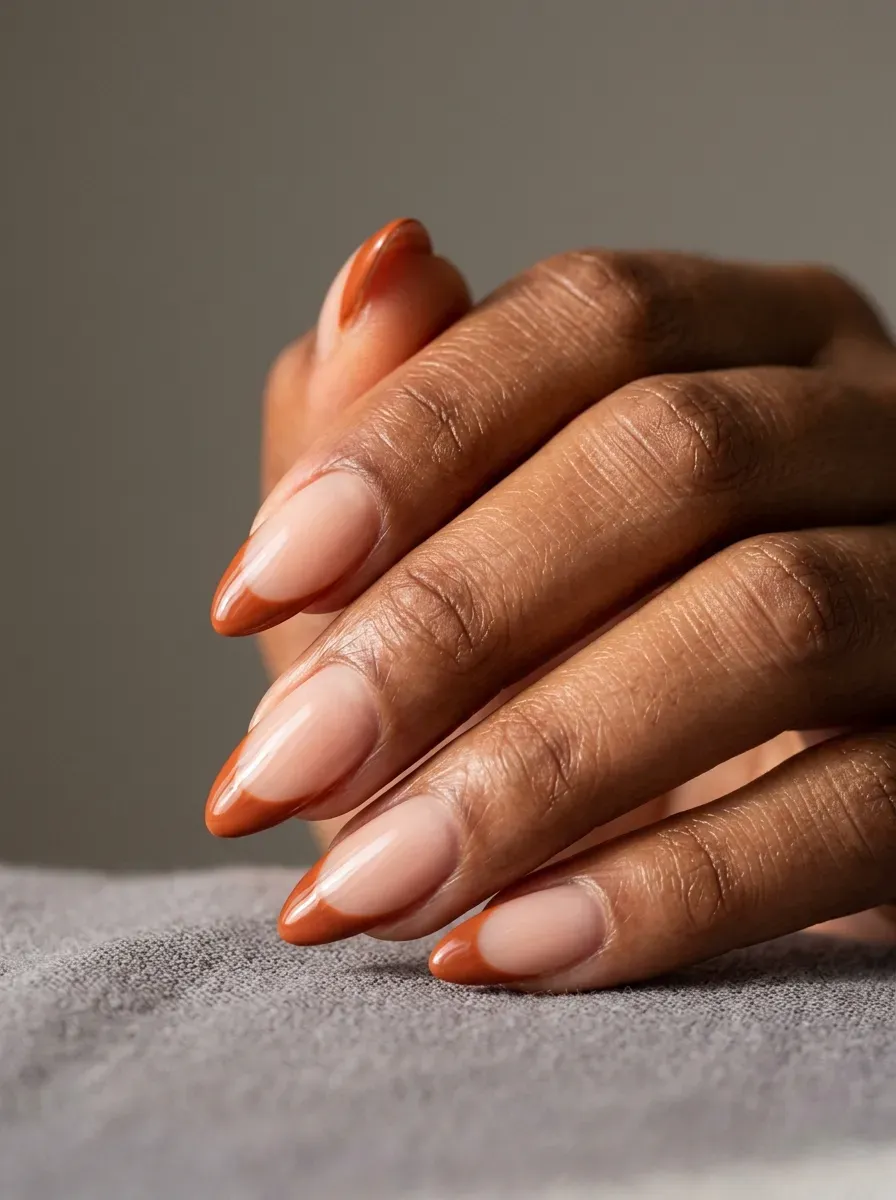
Almond shape tapers to a soft point, which gives a burnt orange tip a naturally elegant line to follow without much extra shaping work.
This shape flatters most hand sizes and elongates shorter fingers, making it one of the more universally wearable options on this list.
Medium length works best here, since the tip’s curve needs enough surface area to read as intentional. Buff the tip’s edge lightly before topcoat for a smoother, more finished line.
3. Coffin Shape Burnt Orange French Tips
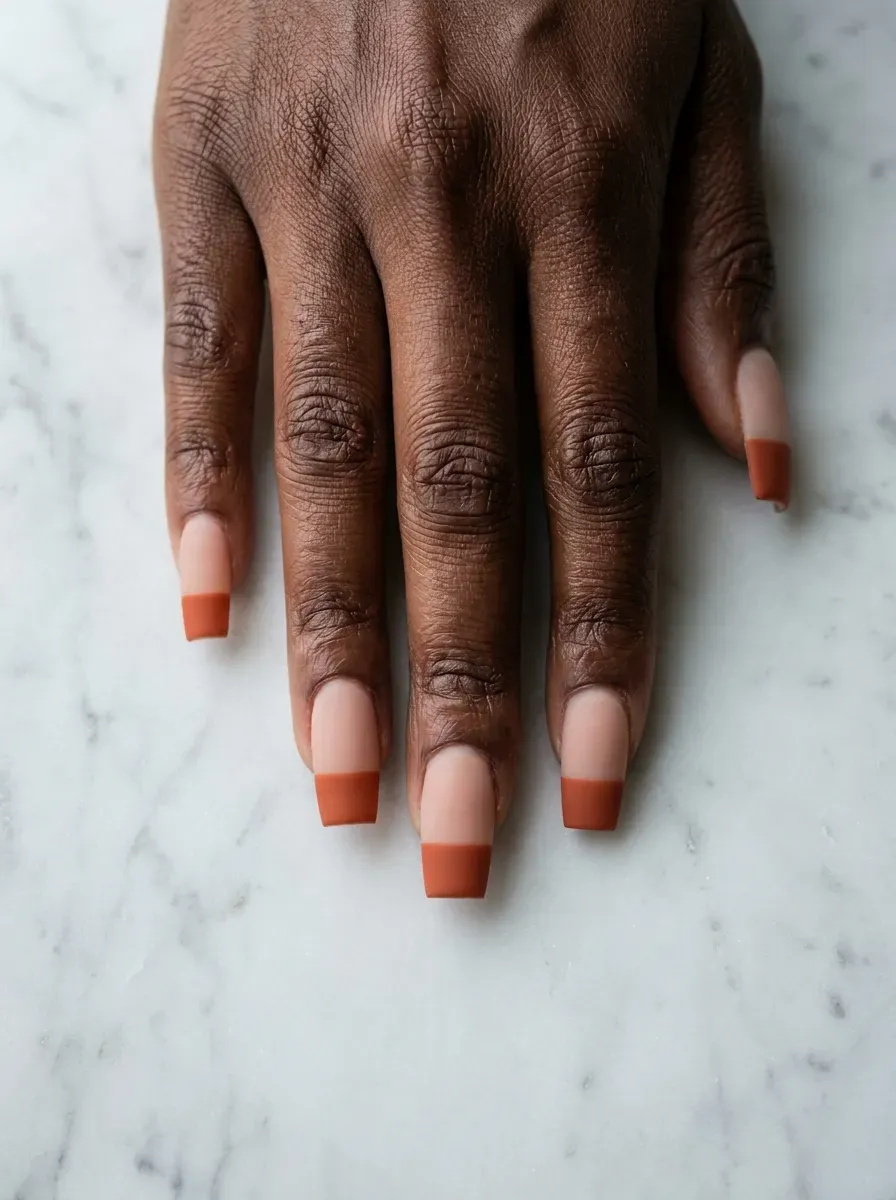
Coffin shape’s flat, squared-off tip gives burnt orange a wide, dramatic edge to sit against, making this one of the boldest ways to wear the color.
The straight tip line reads more graphic than a curved French, closer to a color-blocked design than a soft gradient.
This shape needs length to look proportional, so it suits extensions or naturally longer nails better than a short set.
Keep the tip line perfectly straight using tape as a guide, since coffin shape makes any wobble in the line obvious.
Check out Fall Gel Nails Aesthetic: 45+ Chic Ideas for Autumn
4. Squoval Burnt Orange French Tips
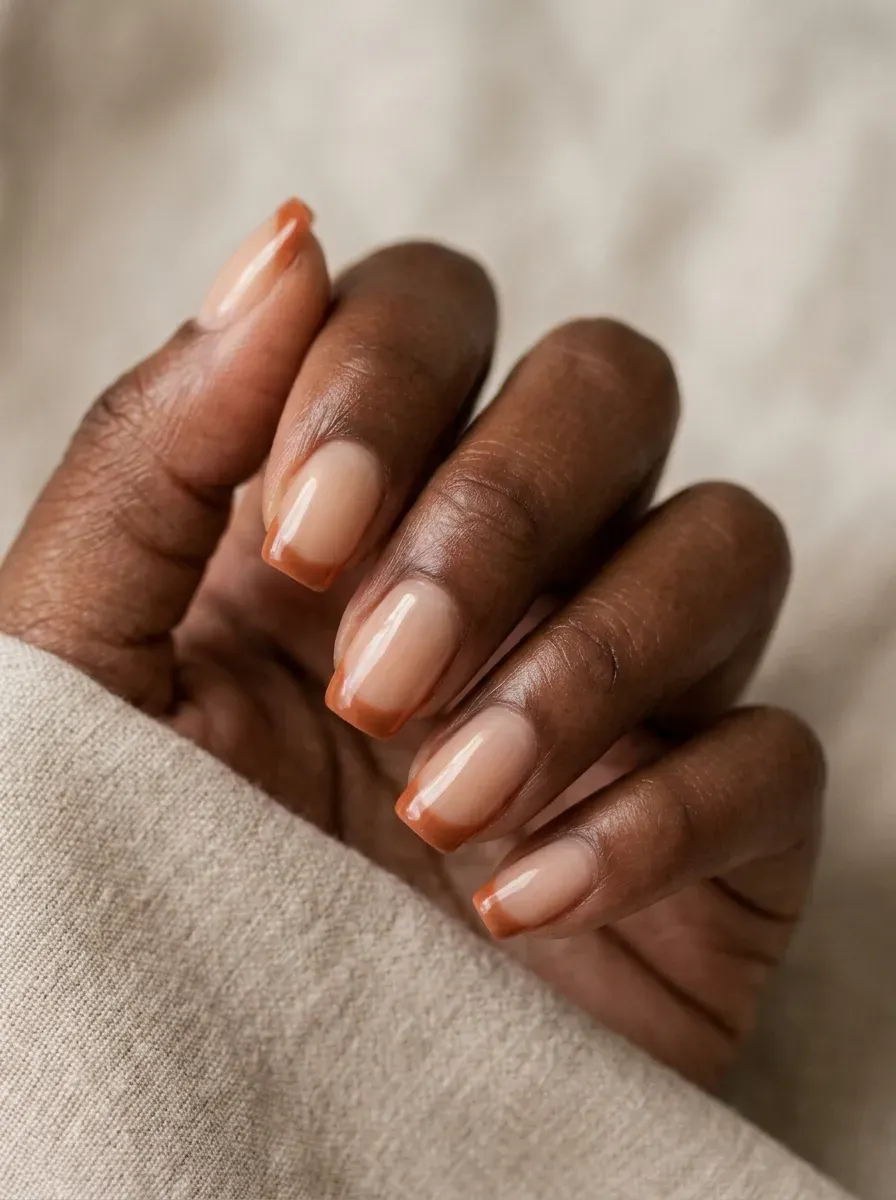
Squoval shape splits the difference between square and round, giving a burnt orange tip a slightly softened edge that still reads clean and structured.
This shape is one of the most forgiving for at-home application, since the gently rounded corners hide minor unevenness better than a sharp square tip would.
Short to medium length keeps this shape looking polished rather than blunt. A slightly rounded tip line, rather than perfectly straight, matches the nail’s natural curve best.
5. Double-Lined Burnt Orange French Tips
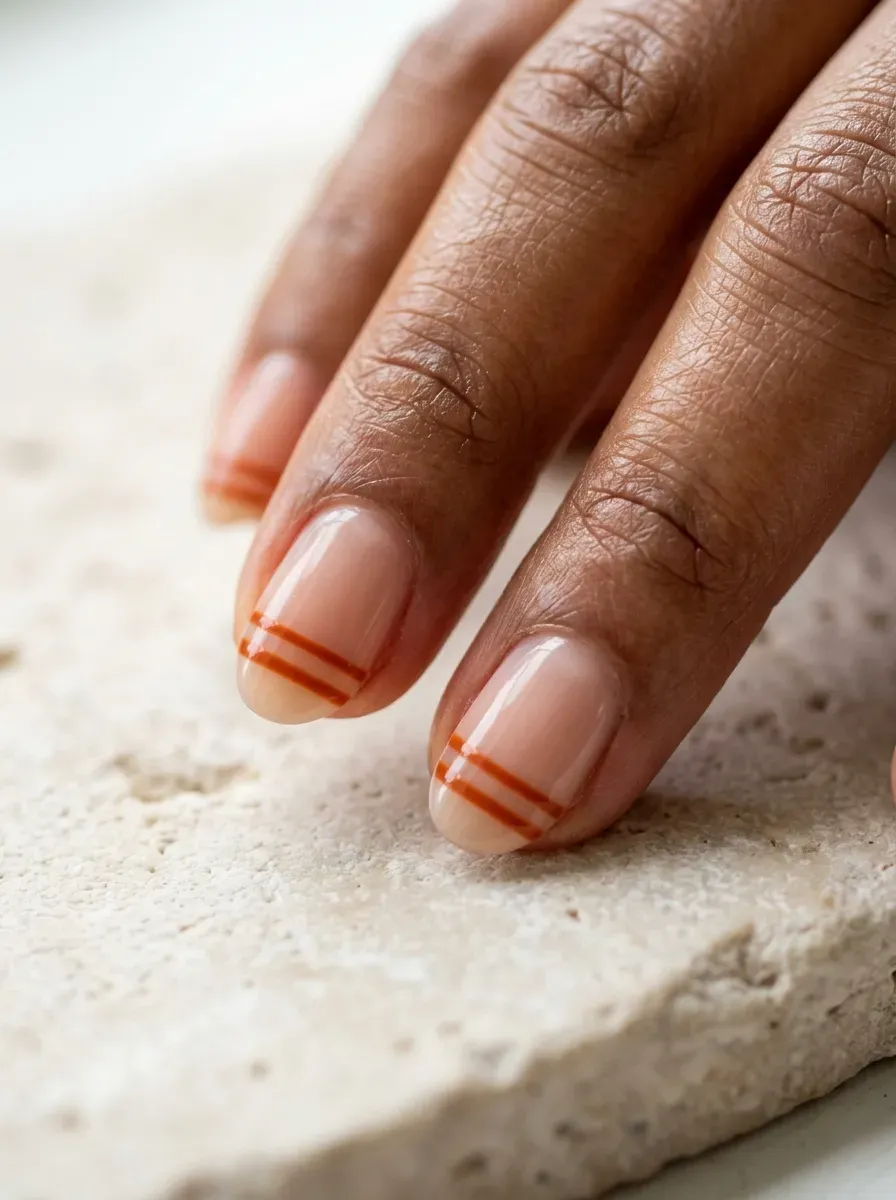
Two thin burnt orange lines run parallel near the tip instead of one solid block of color, creating a more graphic, layered take on the classic French shape.
Leaving a sliver of bare nail between the two lines is what makes this design read as intentional rather than like a mistake in application.
This detail needs a very steady hand or a striping brush loaded lightly with polish.
It photographs especially well in close-up, since the double line adds visual texture a single tip doesn’t have.
6. Diagonal Burnt Orange French Tips
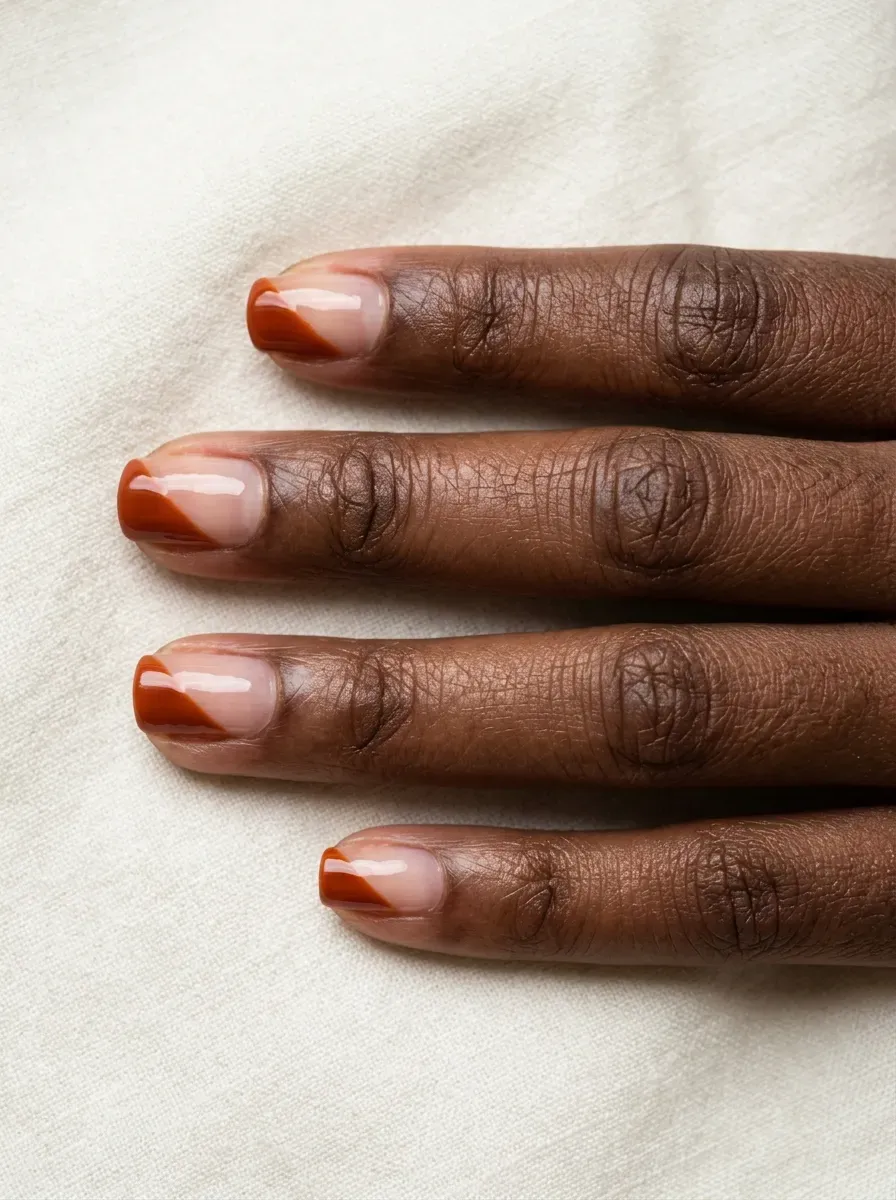
Instead of following the nail’s natural curve, this tip cuts across at a sharp diagonal angle, giving a familiar shape an unexpected, modern edge.
The angle should run the same direction across all ten nails for the set to look cohesive rather than random.
This design suits square or squoval shapes best, since the flatter tip gives the diagonal line more room to read clearly. Tape off the angle before painting for a crisp, straight result.
7. Negative Space Burnt Orange French Design
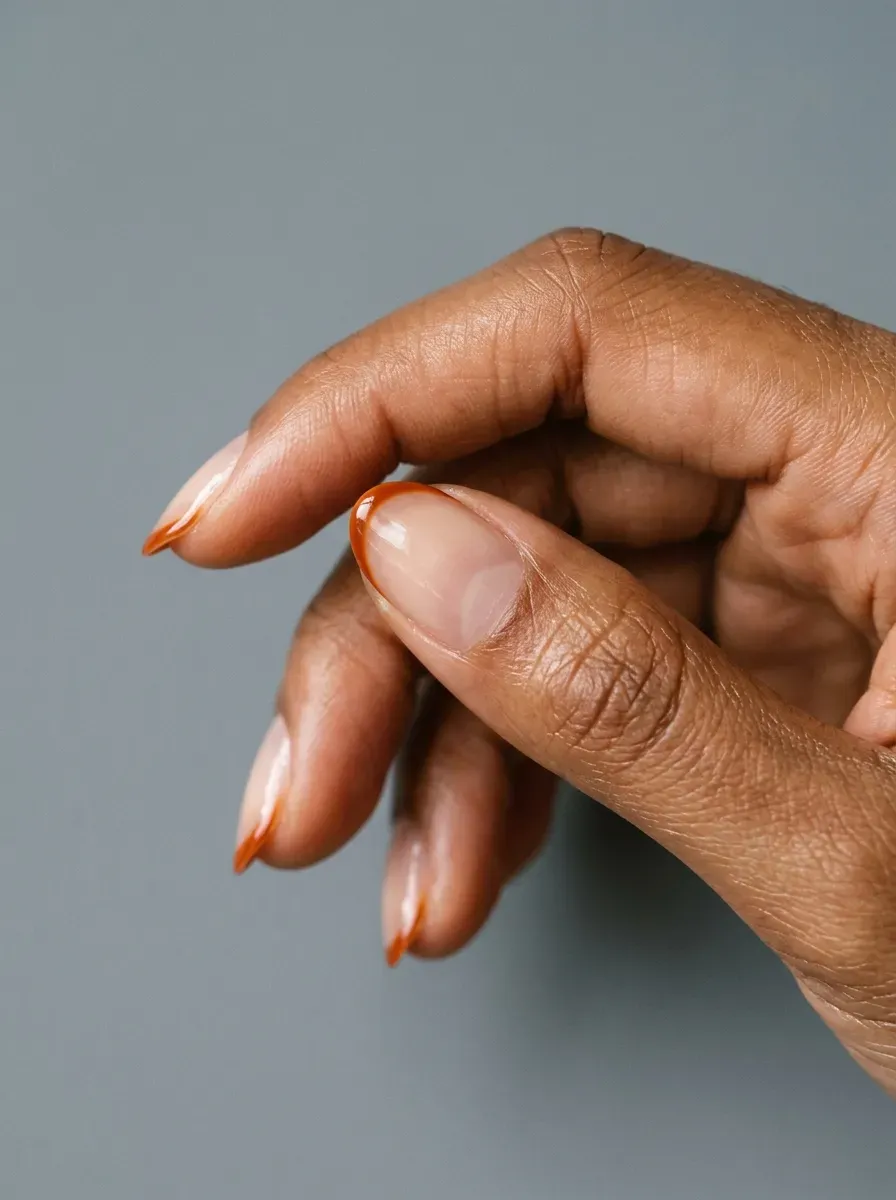
A thin burnt orange outline traces the tip’s edge while the space in between stays completely bare, letting the natural nail act as the second color in the design.
This version feels lighter and airier than a fully colored tip, since so much of the nail is left untouched.
This works best on nails with a naturally healthy, even nail bed, since bare space draws more attention to the nail itself.
A glossy topcoat over the whole nail, bare parts included, keeps the look cohesive.
8. Burnt Orange Tip Over a Milky White Base
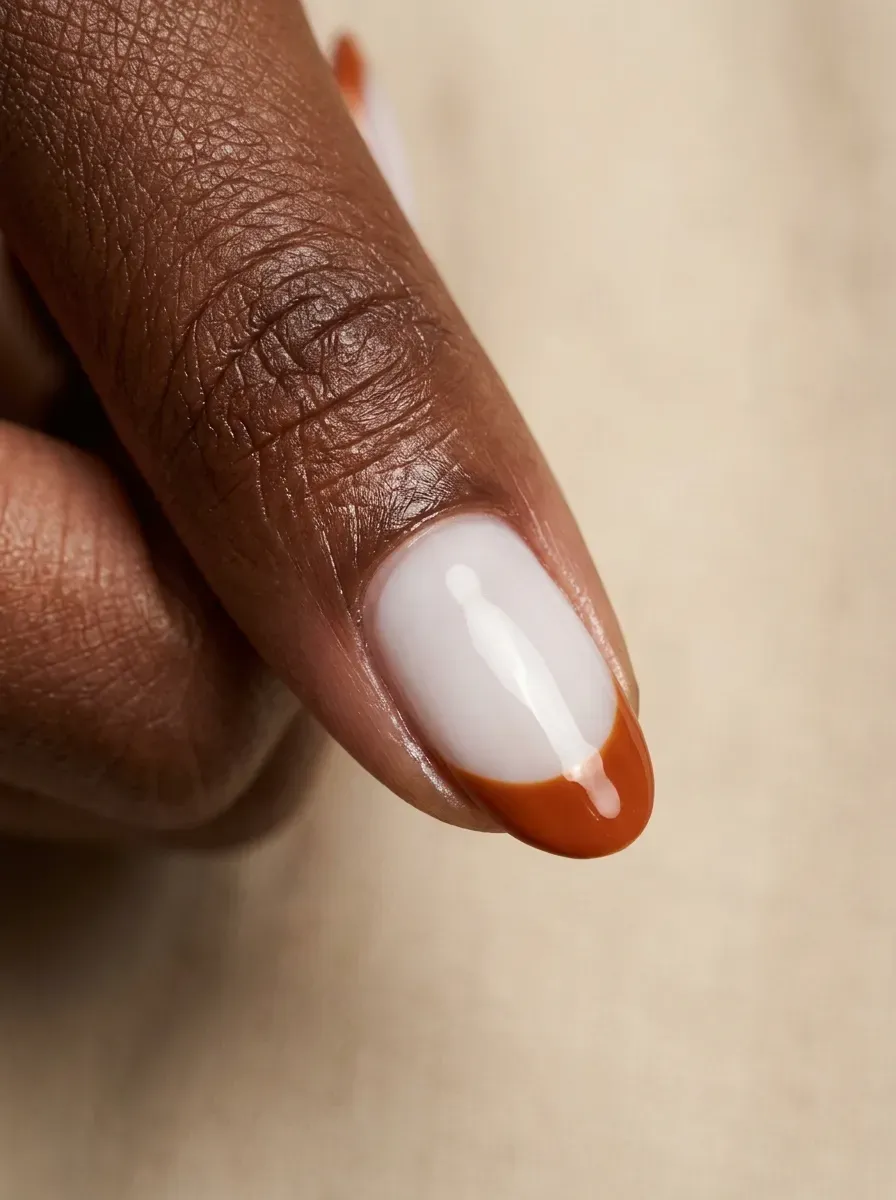
A soft, milky white base sits underneath the burnt orange tip instead of a bare or sheer nude, giving the whole nail a cloudier, more opaque look than a typical French.
This pairing feels fresher and more modern than the classic bare-nail French, since the milky base reads almost like a soft white polish rather than natural nail.
This combination works on any shape or length. Two thin coats of the milky base prevent it from looking streaky before the tip goes on.
Read now Zombie Nail Art Ideas for a Creepy Manicure
9. Burnt Orange Tip Over a Sheer Nude Base
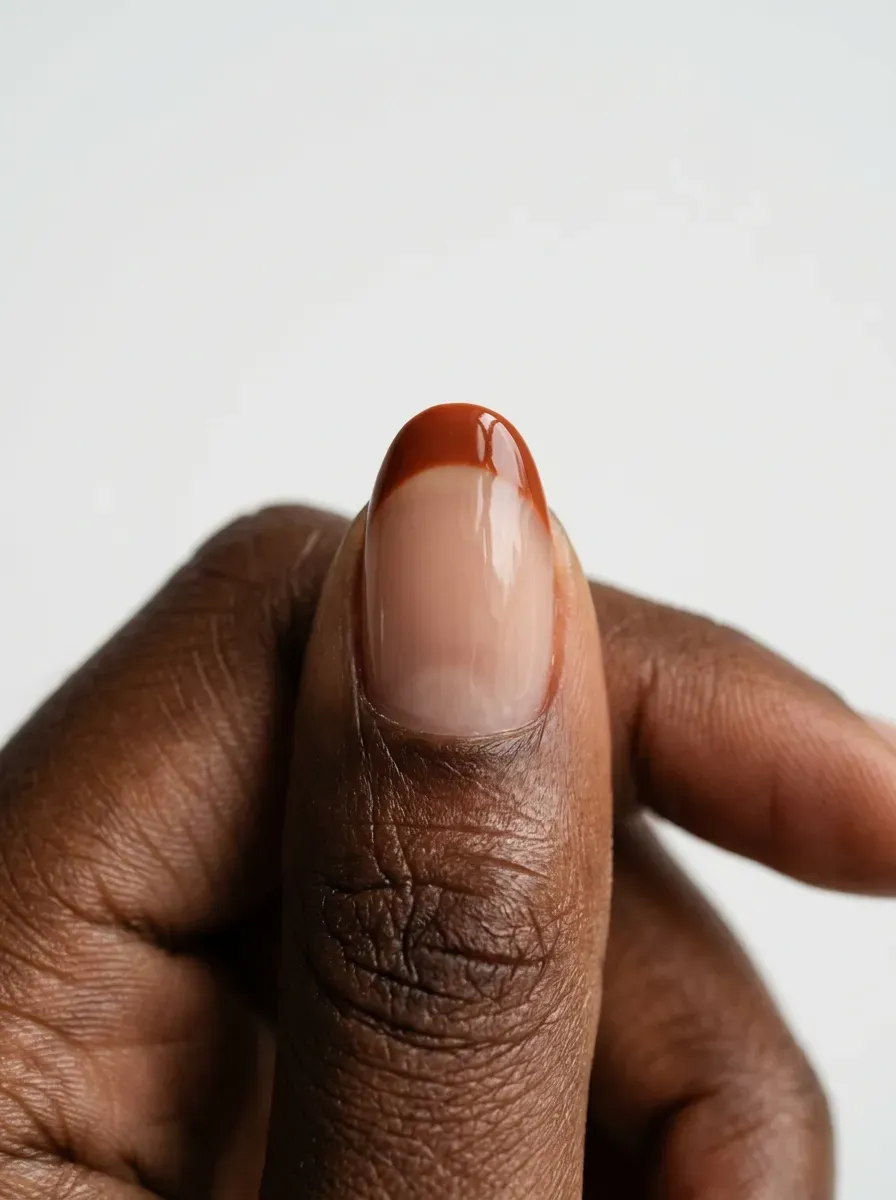
A sheer, barely-there nude base sits under the burnt orange tip, letting a hint of the natural nail show through rather than fully opaque coverage.
This version looks especially natural in photos, since the sheer base doesn’t compete with the tip color the way a fully opaque base sometimes can.
Choose a nude shade close to your actual skin tone rather than a generic pink-nude, since a poor match looks chalky against warmer undertones. One thin coat is enough, this base isn’t meant to be fully opaque.
10. Burnt Orange and Chocolate Brown Two-Tone French

Chocolate brown replaces the usual bare or nude base entirely, with burnt orange taking over just the tip, creating a fully two-toned, richer version of the French shape.
This combination reads more autumnal than almost any other pairing on this list, since both colors sit firmly in the same warm, earthy family.
This works particularly well on medium to long nails, giving both colors enough surface to show clearly. Matte finish on the brown base makes the glossy orange tip pop even more by contrast.
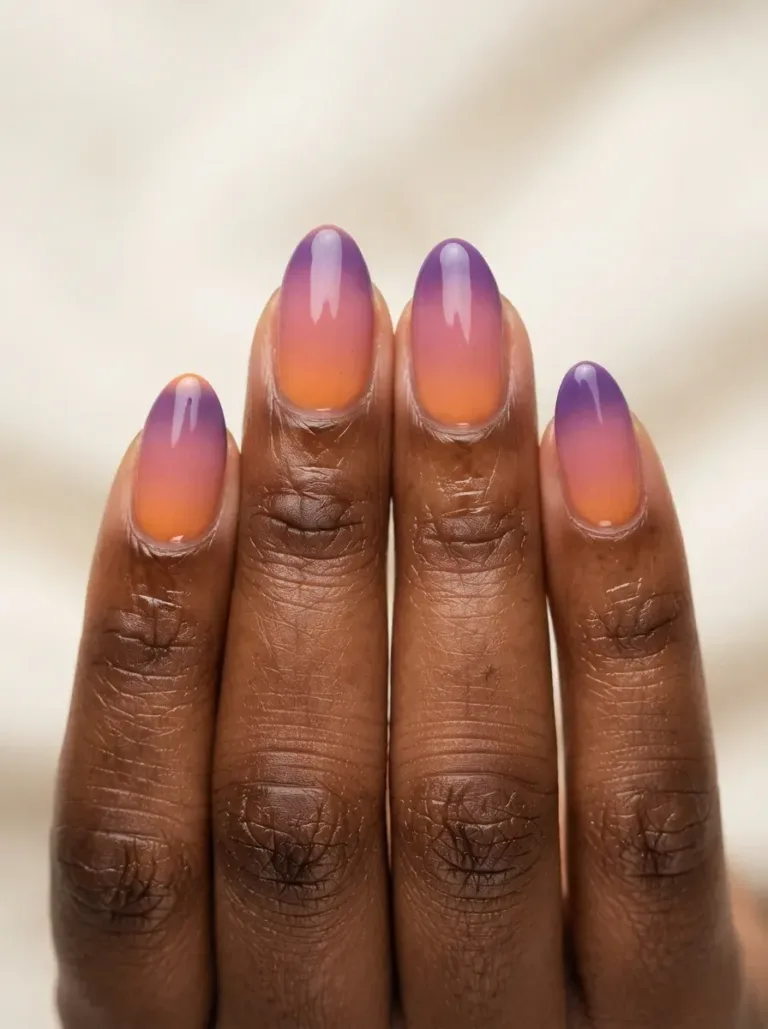
11. Burnt Orange Ombre French Fade
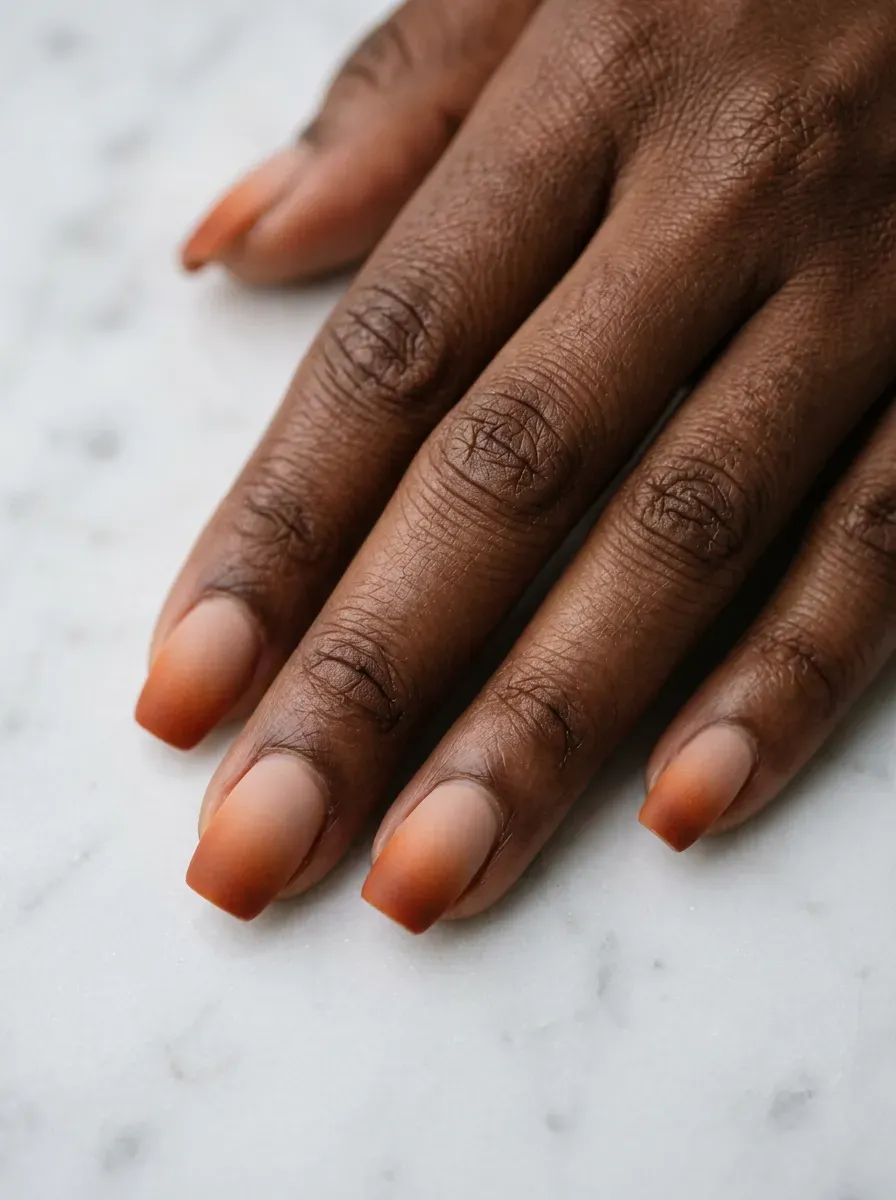
Instead of a hard tip line, the color fades gradually from a nude or bare base into burnt orange, blurring the boundary a traditional French keeps sharp.
A makeup sponge, rather than a brush, blends this transition far more evenly than trying to paint a soft gradient by hand.
This version suits anyone who finds a crisp French tip too stark, since the fade feels softer and more forgiving of imperfect symmetry. Building the fade in thin layers avoids a muddy transition zone.
12. Matte Burnt Orange French Tips
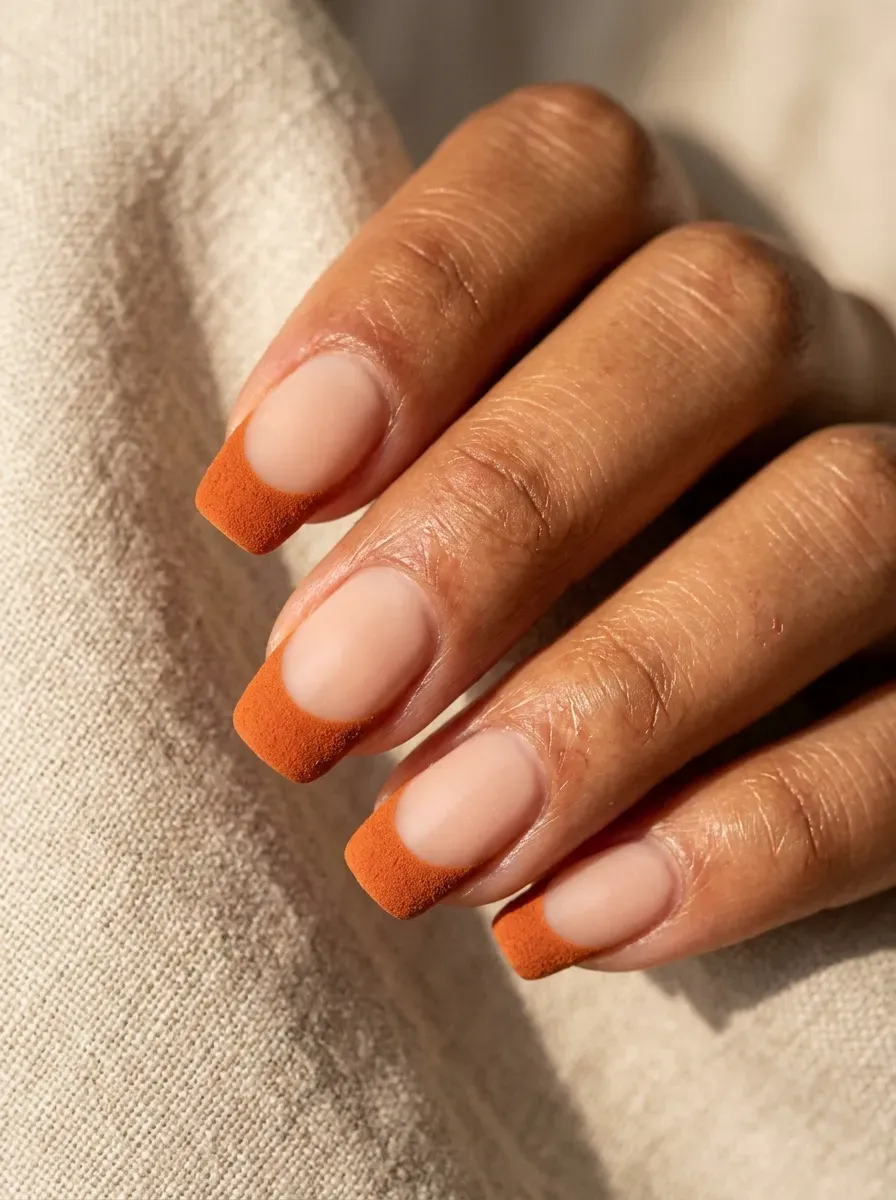
A matte topcoat over the burnt orange tip strips away shine, giving the color a flatter, more muted quality that reads closer to suede than polish.
This finish makes the color look slightly darker and more grounded than the same shade in gloss, which suits the moodier end of the fall palette especially well.
Matte tips show fingerprints and light scuffing more easily than glossy ones, so a gel-based matte topcoat holds up better than a spray-on version for everyday wear.
13. Glossy Chrome Burnt Orange French Tips

Chrome powder buffed over the burnt orange tip gives it a metallic, mirror-like shine instead of a standard glossy finish, adding real dimension to an otherwise classic shape.
The metallic sheen catches light differently depending on the angle, which gives this version more visual movement than a flat, single-finish tip.
This works best on a fully cured gel tip, since chrome powder needs a completely smooth, tack-free surface to adhere evenly. A strong non-wipe topcoat protects the chrome from scuffing.
See now 10 Painful Signs Your Partner Doesn’t Love You Anymore (2026 Guide)
14. Micro French Burnt Orange Tips
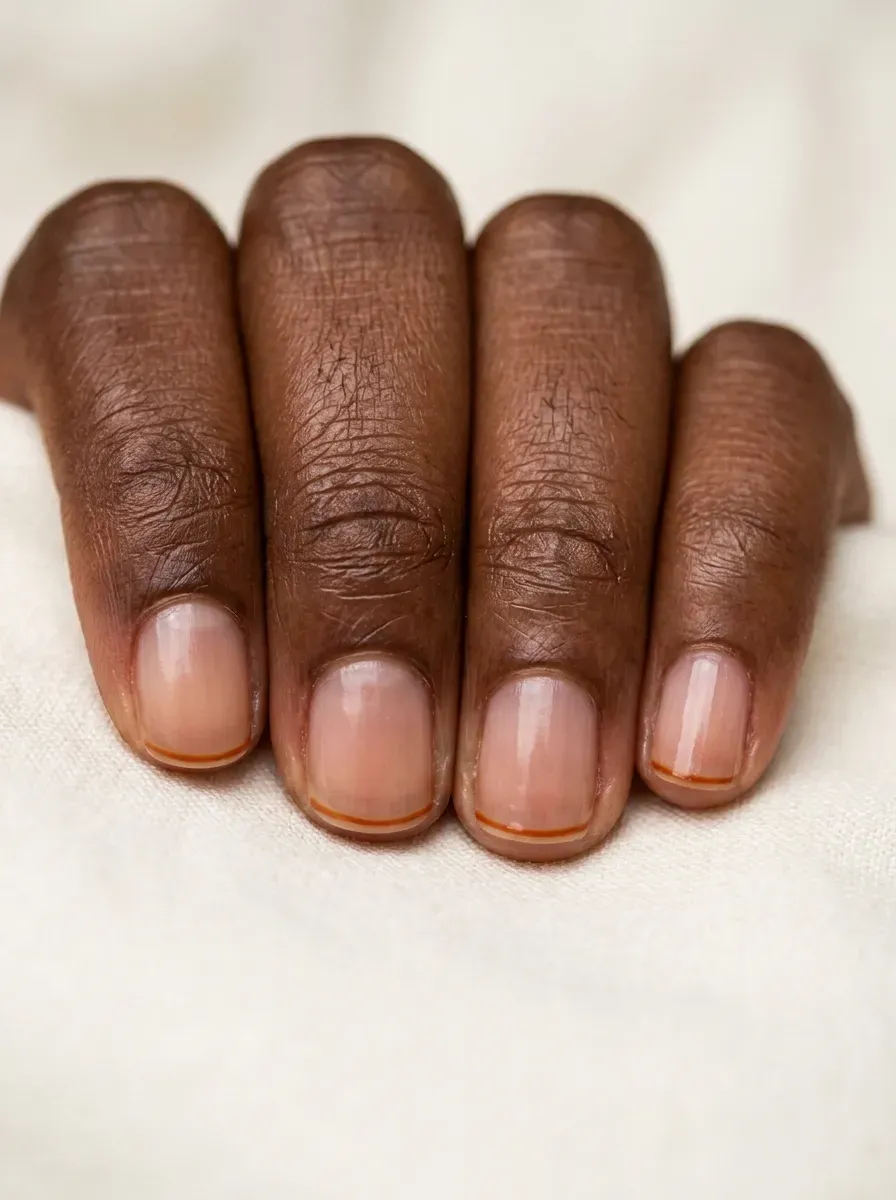
A micro French tip shrinks the color down to the barest possible line, just a few millimeters of burnt orange right at the free edge.
This version suits shorter, more natural nails especially well, since a wider tip can look disproportionate on a shorter nail bed.
This detail takes a very light hand and a fine detail brush, since even a slightly thick line loses the micro effect. A single thin coat is enough; building up color here just widens the line unintentionally.
15. Extended Thick Burnt Orange French Tips
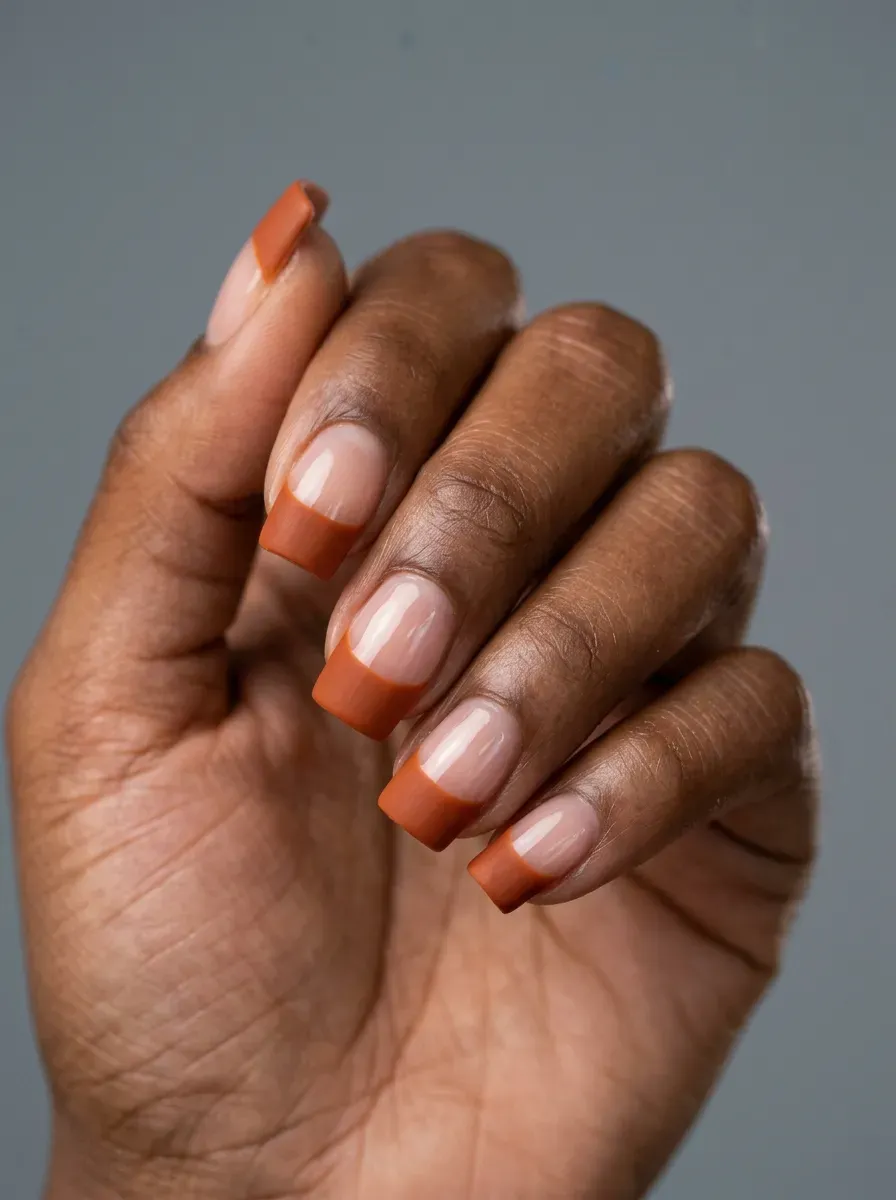
This version takes the opposite approach from a micro tip, extending the burnt orange color up nearly half the nail for a bold, unmissable French reinterpretation.
The wider color block reads more like a color-dipped nail than a traditional tip, giving it a more editorial, statement-making feel.
This needs some nail length to look balanced rather than overwhelming.
A steady, straight line across all ten nails matters even more here, since any unevenness is more visible across a wider color block.
16. Burnt Orange French Tips with Gold Foil Flecks
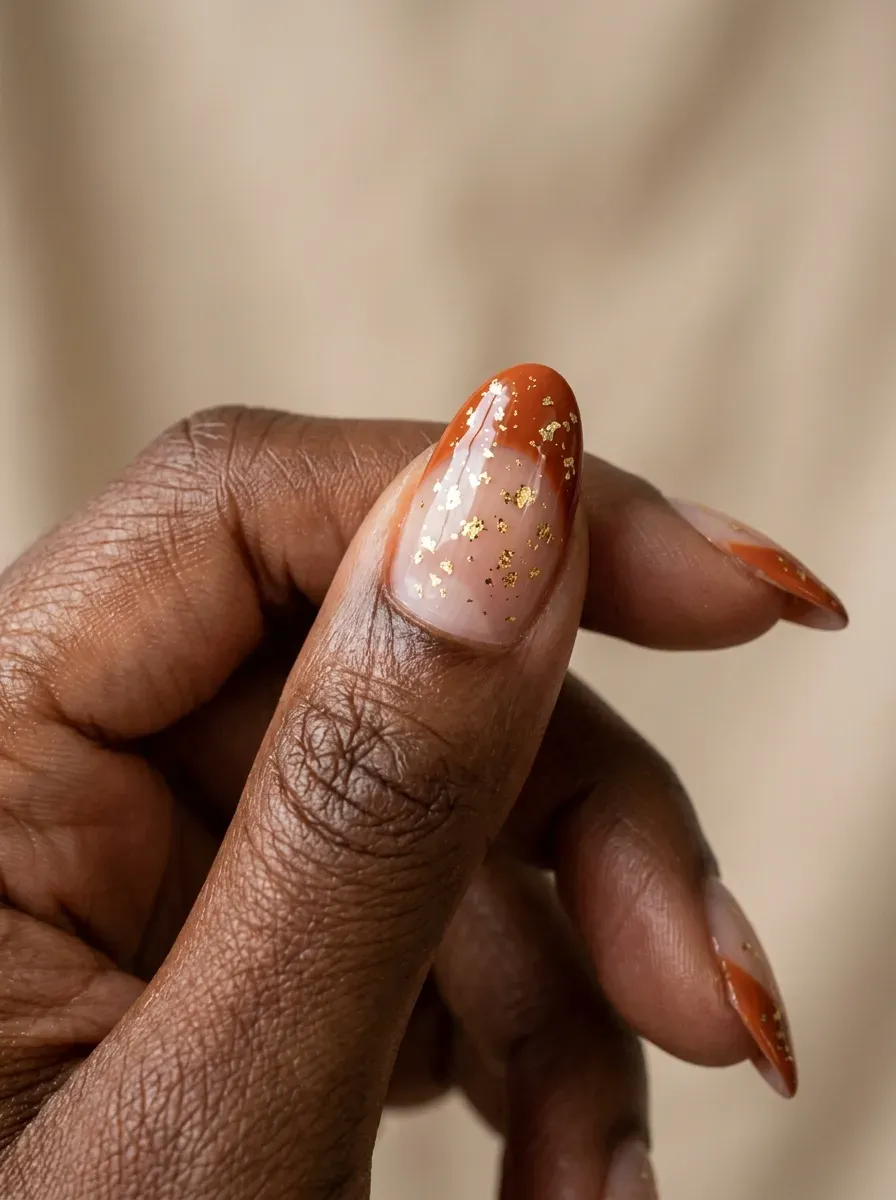
Tiny gold foil flecks scatter across the burnt orange tip, catching light unevenly for a texture that looks closer to hammered metal than smooth polish.
This detail adds just enough sparkle for the cooler months without going full glitter, keeping the design still wearable for daytime.
Applying the foil while the topcoat is still slightly tacky, rather than fully dry, helps the flecks adhere without needing extra glue. A sealing topcoat afterward keeps them from lifting.
17. Burnt Orange French with a Thin Gold Outline
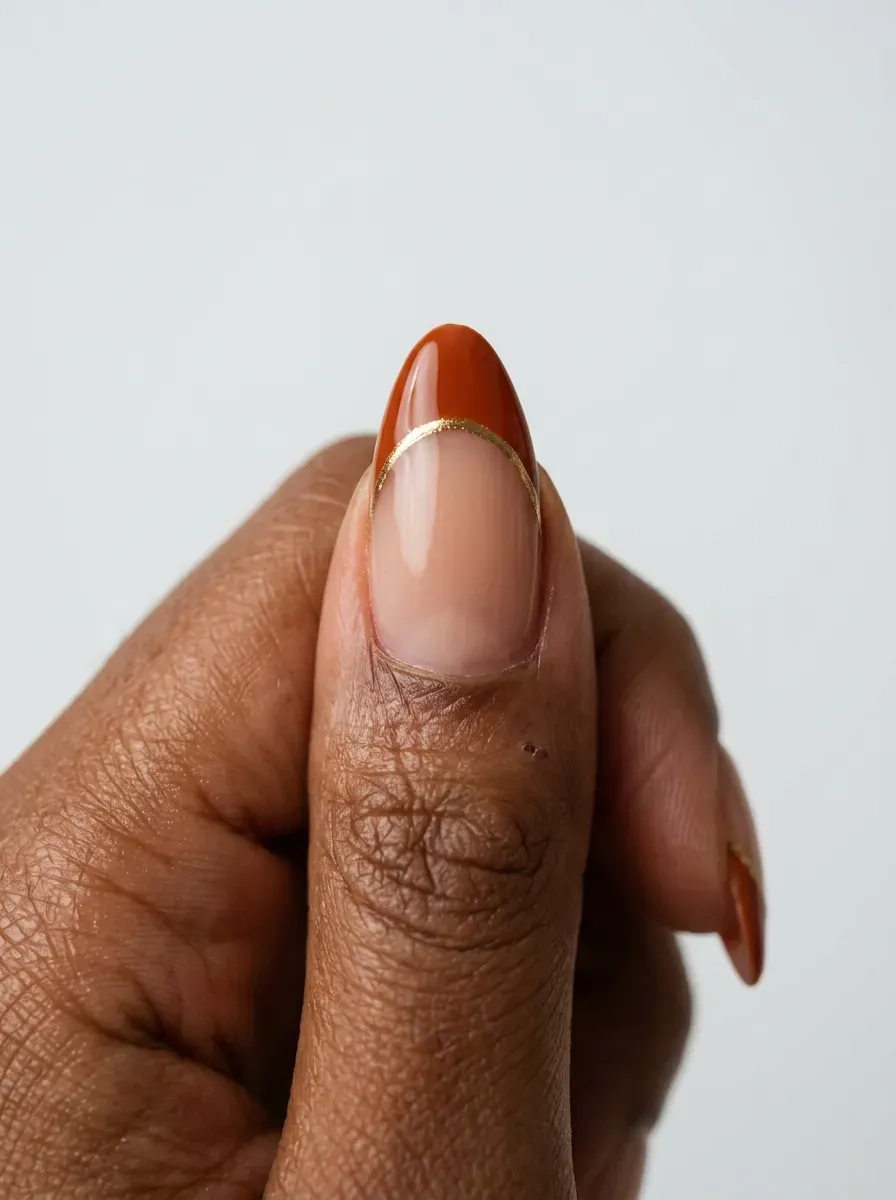
A single thin gold line traces the top edge of the burnt orange tip, separating it from the base color with a clean, jewelry-like detail.
This small addition makes a fairly simple French design feel more finished and considered, without adding much extra time to the manicure.
A striping brush or a gold nail art pen makes this line easiest to control. Keep the gold thin, since a thick metallic line starts to compete with the tip color instead of framing it.
18. Reverse French, Burnt Orange at the Cuticle
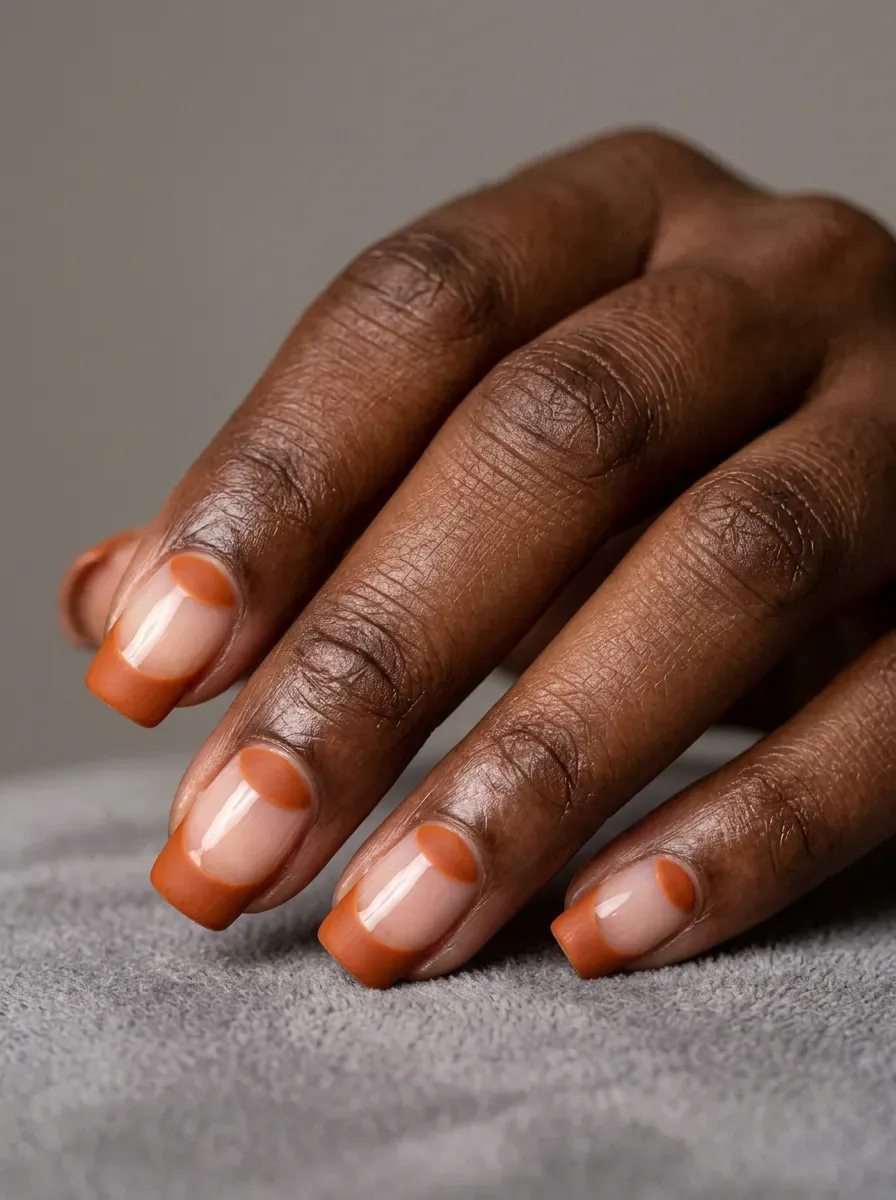
This design flips the classic French entirely, placing the burnt orange color in a crescent at the cuticle instead of at the tip, with the rest of the nail left bare or sheer.
The reverse placement draws the eye toward the base of the nail rather than the free edge, which changes the whole visual rhythm of the design.
A dotting tool or a curved nail art brush gives the cleanest half-moon shape here.
This design works especially well on shorter nails, where a standard tip French has less room to work with.
19. Burnt Orange French Tips with a Single Accent Nail

Nine nails carry a subtle, thin burnt orange French tip while one accent nail, usually the ring finger, goes fully solid in the same color.
This contrast gives the set a clear focal point without making every nail compete for attention at once.
This approach works well for anyone hesitant about a full-color commitment but still wanting more than a thin line somewhere in the set.
Keep the accent nail’s finish, matte or glossy, consistent with the tips for a cohesive look.
See also 30+ Matching Halloween Nails for Couples and Best Friends
20. Burnt Orange French Tips with a Fall Leaf Accent
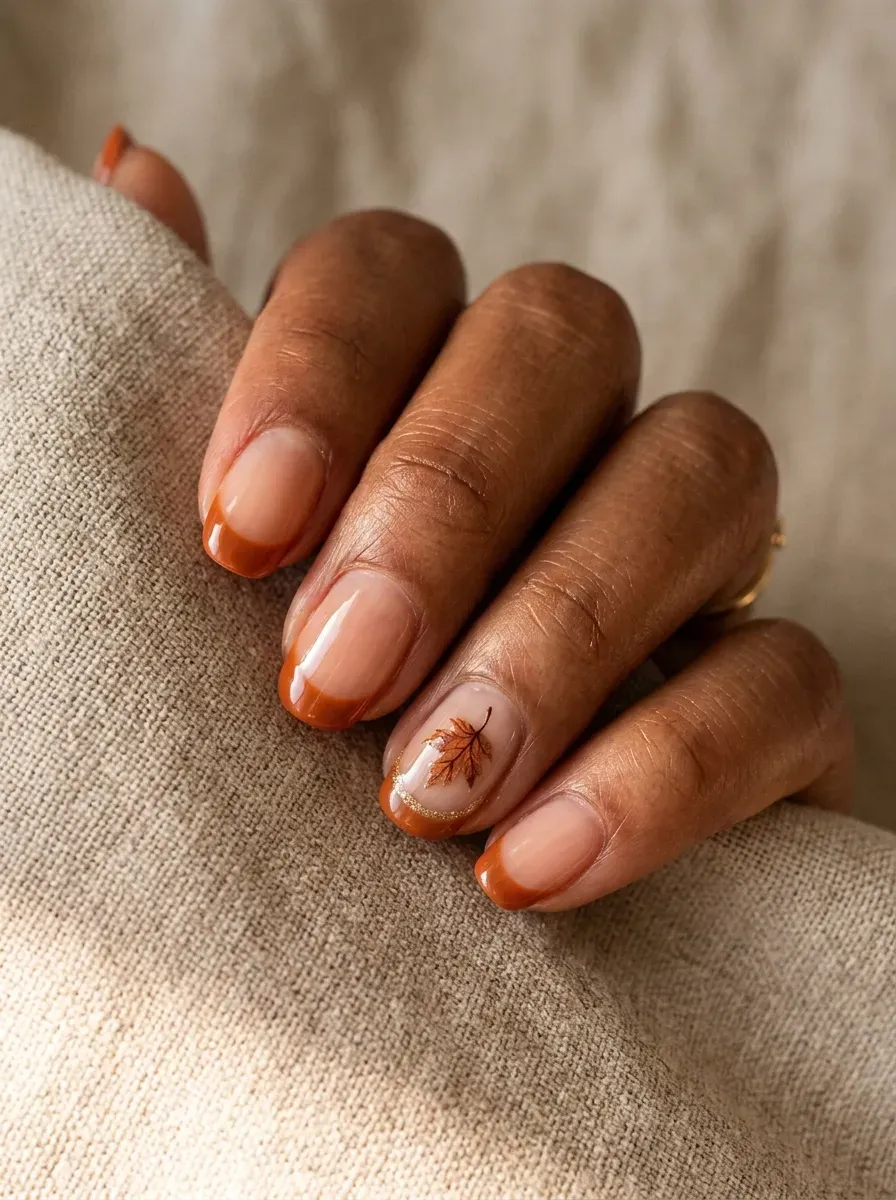
A single small leaf, painted in a slightly deeper rust or brown, sits near the cuticle of one accent nail while the rest of the set keeps a clean burnt orange tip.
One leaf reads as a seasonal detail rather than a full autumn theme, keeping the overall set still wearable outside of October specifically.
A fine detail brush keeps the leaf’s veins thin and delicate rather than clumsy. Limiting this to one nail is what keeps the whole set from looking like a costume design.
21. Burnt Orange and Cream Checkerboard French
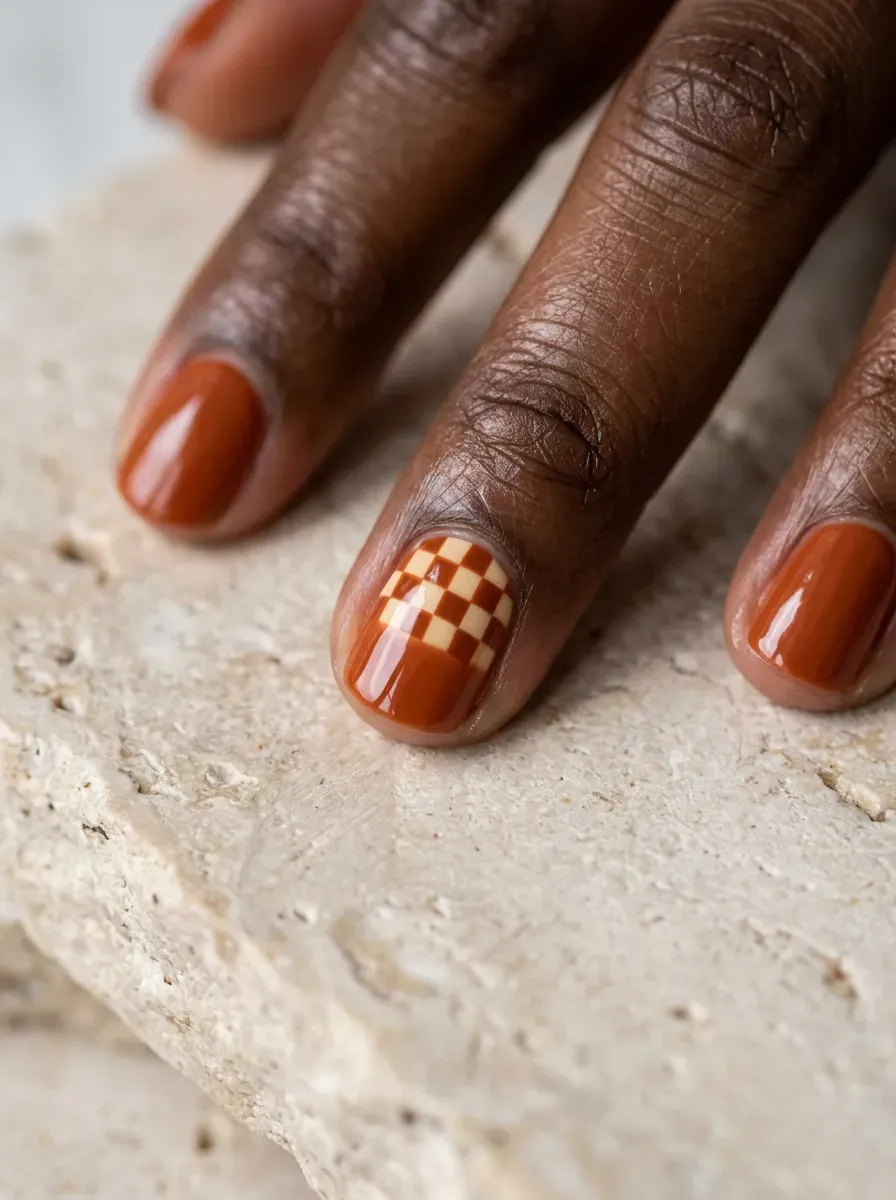
A small checkerboard pattern in burnt orange and cream replaces a portion of the tip, adding a graphic, playful detail to an otherwise classic shape.
Keeping the checkerboard scaled down and confined to one or two accent nails prevents the pattern from overwhelming the rest of the set.
A checkerboard nail vinyl makes the squares far more even than attempting them freehand.
Pair this accent with plain burnt orange tips on the remaining nails to keep the set balanced.
22. Smoky Burnt Orange French Fade

Gray blends into burnt orange in a soft, smoky fade rather than a clean line, giving the classic French tip a hazier, more atmospheric quality.
This pairing works because gray cools down burnt orange’s warmth just enough to keep the combination from reading too bright or costume-like.
A sponge or brush-blending technique keeps the transition soft rather than banded.
This fade suits both matte and glossy finishes equally well, so it’s a flexible choice depending on your preferred look.
23. Burnt Orange French Tips with Subtle Shimmer
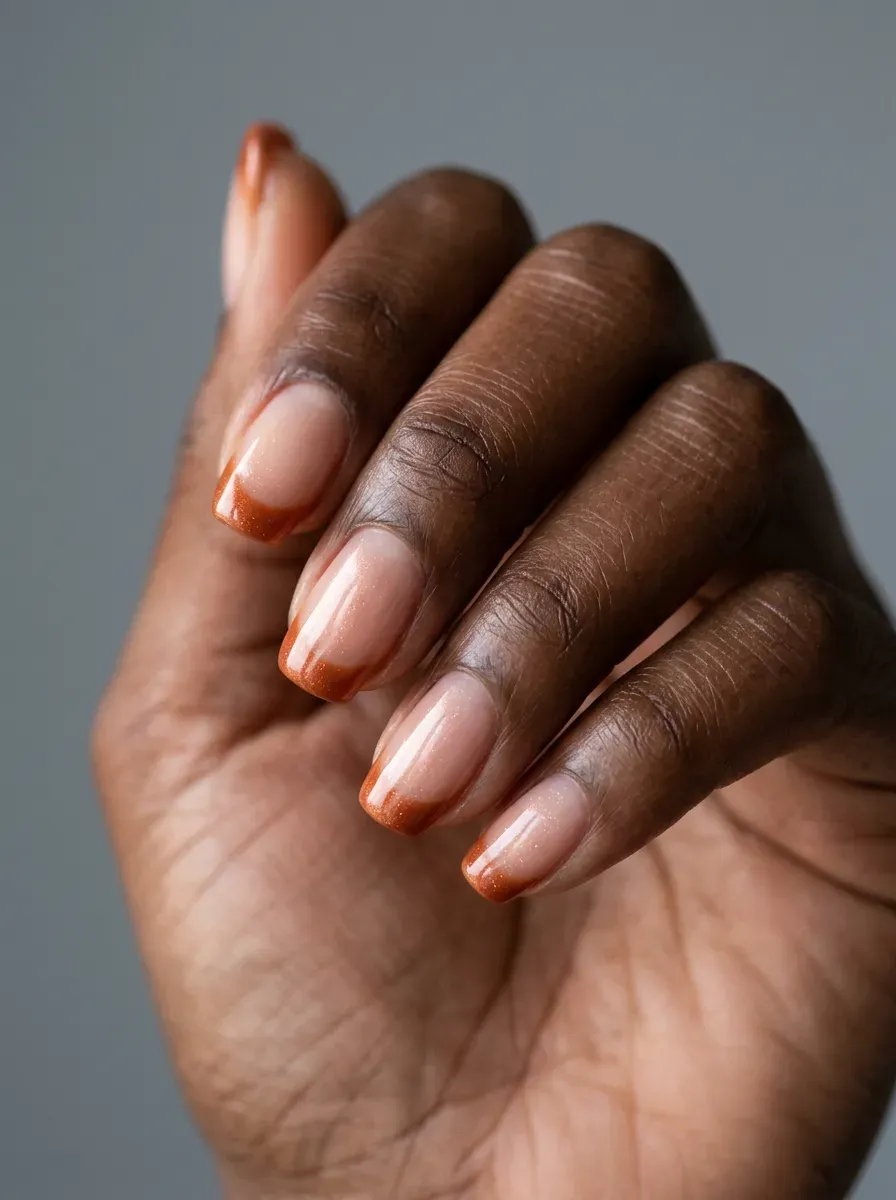
Fine shimmer particles mixed into the burnt orange polish catch light quietly rather than throwing off an obvious sparkle, keeping the look office-appropriate while still feeling a little dressed up.
This version photographs beautifully under natural light, where the shimmer reads as warmth rather than glitter.
A shimmer-specific topcoat, rather than a glitter topcoat, gives this fine, subtle effect without any chunky texture. Two coats build enough shimmer density without needing a third layer.
24. Round Shape Burnt Orange French Tips
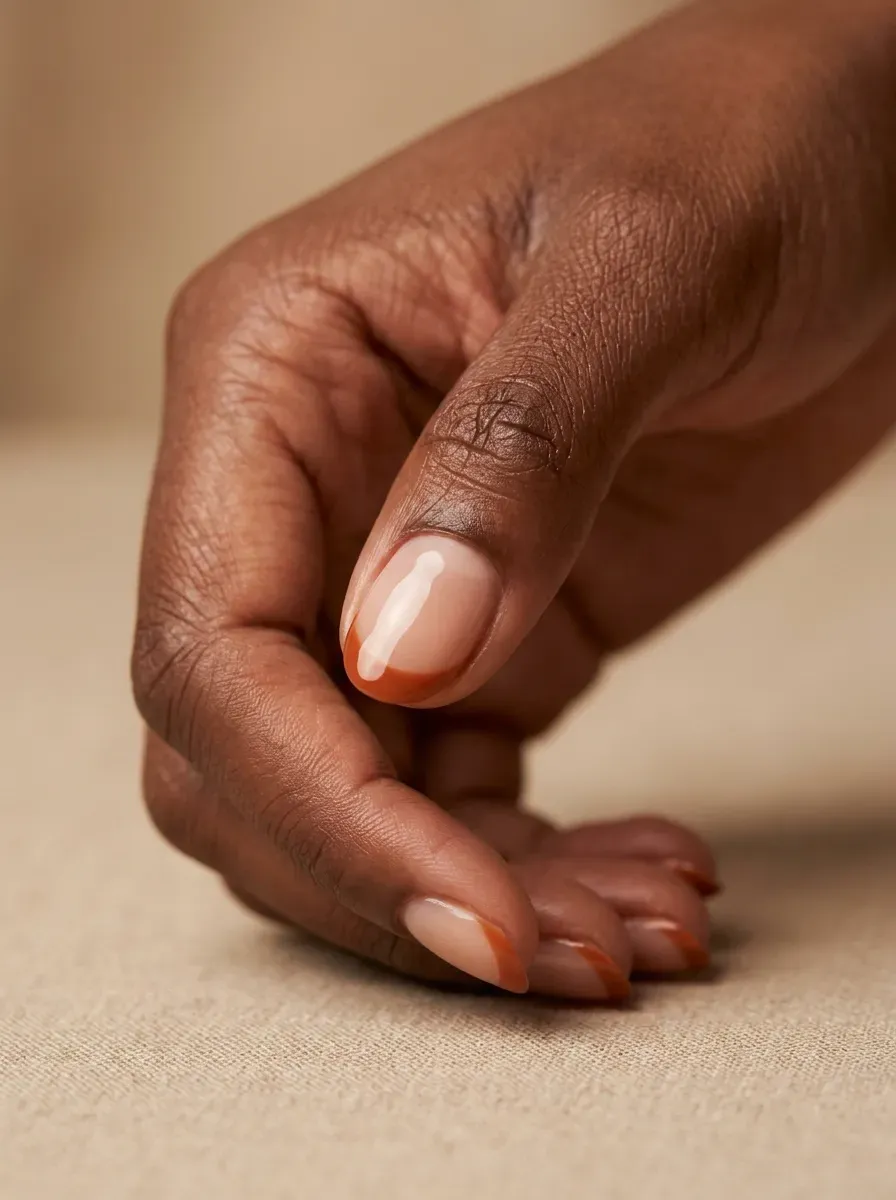
Round shape keeps the whole nail soft and curved, giving a burnt orange tip a gentle, rounded edge instead of any sharp lines.
This shape is one of the lowest-maintenance options here, since round tips grow out more gracefully than squared or pointed shapes.
Short to medium length suits round shape best, keeping proportions balanced.
This design works especially well for anyone who spends a lot of time typing or working with their hands, since the shape catches on fewer things throughout the day.
Check out 25 Back-to-School Nails to Start the Year Right
25. Stiletto Shape Burnt Orange French Tips
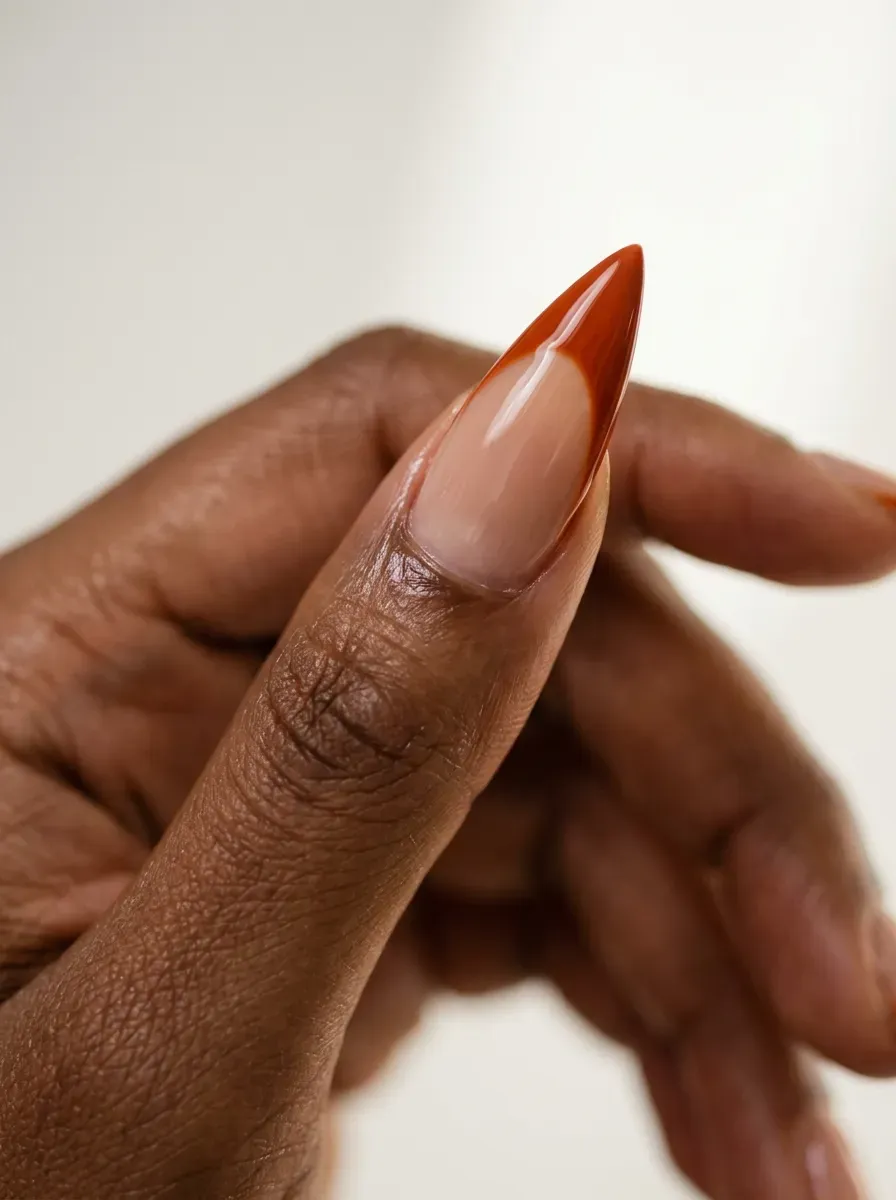
Stiletto shape’s sharp point gives burnt orange a dramatic, elongated tip to sit against, making this one of the boldest, most editorial takes on the trend.
The pointed shape draws the eye straight to the tip, which makes the color placement feel even more intentional than on a rounder shape.
This shape requires significant length and typically acrylic or gel extensions to achieve safely.
Expect a shorter practical wear window for everyday tasks, since the pointed tip is more prone to catching or chipping than a rounder shape.
26. Ballerina Shape Burnt Orange French Tips

Ballerina, or coffin-adjacent, shape tapers narrower than a full coffin but still ends in a flat tip, giving burnt orange a slightly softer, more wearable version of that bold, straight-edge look.
This shape splits the difference between dramatic and practical, appealing to anyone who wants a statement shape without going as extreme as stiletto or full coffin.
Medium to long length suits this shape best. Keep the flat tip edge slightly rounded at the corners rather than perfectly sharp, since sharp corners catch and chip first.
27. Short Square Burnt Orange French Tips
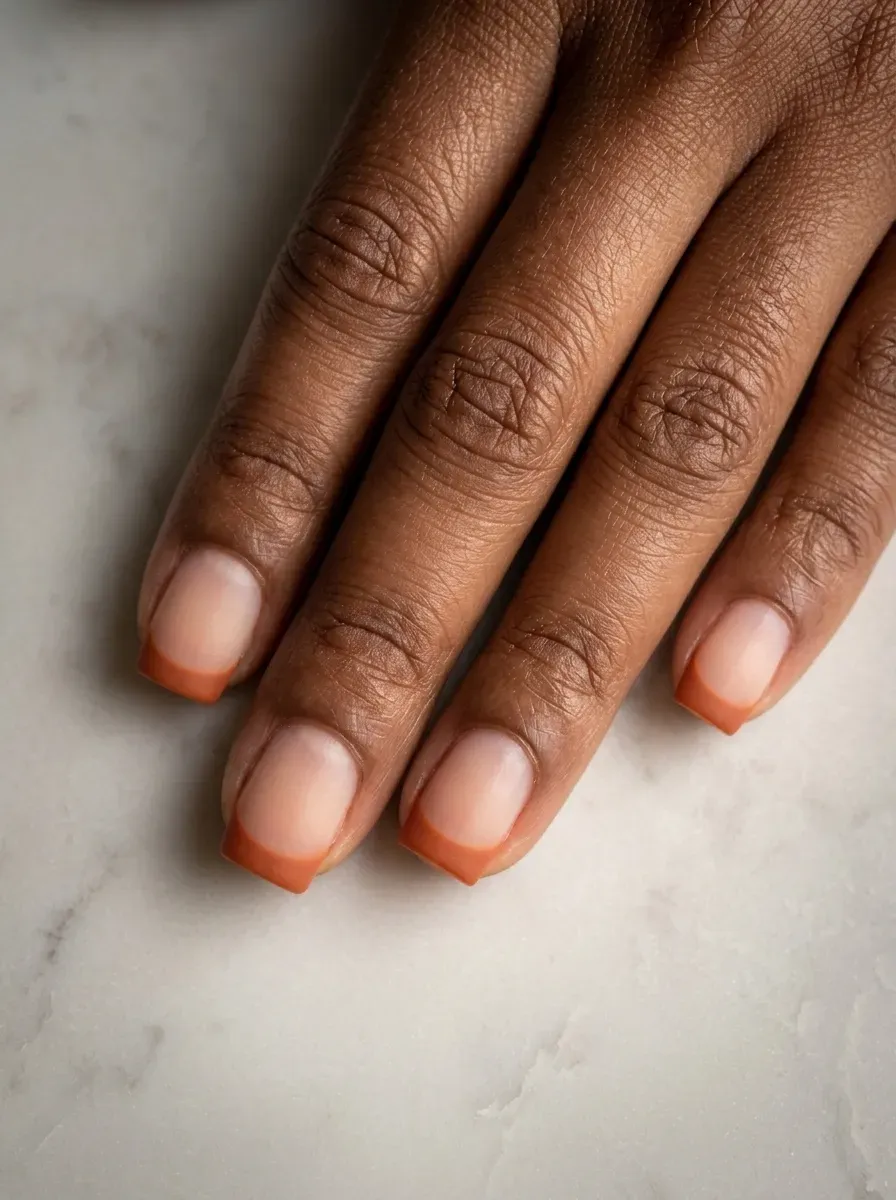
Short square shape keeps this whole look practical and low-maintenance, with a crisp, straight burnt orange tip that suits everyday hand use without sacrificing style.
This combination tends to be the most requested version for anyone returning to gel after a break, since short square is quick to apply and easy to maintain between fills.
A straight tip line matches this shape’s flat edge better than a curved one.
This length and shape combination typically holds up two to three weeks without much visible wear.
28. Burnt Orange French Tips with a Thin Black Outline
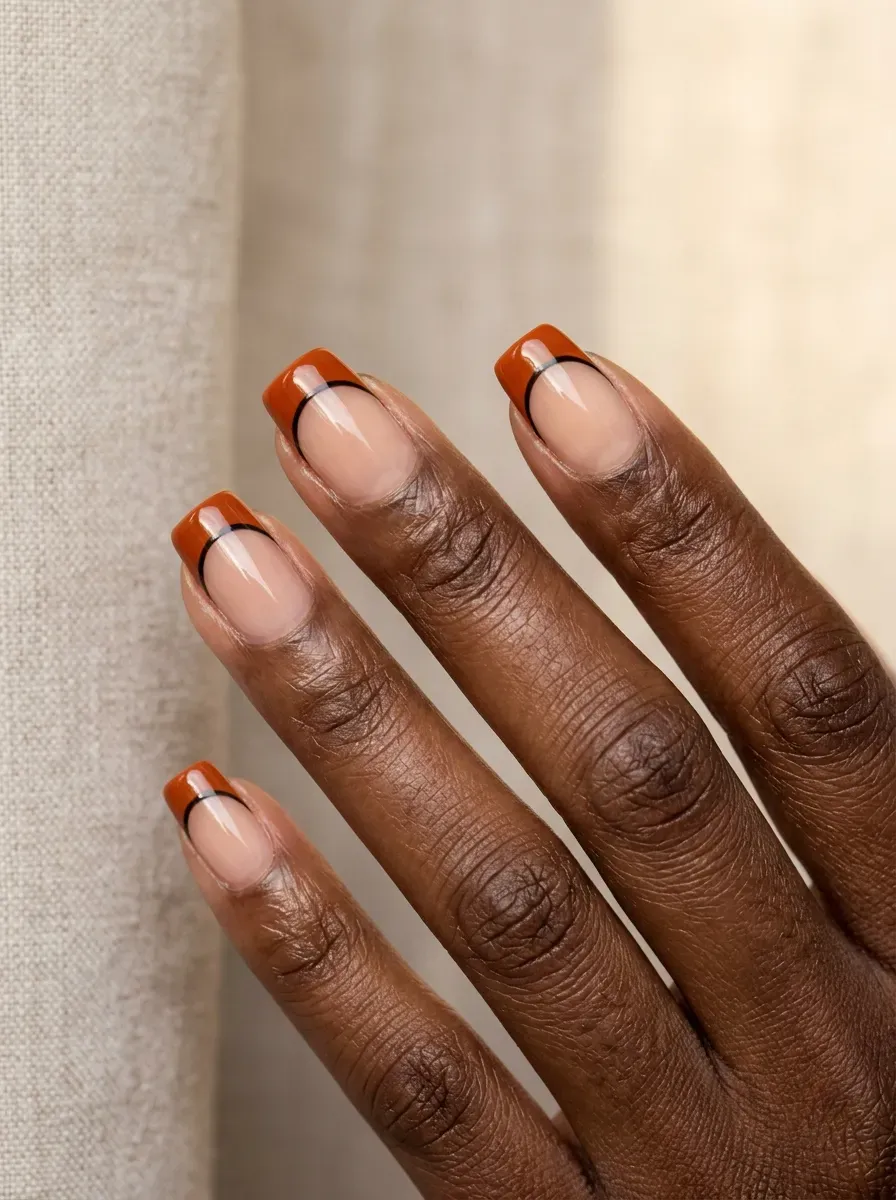
A fine black line traces the edge of the burnt orange tip, adding graphic contrast and making the tip’s shape read more crisply than color alone.
This detail gives an otherwise soft, warm color palette a bit of an edge, closer to a fashion-forward design than a classic French.
A striping brush loaded with only a small amount of black polish keeps this line thin and controlled.
This design photographs especially well in close-up, since the contrast reads clearly even at a distance.
29. Burnt Orange and Burgundy Blended French

Burnt orange and burgundy blend together at the tip rather than staying as two distinct colors, creating a rich, wine-toned gradient that reads as one of the moodier options on this list.
Both colors share enough warmth that they blend smoothly rather than looking muddy at the transition point, unlike some color pairings.
A sponge technique blends this combination more evenly than trying to paint a soft transition by hand.
This pairing suits deeper, cooler evenings and dressier occasions especially well.
Read now European Summer Baches: 20 Dreamy Ideas for the Ultimate Girls Trip
30. Glazed Donut Burnt Orange French Tips

A high-shine, glass-like topcoat over the burnt orange tip creates the glazed donut effect that trended under a lighter color palette, just reworked here in a deeper, autumnal shade.
This finish depends heavily on topcoat quality, since a lower-quality formula won’t build the same glassy depth.
Burnt orange holds up particularly well under this heavy shine, since the color stays rich rather than washing out the way paler shades sometimes do under a thick glaze. Two thin topcoat layers give more depth than one thick one.
31. Burnt Orange French Tips with Freckled Speckles
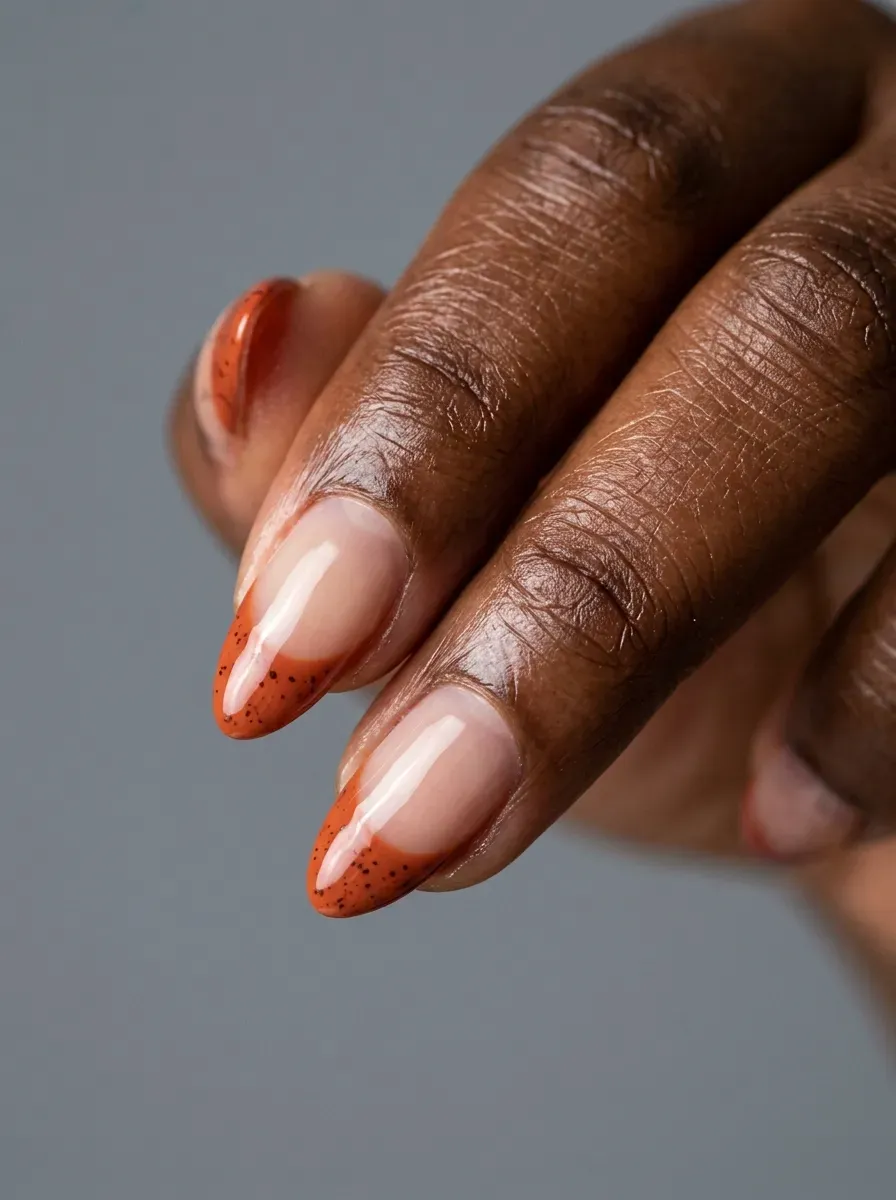
Fine brown speckles, flicked onto the wet burnt orange tip using a dry brush technique, add a freckled, sun-kissed texture instead of a flat, single-tone color.
Varying the speckle density slightly from nail to nail keeps the effect looking natural rather than mechanically repeated.
A stiff, short-bristled brush produces finer, more controlled speckles than a standard polish brush.
This texture holds up well day to day, since small surface marks blend into the speckled pattern rather than standing out.
32. Asymmetric Burnt Orange French Tips

Each nail’s tip line sits at a slightly different height or angle rather than matching evenly across the hand, giving this version a deliberately imperfect, artistic quality.
This works because the asymmetry is consistent in its inconsistency, every nail looks intentionally different rather than like a mistake on just one.
This design suits shorter, uniform nail shapes best, since the asymmetry reads more clearly against a simple base shape.
Plan the variation before starting so the whole set feels cohesive rather than random.
33. Burnt Orange French Tips Over a Taupe Base

A muted, grayish taupe base sits underneath the burnt orange tip instead of a warmer nude, cooling down the overall palette just slightly for a more sophisticated result.
This pairing works especially well for anyone who finds a fully warm-toned French a little too sweet or bright for their taste.
Taupe suits cooler undertones particularly well, balancing out burnt orange’s inherent warmth. Two coats of taupe give full, even coverage before the tip color goes on.
34. Wide Burnt Orange French Tips
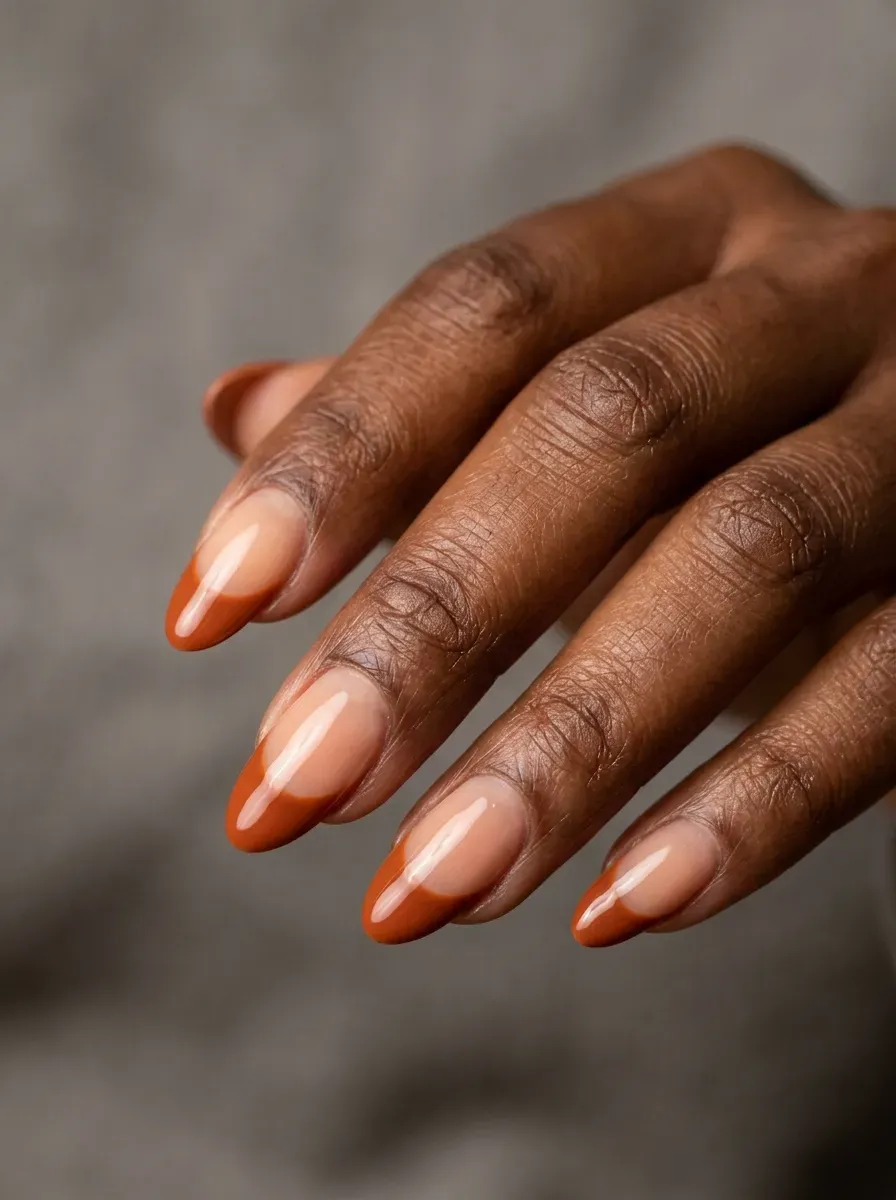
A wide tip line extends noticeably further up the nail than a classic French, turning the color into a real focal point rather than a subtle accent.
This version works well on medium to long nails, where the extra surface area keeps the wider tip from looking disproportionate.
A consistent width across all ten nails matters most here, since any variation in tip height is more noticeable with a bolder proportion. Tape guides help keep the line even across the whole set.
35. Burnt Orange French Tips with a Thin White Line Between Colors
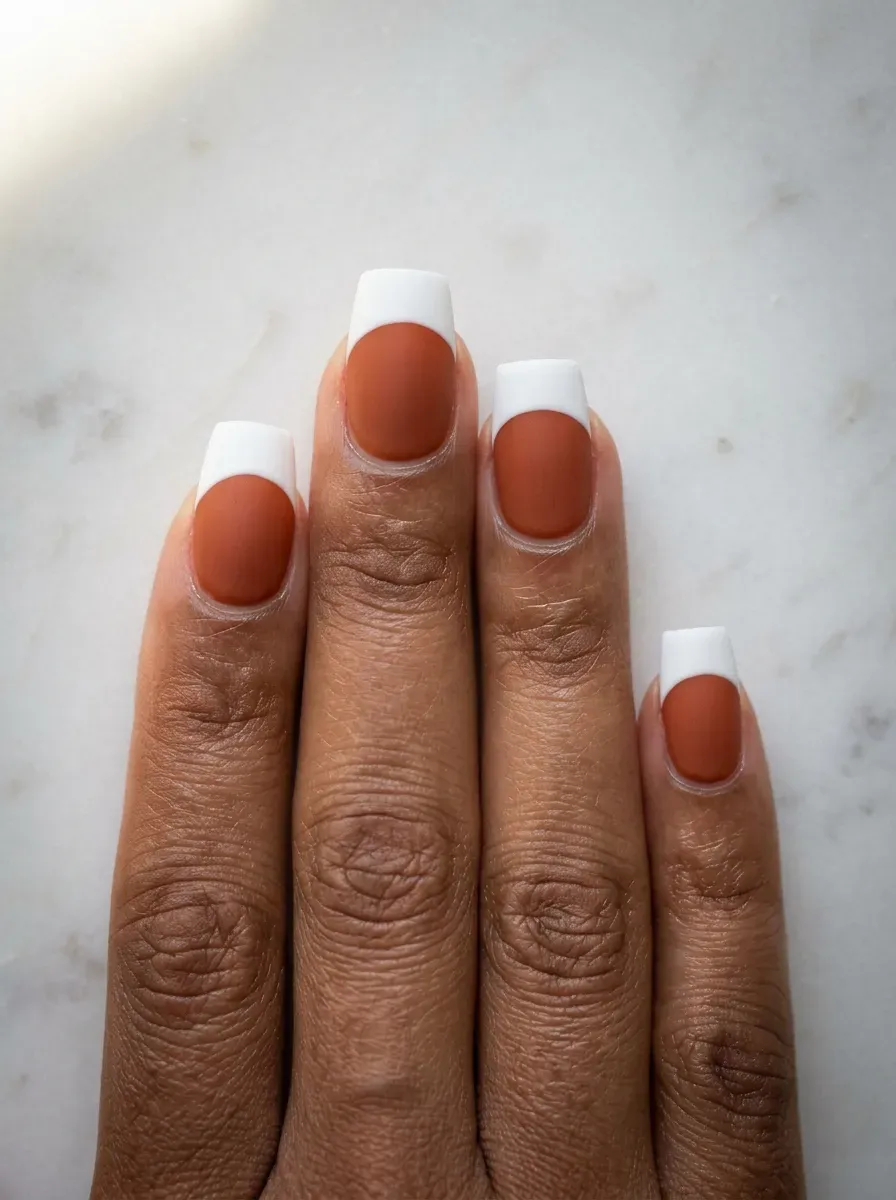
A crisp, thin white line separates the base color from the burnt orange tip, adding a graphic break between the two shades instead of a direct transition.
This detail borrows from a technique often seen in colorful French manicures, giving a fall palette the same playful structure.
A striping brush or a fine detail pen keeps this line thin and even.
This design works especially well over a deeper base color, since the white line needs contrast on both sides to read clearly.
36. Burnt Orange V-Shaped French Tips
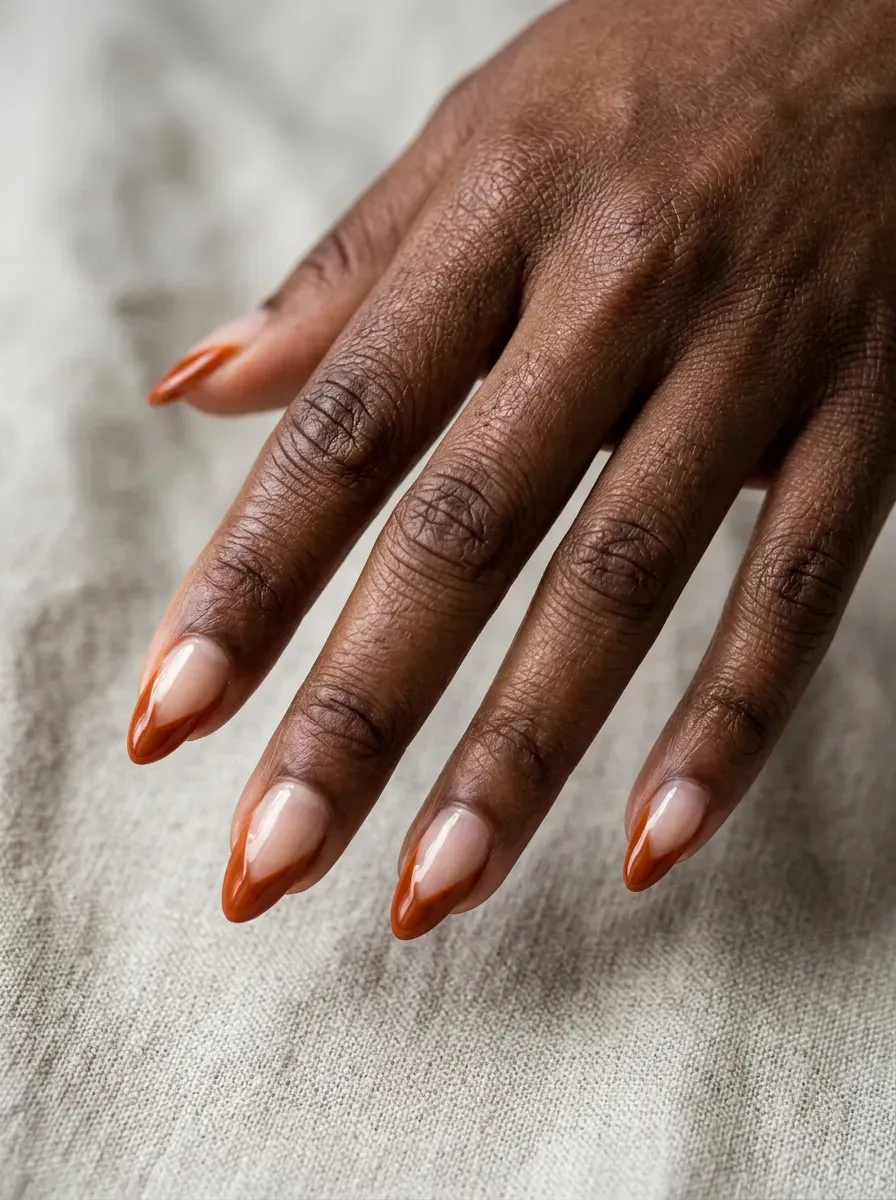
Instead of a straight or curved line, the burnt orange tip forms a sharp V shape pointing back toward the cuticle, giving the classic French a more geometric, modern update.
This shape draws the eye toward the center of the nail rather than following the natural tip line, creating a different visual effect than any curved version.
A striping brush and a steady hand are essential here, since the V’s point needs to be crisp and centered.
This design suits squarer nail shapes, where the flat edge gives the V’s angles more definition.
37. Burnt Orange French Tips with a Tiny Gold Dot Accent
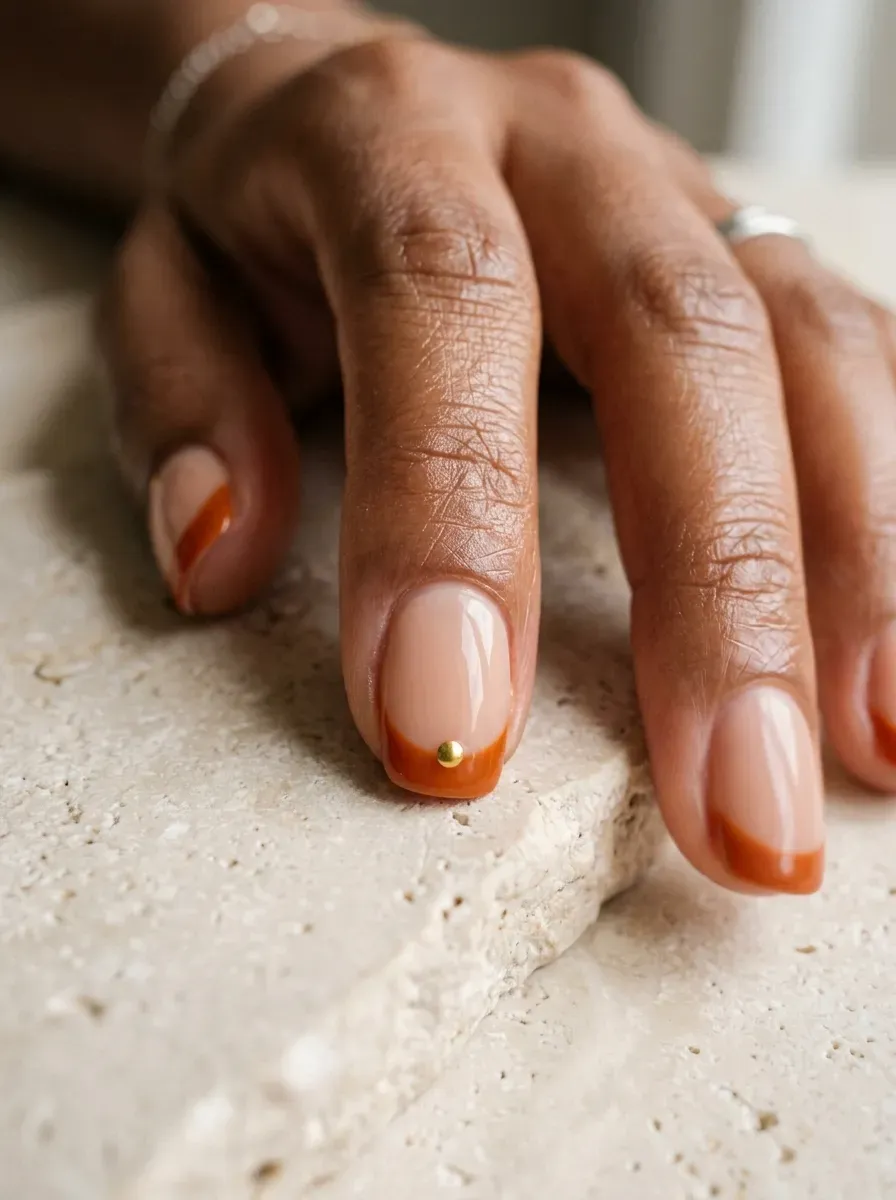
A single small gold dot sits right where the base color meets the burnt orange tip, marking the transition with one tiny, jewelry-like detail instead of a full accent design.
This is one of the simplest additions on this list, but it changes how finished the whole manicure feels for very little extra time.
A dotting tool gives the cleanest, roundest dot shape. Keep this detail to one or two nails rather than repeating it across the whole set, so it stays a subtle accent rather than a pattern.
38. Textured Velvet-Finish Burnt Orange French Tips

A velvet-effect topcoat applied over the burnt orange tip while still wet creates a soft, fuzzy-looking texture instead of a smooth, glossy finish.
This texture photographs with noticeably more depth in close-up shots, since the velvet effect catches and scatters light differently than standard polish.
Velvet finishes are more delicate and don’t hold up as well to frequent hand-washing, so this version suits shorter-wear occasions better than everyday use.
Burnt orange’s richness pairs particularly well with this texture, since deeper colors read more luxurious with a matte-textured finish than paler ones do.
Continue reading Neutral September Nails: 40+ Chic Ideas for the Summer-to-Fall Transition
39. Burnt Orange French Tips Paired with a Nude Base for Work
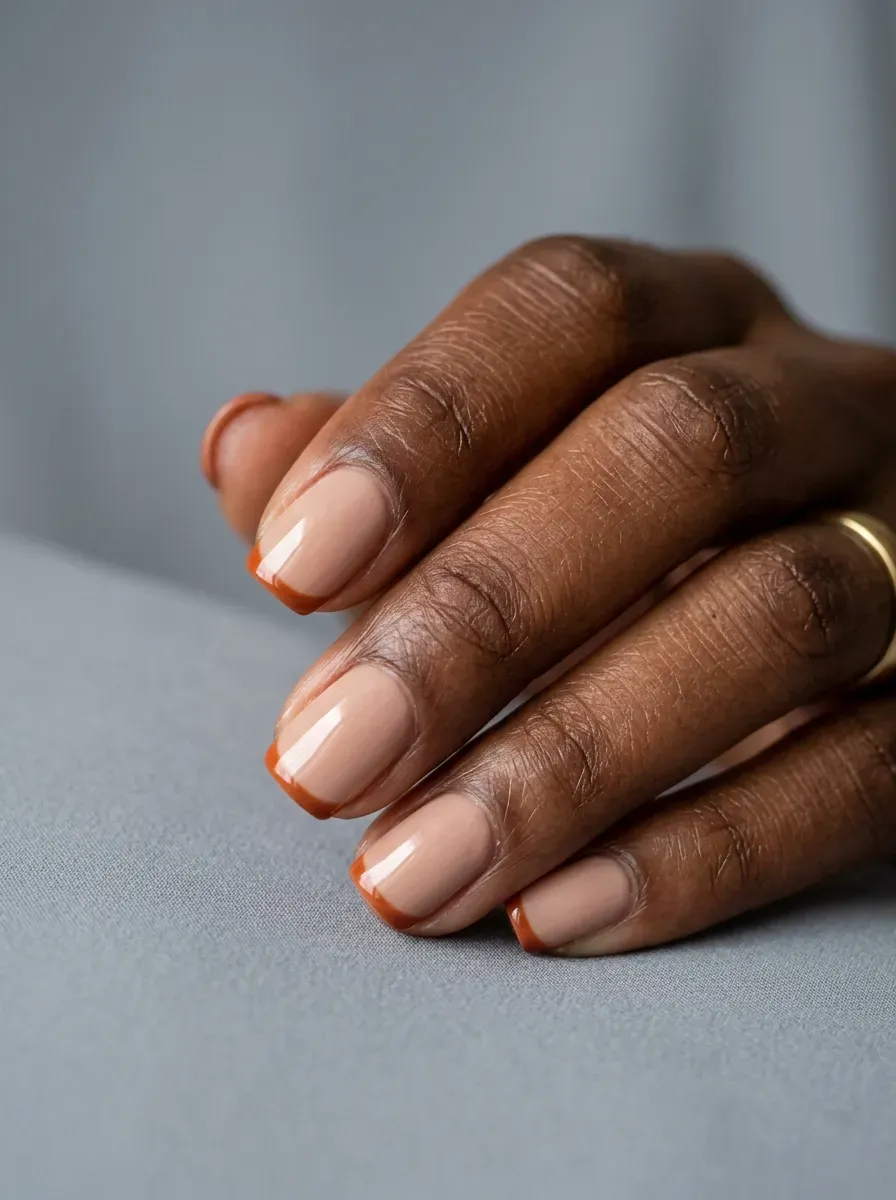
A quiet, professional nude base keeps this version workplace-appropriate, with the burnt orange tip staying thin enough to read as seasonal rather than bold.
This combination gives anyone hesitant about wearing color to the office a low-risk way to still participate in the trend.
Keeping the tip on the thinner side, rather than wide or heavily textured, is what makes this version read as polished rather than casual.
This pairing also transitions easily from desk to evening plans without needing a change.
40. Burnt Orange French Tips with a Subtle Marbled Tip
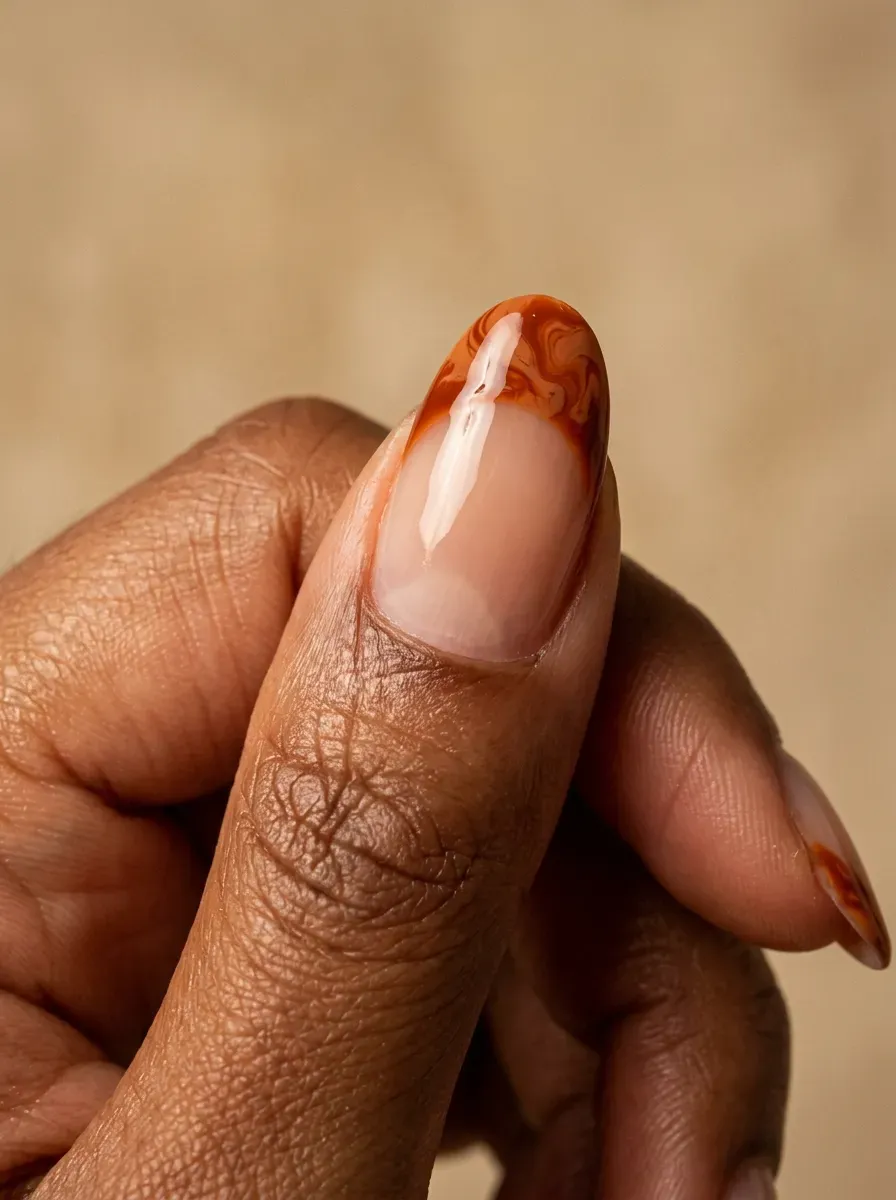
Instead of a flat, single-tone tip, burnt orange and a slightly lighter rust shade marble together right at the tip, adding subtle texture without a full marbling technique across the whole nail.
Containing the marbling to just the tip keeps this design wearable and not too busy, while still giving it more visual interest than a flat color block.
A thin detail tool dragged lightly through the wet polish creates this marbled effect.
This version works on any base color, though a plain bare or nude base lets the marbled tip stand out most clearly.
Read now 27 Vacation Loc Styles for Travelling Women
Why Burnt Orange Reads Differently Than Basic Orange Polish
Burnt orange sits closer to rust and terracotta than to a true, bright orange, which is exactly why it works as a French tip color when a standard orange would look costume-like or seasonal in the wrong way.
The color leans on brown and red undertones rather than yellow, giving it a muted, grounded quality that reads as sophisticated rather than playful.
This matters most when you’re picking a polish off a shelf or a color chart, since bottle lighting can make burnt orange look more like a standard orange than it actually is once applied.
Ask to see the color swatched on an actual nail, not just the cap, before committing, since cap color and applied color can differ noticeably with this particular shade family.
It’s also worth knowing that burnt orange behaves slightly differently across cream, shimmer, and matte formulas.
Cream formulas show the truest version of the color, shimmer formulas can shift it slightly warmer under direct light, and matte formulas tend to mute it further, sometimes closer to a deep terracotta than the glossy version of the same bottle.
If you have a specific shade in mind from a photo, bring that reference and ask your nail tech which formula will get you closest to it, since the difference between formulas is bigger with this color than with more neutral shades.
Deciding Between a Thin Line and a Wide French Tip
Tip width changes the entire personality of this design, and it’s worth deciding before your appointment rather than figuring it out in the chair.
A thin line, just a few millimeters, keeps the look understated and works well for first-timers or workplace settings where a bold color block might feel like too much.
A wide tip, extending a third of the way up the nail or more, turns the same color into a genuine statement, better suited to longer nails and settings where a bolder look fits.
Nail length plays a real role in this decision. Short nails often look best with a thinner tip, since a wide tip on limited surface area can end up covering most of the visible nail and losing the French shape entirely.
Longer nails have more room to carry a wider tip without looking disproportionate.
If you’re unsure which you’ll prefer, a middle-width tip, wider than a classic French but narrower than a full color block, is a reasonable starting point that can be adjusted wider or thinner at your next fill depending on how you feel about it after wearing it for a couple of weeks.
The Mistake That Makes French Tips Look Crooked Instead of Crisp
The most common issue with any French tip design, burnt orange included, is an uneven line that curves differently from nail to nail rather than following a consistent shape across the whole hand.
This usually happens when the tip is painted freehand without any guide, relying purely on a steady hand rather than a reference point.
French tip guide stickers or strips solve this problem directly, giving a consistent line to paint against rather than guessing where the curve should start on each nail.
Even with a guide, the mistake still shows up when tip height varies noticeably from nail to nail, one tip clearly wider than its neighbor draws attention immediately once the whole hand is visible together.
Measuring or at least eyeballing consistent height before starting, rather than painting one nail at a time and hoping they match, catches this problem before it becomes permanent.
If you’re having this done professionally, it’s worth glancing at your hand under good lighting before you leave the salon specifically to check tip consistency, since uneven tips are easier to fix in the chair than after the polish has fully cured.
What to Tell Your Nail Tech to Get This Exact Shade
Burnt orange isn’t a universally standardized color name, so what one salon calls burnt orange might look noticeably different from another salon’s version of the same name.
Bringing a reference photo is the single most useful thing you can do, ideally one showing the color on an actual nail rather than a polish bottle or a paint swatch, since lighting and surface differences change how a color reads.
Mention explicitly whether you want the tip on the warmer, more red-leaning side or the cooler, more amber-leaning side, since burnt orange spans a fairly wide range and your nail tech can’t guess your preference from the name alone.
If you’re set on a specific finish, matte, chrome, shimmer, say so before the base color even goes on, since some finishes need different prep or products than a standard glossy tip.
Finally, mention your base color preference clearly too, bare nail, milky white, sheer nude, or a deeper base like taupe or brown all change the final look significantly, and it’s a much smaller adjustment to make before starting than after the tip color is already applied.
Final Pick Guide
Narrowing this list down usually comes down to a handful of quick questions.
How long are your nails, since wider tips and dramatic shapes need length that a short, natural set doesn’t have?
How bold do you want the color to read, a thin, barely-there line or a full, wide color block?
Is this for everyday wear or a specific event, since textured and metallic finishes don’t hold up as long as a flat gel tip?
And how much detail do you actually want to maintain, a plain tip is a very different commitment than hand-painted leaves or a checkerboard accent.
Answering those questions first turns this list from overwhelming into two or three ideas worth bringing to your next appointment.